Page 3 of 6
Re: Doris NP Super Dexta rebuild
Posted: Sat Dec 15, 2012 9:43 pm
by Dextrous
tom lad wrote:
keep playing with the welder m8 , i learnt alot on a evening course at collage , u'll learn quicker being shown, and it all comes easyer with practice

Thanks Tom - I may look for a short course, not much time with work and kids but would love to get up to speed quickly
tom lad wrote:i'd prob reccomend running it on a 16 A blue round plug rather than the standard 13 A 3 pin to make full advantage of ur power / duty cycle .
I was too eager to play

I have a load of plugs but need to fit some sockets. I wired the workshop ring with 4mm rather than 2.5 so should be good for it

Re: Doris NP Super Dexta rebuild
Posted: Sun Dec 16, 2012 3:05 pm
by tom lad
Re: Doris NP Super Dexta rebuild
Posted: Sun Dec 16, 2012 9:28 pm
by welderpaul
Dextrous wrote:Hi Dave
It is possible. She was stored outside to begin with but with the exhaust removed and a fitted tractor cover over her. After that she was moved to the barn where she was dismantled before being hauled up into the workshop above. The barn was in the process of being constructed and didn't have all the boarding on it. The exhaust manifold was facing the leeward side which is covered in trees so it would be difficult to get water in that way but it was stood for 18 months or so and we do get wild weather up in the Pennines (at least by UK standards!) so that may be the obvious culprit.
I ordered a Sparex engine kit from Dunlop's of Northern Ireland on Monday so she will have new pistons and valves/guides soon and I also ordered a gallon of 42% phosporic acid to remove any remaining rust in the water galleries. I also discovered that my local Agri engineer about a mile away has all his own kit for pressing in liners, boring and honing, head skimming etc.
The only thing he doesn't do is crank grinding but I know a man who does.
So I'm all set to accelerate the build of Doris after 8 years. My aim so to take her to the local classic car show in Hebden Bridge in August next year with the back box full of beer, I brew my own.
Regards
Andy
Andy...second picture in your post, what is the aluminium casting jobbie, bottom right of the picture, sitting in the bottom.

Re: Doris NP Super Dexta rebuild
Posted: Sun Dec 16, 2012 10:06 pm
by Dextrous
Hi WP
That's the hydraulic pump.
I've sent an IM about the manual
Cheers
Andy
Re: Doris NP Super Dexta rebuild
Posted: Sat Dec 22, 2012 11:55 pm
by welderpaul
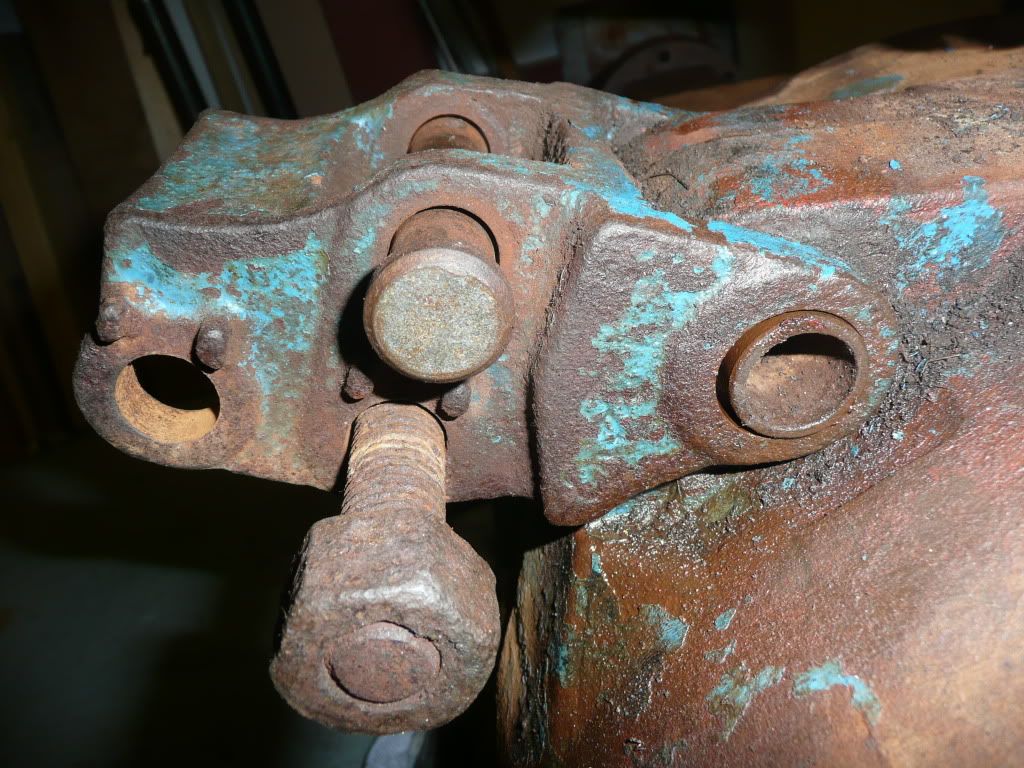
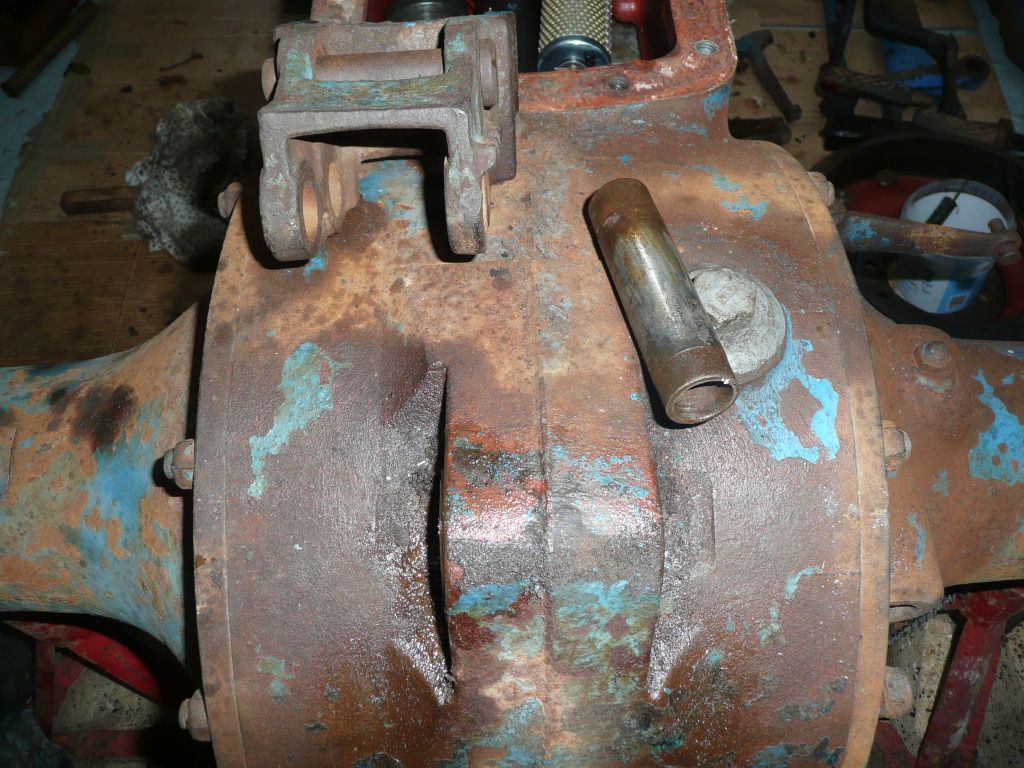
Dextrous wrote:The only really difficult bit is the top link bracket or rocker as its called in the parts list. The bush or pin that holds it in place must be a push fit into the rear diff casting and doesn't want to move.
Do I clean it up and paint it in situ or get the tinker out? The rocker is a bit loose on the bush but I think it will take some heat and pressure to get it out, I've been soaking it with penetrating oil for a month.
Anybody managed to get one of these out before? What technique did you use? Here's a pic, if you can't see the pin on the far right then you need to right click and choose "view image" some browsers at some screen resolutions seem to truncate the picture.
I've been struggling to get this out too, it was full of muck underneath so it needed to come out before cleaning up otherwise the muck and oil would bleed and damage the paint. I put a hacksaw blade through the bush and cut a slot in it; enough to break its bite in the hole. Knocked straight out once i had carefully cut through it.
Re: Doris NP Super Dexta rebuild
Posted: Sun Dec 23, 2012 10:40 am
by Dextrous
welderpaul wrote:Dextrous wrote: I put a hacksaw blade through the bush and cut a slot in it; enough to break its bite in the hole. Knocked straight out once i had carefully cut through it.
I'll have a go at this sometime today Paul, I just got the hacksaw through the bush then got called away to look after the kids.

First impression was that the bush in mine is hardened but I could be wrong.......
Re: Doris NP Super Dexta rebuild
Posted: Sun Dec 23, 2012 11:04 am
by welderpaul
The bush was fairly hard as it sparked when i tried to knock it out with a punch. It cut fine with a new hacksaw blade.
Didnt fancy running a bead of weld inside it to shrink it...knowing my luck i would have blown through it and welded it in place

Re: Doris NP Super Dexta rebuild
Posted: Sun Dec 23, 2012 5:34 pm
by Dextrous
I gave it a go with new hacksaw blades, after a resonable amount of time I just about managed to wear, not cut, a slight groove at one end. The blades in question were supposedly HSS and made in the UK however branded Screwfix (no its not a dating agency
) and Wickes so either the blades are cr@p or the pin is very hard.
I have some decent blades I got from my dad when he used to work for British Ropes years ago, part worn where they were used to cut wire samples but last for ages. I'll have a go with them when I find them if that doesn't work its back to plan B.
Cheers
Andy
Re: Doris NP Super Dexta rebuild
Posted: Mon Dec 24, 2012 9:08 am
by tom lad
it will be hardened m8
i pushed mine out , but the ends of mine were rotten so the rocker came off. prob made mine easyer to do ? still needed heat to get it too move .
tom
Re: Doris NP Super Dexta rebuild
Posted: Thu Dec 27, 2012 1:58 am
by Dextrous
I found some decent hacksaw blades, no difference, still poloshing the pin, tried my reciprocating saw with a Bosch blade, still the same, the pin has been hardened beyond the realms of sawing through it with a hacksaw
I made a tool today to push the pin out, I used a big bolt and a couple of spacers out of the scrap box. I didn't have time to apply any heat so left it until tomorrow.
Talking to a mate with a MF 165, he appplied about 12 tons with his garage press and a torch and couldn't get his top pin out so he made an adaptor for his air hammer and that shifted it - again needed heat.
So seeing as I'm donating a few gallons of homebrew to his new year party if my method doesn't work then I may try his next as he said he would lend me the tools. Trouble is I have no oxygen so a plumbers lamp is the best I can do heat wise. I could run some compressed CO2 through the pin to cool it down a bit while heating the casting. Hopefully it won't get to that as the MF has a different pin arrangement with knurling on one end.
Cheers
Andy
Re: Doris NP Super Dexta rebuild
Posted: Thu Dec 27, 2012 8:57 am
by Tubal Cain
I doubt that you will have sufficient heat from a Plumbers lamp.
I made up a puller using 3/4" studbar and a piece of pipe etc. and I found that if I gave the puller a good clout with a heavy hammer as I tightened the nut the pin could be drawn out. It was a slow process but effective.
Sometimes the ends of the hollow pin are splayed out and require to be cut off with a thin cutting disc.
Gerald
Re: Doris NP Super Dexta rebuild
Posted: Thu Dec 27, 2012 9:20 am
by justjamiefarming
Just to chuck my twopenny's worth in,
When my tractor still had its roll bar on, I turned a 10t bottle jack on its side and pushed out the pin from against the roll bar.
Regards, Jamie.
Re: Doris NP Super Dexta rebuild
Posted: Thu Dec 27, 2012 1:09 pm
by Dextrous
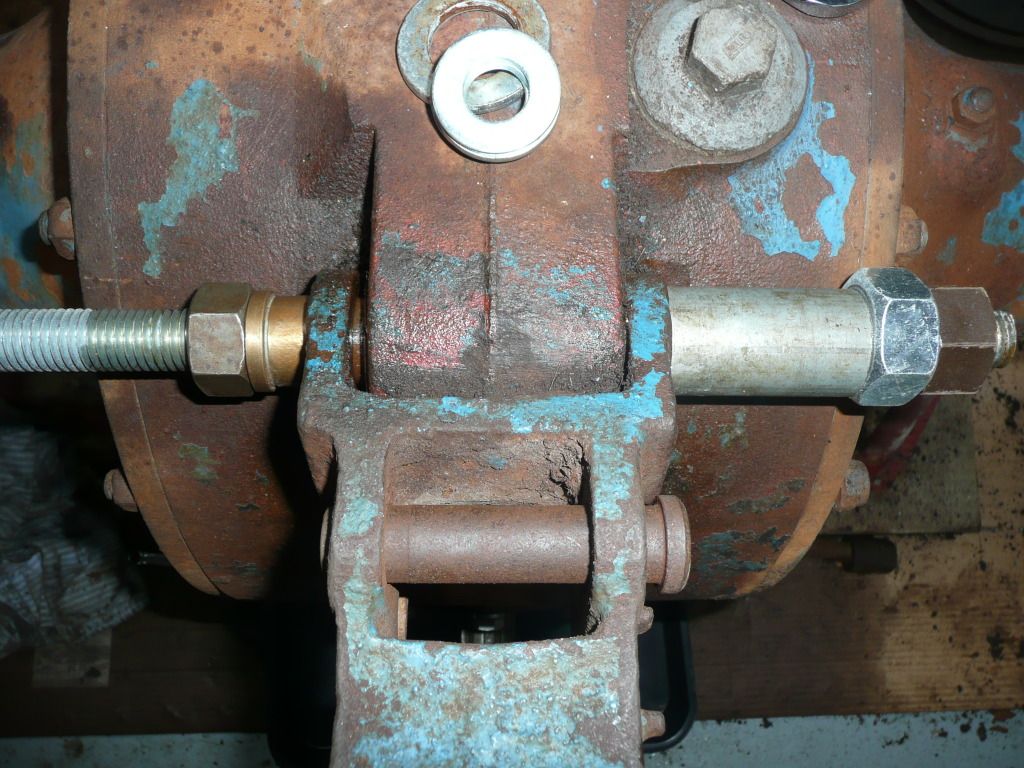
Unfortunately I haven't got anything to push against so it will have to be the threaded puller/pusher. Just before I give it some welly, the pins aren't slightly tapered and only push in one way do they?
Here's what I've set up so far. The brass bush on the left fits inside the top link bracket resting on the pin. The pin protrudes from the bracket on the right hand side and I parted a bit of pipe off on the lathe so the ends are square. The pipe goes over the pin. The large nut is acting as a washer. I haven't applied any heat yet. I've tensioned it up and give it a few bangs with the lump hammer and the solid sound I'm getting suggests this is going to be a battle of wills. I have all the bagging, torches and regulators of a portapack from my dad but he gave up the bottles years ago, sounds like I may have to call in a favour to get some proper heat around, a bit easier than tacking the tractor around to a mates

Re: Doris NP Super Dexta rebuild
Posted: Thu Dec 27, 2012 3:22 pm
by Tubal Cain
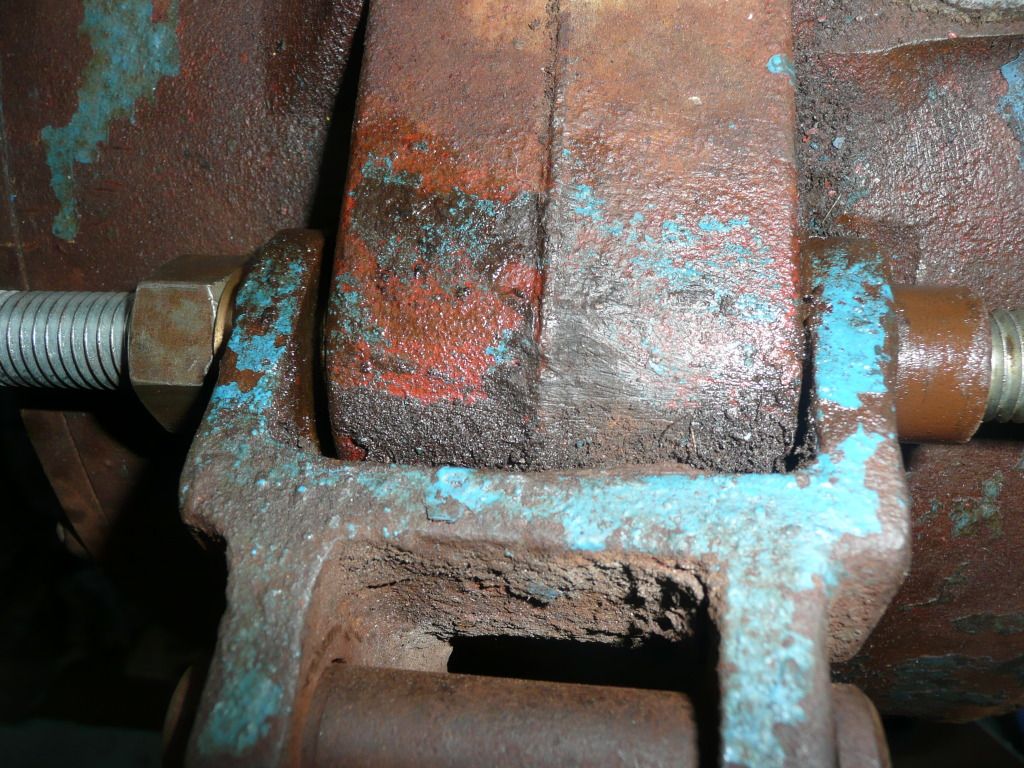
I think that you will find that the copper is too soft for this job, you would be better off with a piece of steel to drive the pin out slightly smaller in dia than the pin.
When I did it, I tightened up the nut on the right of your picture and hammered the left hand end. The pin was very tight to the extent that the stud bar on the left hand end was peened over but, it came eventually.
Gerald
Re: Doris NP Super Dexta rebuild
Posted: Thu Dec 27, 2012 3:46 pm
by Dextrous
Tubal Cain wrote:
When I did it, I tightened up the nut on the right of your picture and hammered the left hand end. The pin was very tight to the extent that the stud bar on the left hand end was peened over but, it came eventually.
Gerald
Thanks Gerald
That's what I'm doing so hopefully no surprises, if the bit of brass is too soft I'll turn a bit of steel down.
Cheers
Andy
Re: Doris NP Super Dexta rebuild
Posted: Fri Dec 28, 2012 11:11 am
by Dextrous
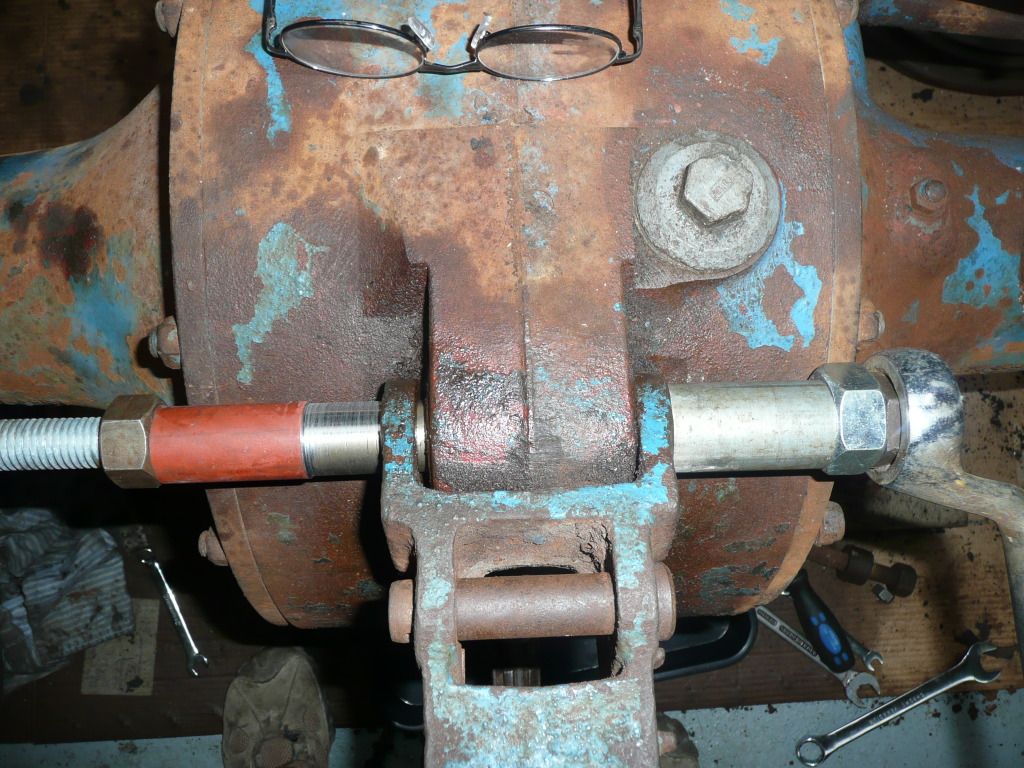
Success!!
it moved with the brass bush
so I turned down a bit of gas pipe to push it a bit further as it still didn't want to come out with a drift
And here is the little tinker
I think that is the last bolt or pin I will have major difficulty with, the flywheel bolt was a pig and I had to drill some of the rear mudguard bolts out of the back axle (easy with a mag drill
)
I'm sure other will pose problems but not several days worth of tractor time - I hope..........
Cheers
Andy
Re: Doris NP Super Dexta rebuild
Posted: Fri Dec 28, 2012 8:17 pm
by welderpaul
Nice job. I cut it with a new Eclipse blade, cut fairly easily, although it was harder than mild steel. Made a bit of a mess of the blade but got through.
Stubborn things aint they

Re: Doris NP Super Dexta rebuild
Posted: Fri Dec 28, 2012 8:21 pm
by Lesfen
Andy,
Nice work and thanks for the photos!
The brass bushing was stronger than I expected!

Will you be adding the operation to your website?

Les
Re: Doris NP Super Dexta rebuild
Posted: Fri Dec 28, 2012 8:39 pm
by Dextrous
welderpaul wrote:Nice job. I cut it with a new Eclipse blade, cut fairly easily, although it was harder than mild steel. Made a bit of a mess of the blade but got through.
Stubborn things aint they
I eventually found an Eclipse blade but it did the same as the others, just polished it. So either my pin is harder than yours

or I'm just cr@p with an hacksaw.
I'm going to replace it with a removal pin, i.e, not an interference fit.
Re: Doris NP Super Dexta rebuild
Posted: Fri Dec 28, 2012 11:37 pm
by Dextrous
Lesfen wrote:Andy,
Nice work and thanks for the photos!
The brass bushing was stronger than I expected!
Will you be adding the operation to your website?
Les
I haven't updated that site since just after I bought the tractor

I was thinking of transferring it to either a wordpress blog or Joomla CMS etc.
Re: Doris NP Super Dexta rebuild
Posted: Sat Dec 29, 2012 5:49 pm
by tom lad
well done removeing it
is the bush to worn to re use ?
Re: Doris NP Super Dexta rebuild
Posted: Sat Dec 29, 2012 6:20 pm
by Dextrous
Its only lightly worn but I think I would rather have a solid pin that is not an interference fit so I can take it out at will.
Re: Doris NP Super Dexta rebuild
Posted: Sat Dec 29, 2012 7:16 pm
by welderpaul
Got the head off the engine and a few other stubborn bits this afternoon. Doesnt seem in too bad condition; there is slight wear on the cylinders, enough to just catch a fingernail at the top of the stroke. Is this sufficient to require 1. new liners, 2. new rings or, 3. nothing
Its all having a bath in Jizer at the moment to clean stuff up a bit. Back to it tomorrow.
I've looked at the valves in the book and can see how they are made up, but how the hell do you get them out?

Re: Doris NP Super Dexta rebuild
Posted: Sat Dec 29, 2012 11:47 pm
by Dextrous
Hi Paul
Sounds like your cracking on
Sparex engine kits are about 200 quid or so and include liners, pistons, valves, guides, springs etc. see
this thread - note you may need a differnt kit as mine is for a super.
The valves are held on with split collets, ideally you need a valve spring compressor however you can use an adapted g-clamp or press etc.
Cheers
Andy
Re: Doris NP Super Dexta rebuild
Posted: Sun Dec 30, 2012 1:06 am
by PghBill
Paul,
You will have to use an inside micrometer and check to see how far out of spec your liners are. Check them for any scoring. Then decide whether it's necessary to bore them out or replace them. Or ream the ridge out and live with them. New rings will be a certainty. Reusing the old ones is just asking for trouble. If you find the liners are still in spec,you'll have to break the glaze inside so the new rings will seat properly . New liners would be required to be pressed in and then bored anyway. Almost all replacement liners are not finished inside. Plus they may distort a little during the pressing process.
Good luck, Bill