Page 1 of 1
Rear Axle Seal
Posted: Wed Feb 17, 2010 3:45 pm
by maddyn99
I am replacing the real axle seals and bearings on my 58' Power Major, and have run into a bit of a problem. The new seals dont seem to go down on the axle enough to put the bearings on all the way. How close do the seals need to be to the bearing? Are they supposed to touch or is there supposed to be a gap? I looked at my repair manual, but either I don't understand what is supposed to be done there or its not there.
Posted: Wed Feb 17, 2010 4:49 pm
by Ian
Mine looked like that ;p You are supposed to put a spot of oil on the felt bit of the seal I think.
Posted: Wed Feb 17, 2010 10:49 pm
by maddyn99
Thanks for the picture, I will try again this weekend. So much to do and so little time

Posted: Wed Feb 17, 2010 11:01 pm
by Ian
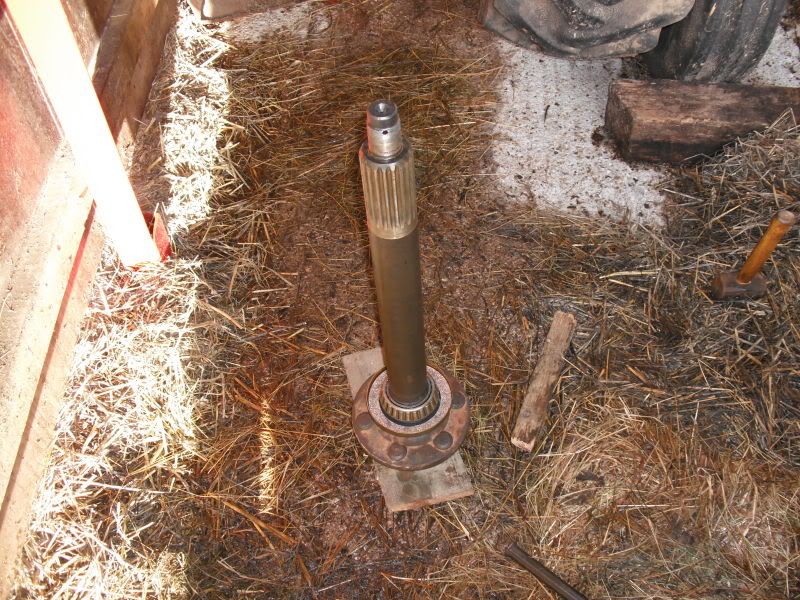
The seal should literally just drop onto the shaft. The shaft spins and the seal remains fixed, so it can't be that tight at all. You sure you got all the inner bearing off the shaft ? The shaft should look like this before you slip the new seal and bearing into it.
The bearing, that takes somewhat of a beating to get on the shaft. I used the old inner part of the bearing to push the new one onto the shaft, with some help from my old friend, the lump hammer

Posted: Thu Feb 18, 2010 1:15 am
by BearCreek Majors
There are two different style of seals used on the rear ax, the best I can tell the LIGHT duty unit was used a lot over here in the US and the only place for parts I have found is New Holland. The seals and felts can be bought separately, installed in the metal housing and then the assembly can be installed on the rear ax. No guarantee this is your problem but I just wanted to warn ya.
Pat
Left side, LIGHT DUTY US seal, right side, HEAVY DUTY US or UK seal.

Posted: Sun Feb 21, 2010 8:53 am
by BarryM
Maddyn99,
If you warm the bearing in the oven until you are just able to hold it, it will drop on to the axle without too much trouble, and will require just a light tap to position it.
Posted: Sun Feb 21, 2010 10:12 am
by Brian
Have a care with the wife's oven!
Our new microwave was never the same after I used it to melt bees wax off some supers to extract the remaining honey.
The hot wax melted the bottom out of the plastic jug and hot wax and honey mix went all over the inside of the microwave and flowed out of the door, all over the worktop.
It really did take years to remove all the residue which, of course, sets solid when cool.
Posted: Sun Feb 21, 2010 3:27 pm
by maddyn99
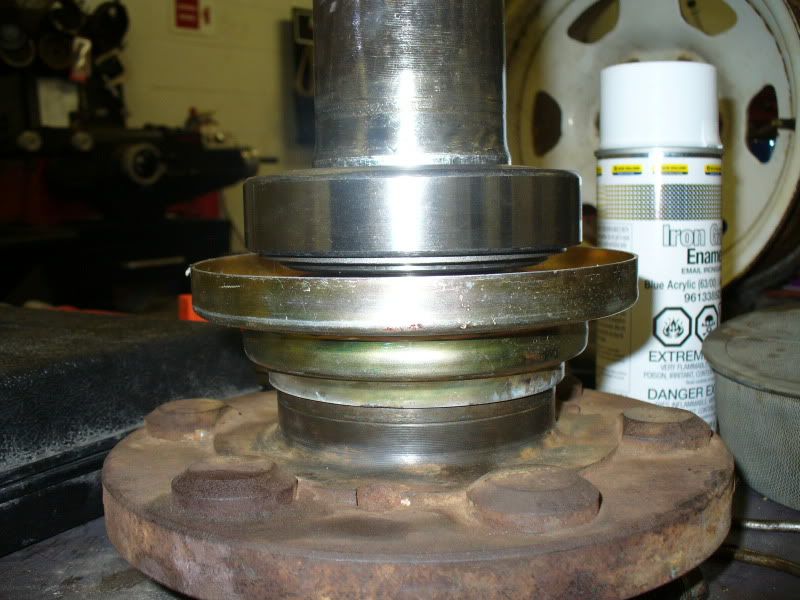
The bearing goes on just fine, the problem is the size of the seal. We ended up cutting off a portion of the metal on the seal on the one we haven't put the bearing on yet so it wasn't too bad. The other one has the bearing pressed on already. So its gonna be a cutting wheel and a prayer

Ill try and take some pics today to show you.
Posted: Sun Feb 21, 2010 5:17 pm
by Ian
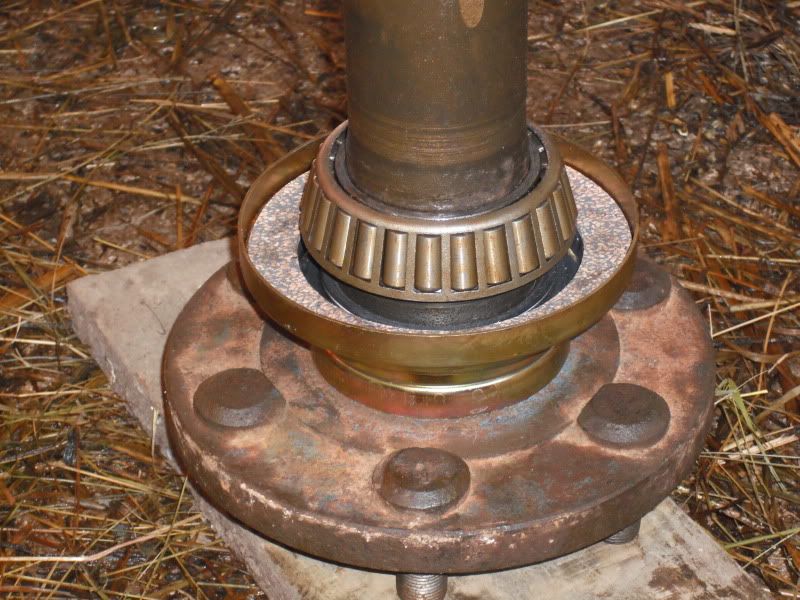
Get this ..

Just slide that on, then hammer the bearing on afterwards. Remember to get the bearing on the right way around !
Posted: Tue Feb 23, 2010 3:07 am
by maddyn99
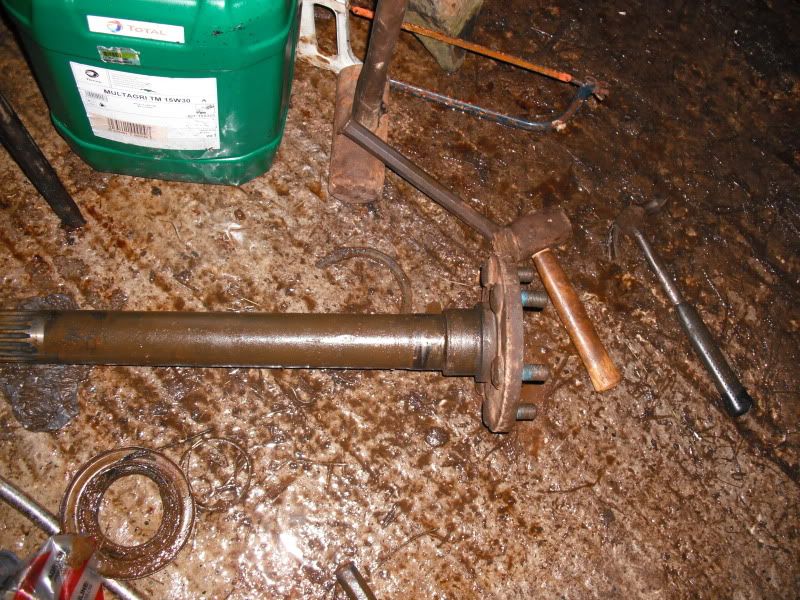
Here is what we ran into. The seal would not go on far enough to allow the bearing to go all the way onto the axle.
So we had to modify the seal to make it fit. This side was pretty easy considering the bearing wasnt pressed on already.
On a positive note. Both brake seals have been removed and replaced. Although they seem quite a bit thinner than what was there. And the back half of the tractor has been wire wheeled and is ready for paint once we finish up the axles and brakes.
Posted: Tue Feb 23, 2010 11:28 am
by Ian
If the seals didn't fit .. I suggest you contact the guys that made them. Because it should just slide on, you shouldn't need to cut them up like that. When I put the seal back on the axle housing, I found a hammer with a piece of wood help knocked it on okay without damaging it. Also, remember to grease up the damn thing before you put it in. If you haven't noticed the grease nipple placement isn't the greatest with regard to the bearing.
Posted: Tue Feb 23, 2010 3:54 pm
by maddyn99
Ian wrote:If the seals didn't fit .. I suggest you contact the guys that made them. Because it should just slide on, you shouldn't need to cut them up like that. When I put the seal back on the axle housing, I found a hammer with a piece of wood help knocked it on okay without damaging it. Also, remember to grease up the damn thing before you put it in. If you haven't noticed the grease nipple placement isn't the greatest with regard to the bearing.
Well they came from Agriline so they should have fit, I dont know why, just that that they dont. Like I mentioned above the brake seals are different that what are in place now as well.
Posted: Tue Feb 23, 2010 5:35 pm
by Ian
Did you try just hammering it on? The ones I bought were also from Agriline. By the way, how did you get the outer part of the bearing out ?
That was the hardest part of the job I thought.
Posted: Tue Feb 23, 2010 6:11 pm
by maddyn99
Ian wrote:Did you try just hammering it on? The ones I bought were also from Agriline. By the way, how did you get the outer part of the bearing out ?
That was the hardest part of the job I thought.
We used something similar to this.
http://www.drillspot.com/products/43037 ... moval_Tool

It has 3 arms that clamp behind the bearing and then you slam weight straight out and the bearing pops right out.[/img]
Posted: Tue Feb 23, 2010 6:22 pm
by Ian
nice,
fairly expensive bit of kit though. I used Dennis' home made puller tool
Posted: Sun Mar 07, 2010 4:22 pm
by BearCreek Majors
WRONG SEALS! If you look closely at the picture of Ian’s axel laying on the floor you can see the first step in the shaft for the bearing, the next step for the seal, and the last step on the back side of the “flange” that the rim bolts to, note a sharp 90 deg angle where the last two steps intersect and the length of the seal step. Your shaft will have a radius rater than a 90, if you look closely at the last step on your axel you will see what looks to be a machine mark that is actually the mating of a additional collar with the radius that is pressed on for the “US seal”.
There are a few options, if your original shells are usable you can use the lip seal and felt seal from the new “UK seals”, assuming the lip seal doesn’t get trashed getting it out. The felt is somewhat different but I have made them work. I have also chucked the UK shell in the lathe and bored the spotwelded lips out until the two pieces separated and gently hammered the remaining lip straight to get it close to the same dimensions as the US shell. Again I believe all the parts are still available from New Holland.
I have seven majors, all but two have the US seal. Of the two that don’t, one is I believe a UK tractor that was exported to the US as used equipment, and the other is an industrial with no 3 point or hydraulics. My parts manual list two different seals, one not for use with the industrial,(light duty) and a heavy duty seal, (to be used on the industrial's). Contrary to what I posted before I believe the standard seal for the US is a “light duty” and the UK seal would be the US heavy duty seal.
Pat
Posted: Thu Apr 22, 2010 8:56 am
by Gubbels
I have the same problems with the seals, I have the light version originally mounted, I ordered the UK (heavy duty) version at agriline. Where can I get the light (US) version, are these still available?
thanks,
Arno Gubbels
Posted: Thu Apr 22, 2010 12:14 pm
by Foxen
Watching this topic makes me glad to live in Sweden where only the heavy duty version exist...
Posted: Fri Apr 23, 2010 2:56 am
by maddyn99
Gubbels wrote:I have the same problems with the seals, I have the light version originally mounted, I ordered the UK (heavy duty) version at agriline. Where can I get the light (US) version, are these still available?
thanks,
Arno Gubbels
You might try these guys. Only other place in the US that has a decent selection of Fordson parts.
http://www.importtractorparts.net/fordsonraxle.html
Not sure if its different, since I used the agriline ones.
Posted: Sat Apr 24, 2010 2:46 am
by BearCreek Majors
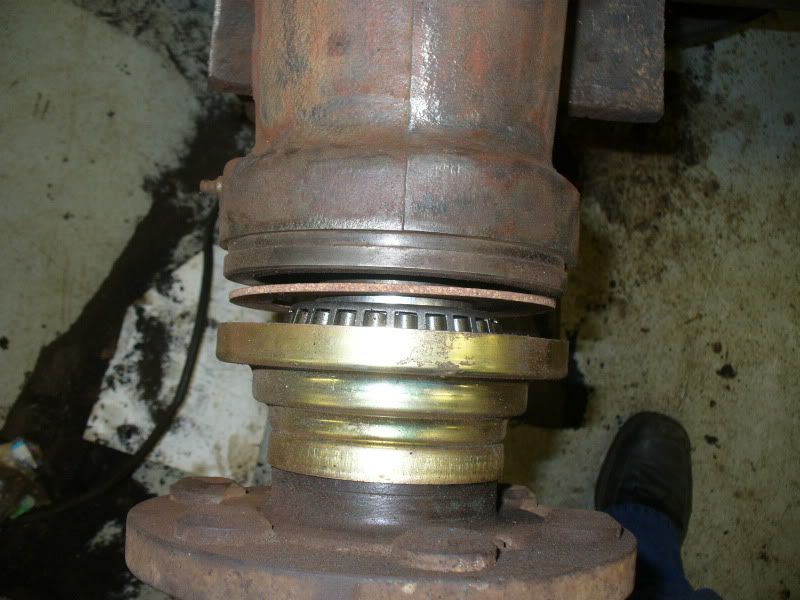
Arno, unless you are restoring to original or really anal like I am….. getting the heavy duty seals and cutting off the outer ring and inner lip that it is welded to works quite well. (Maddyn's pic of modified seal on shaft).
The individual parts are still available from New Holland over here in the US.
Pat
Posted: Tue Sep 28, 2010 10:24 pm
by Nick
okay, ive got the gist of this i think, the only thing i dont understand is how do you extract the hub and shaft out the backend? Ive got leaking seals both sides on my 54 major and im a novice at this stuff

Posted: Wed Sep 29, 2010 6:33 am
by Brian
The lift has to come off, then you undo the nuts on the ends of the shafts.
Posted: Wed Sep 29, 2010 10:58 am
by Supermanuel
The oil level is below these seals. Normally the easiest way to stop oil leak is to fill with grease gun the space inside the bearing. A half grease cartridge is needed to do it. Quite a lot. The space is abt. 2 inches long and there is only a hole inside where just the shaft passes
Neglected service of grease nipple causes main part of the leaks. Then the space will be filled with oil, instead of grease.
If I leave my Super over night one rear wheel at least 1 feet higher, even the tight seal is slightly leaking on the other side. May be between rear axle housing and pressed steel seal housing.
Posted: Wed Sep 29, 2010 8:01 pm
by Nick
ideal, i may try filling them up with grease first then, ive never put any in there! ive got an air greaser so loads of grease!