Page 1 of 5
engine overhaul
Posted: Sat Feb 16, 2019 5:31 pm
by mathias1
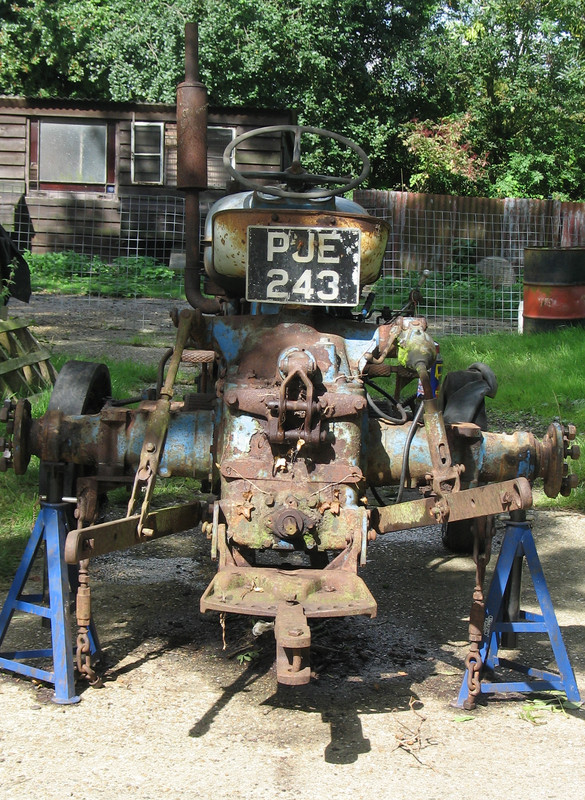
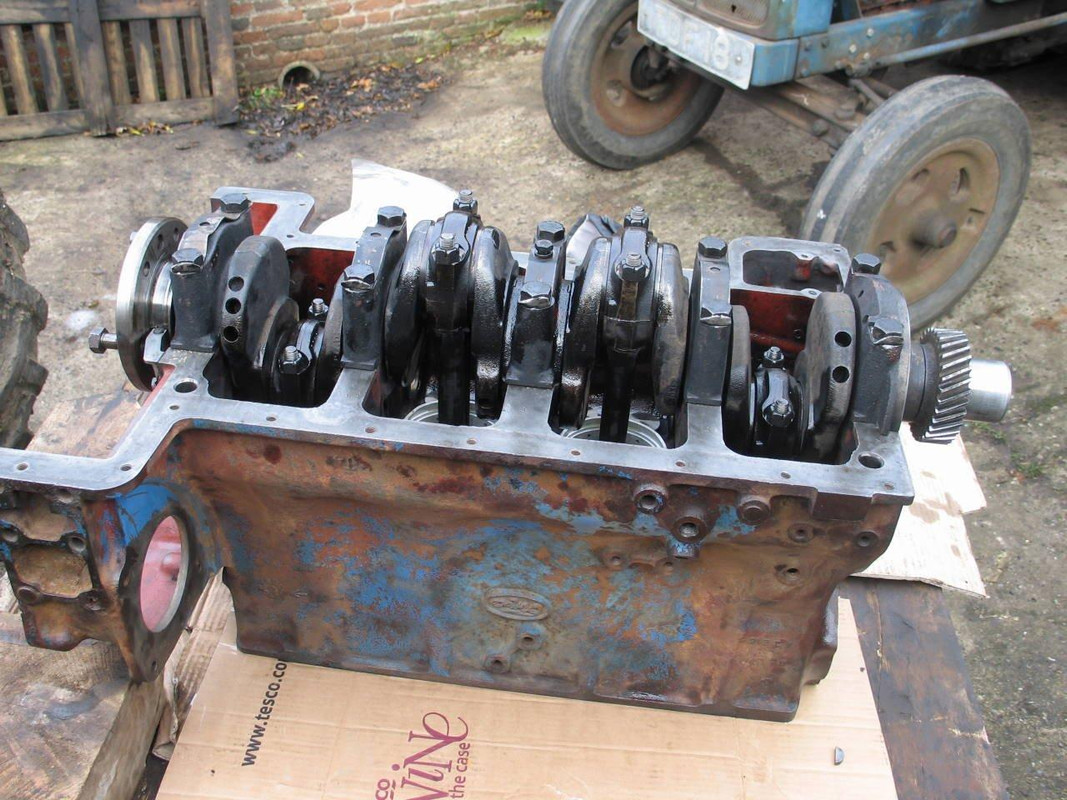
Finally found a new performance engine to replace the Ebro engine in my super major.
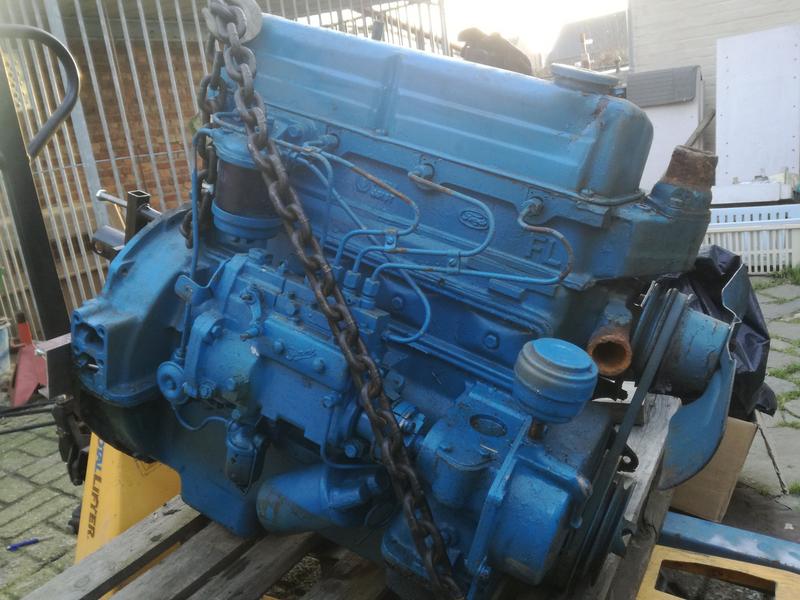
Need some extra support to fit it on the engine stand.
Will take it apart and change all seals to be sure it's not leaking.
Re: engine overhaul
Posted: Sat Feb 16, 2019 6:19 pm
by oehrick
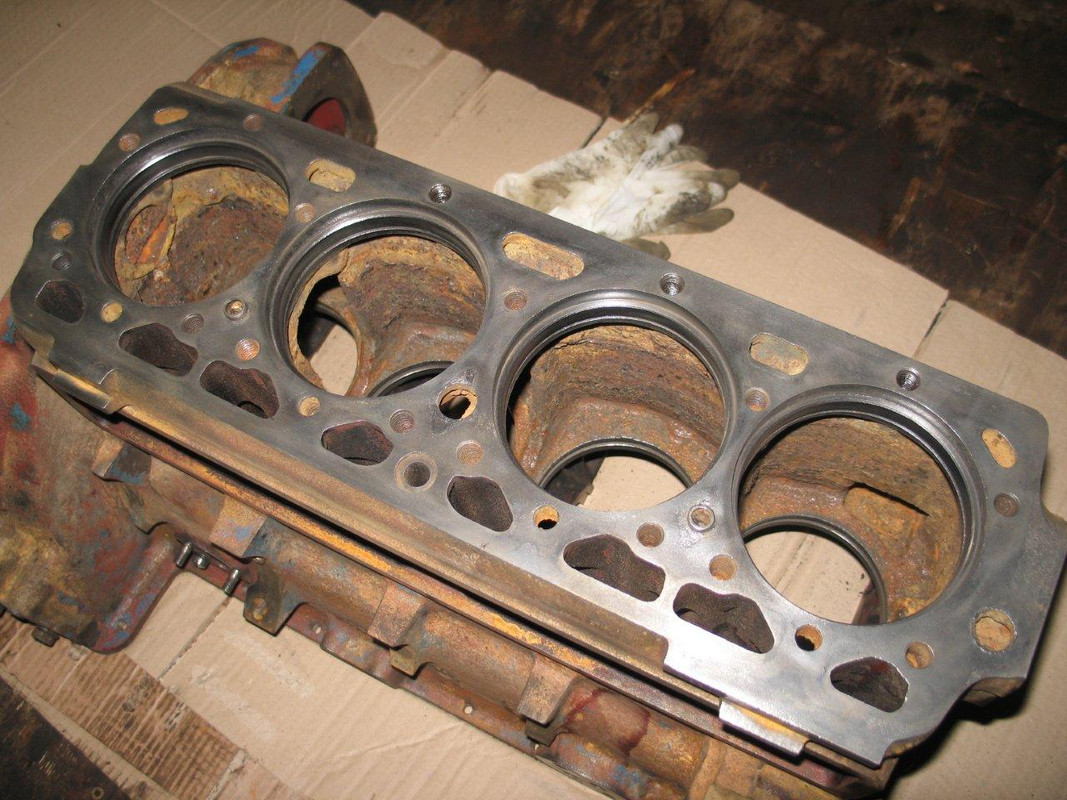
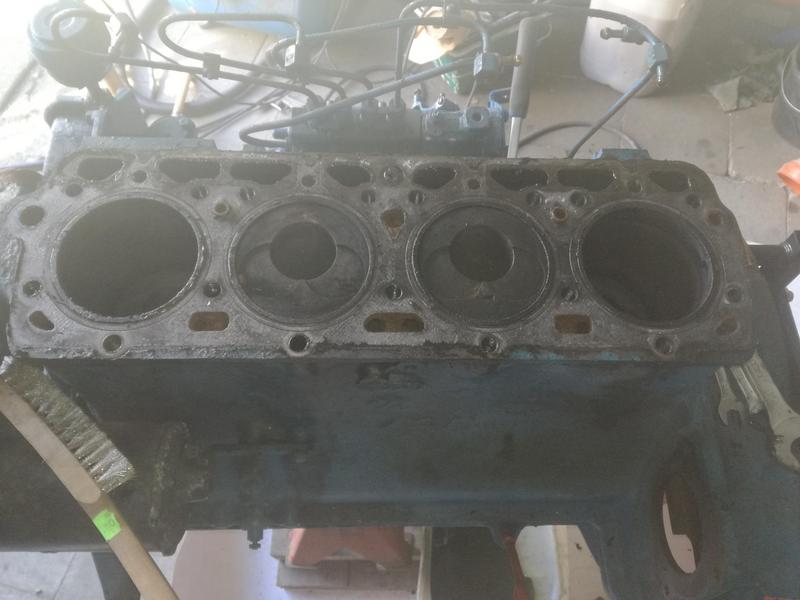
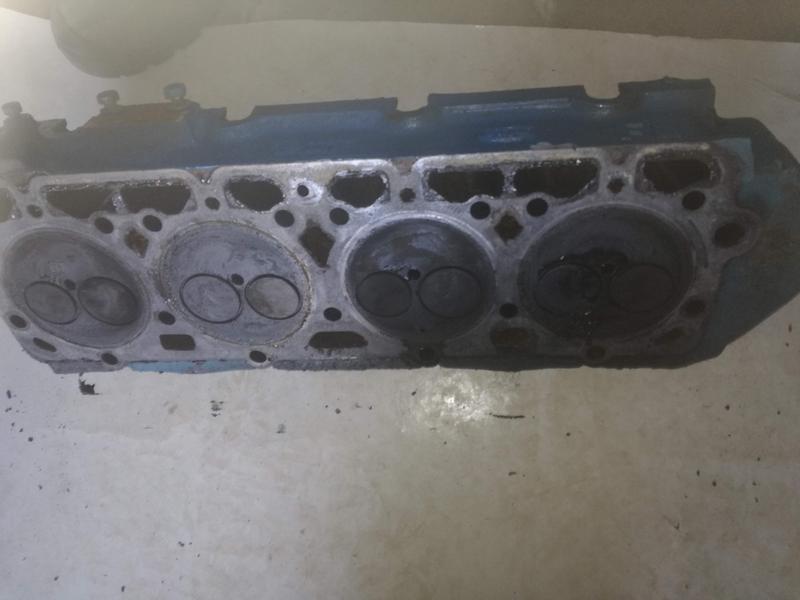
Looks in nice straight condition Mathias, hope the insides match. I've the head off mine at the moment and I'm fairly sure I've found the compression leak, there is a gap around much of liner 3 so I have run some hydraulic sealer into it and while its a little bruised I shall put a drop of rust cement or graphite / linseed in just as a little extra filler.
Yours may be a little too modern, in the waterway into the thermostat chamber underneath the head I found a bit of roughly rolled brass forming a tube and wondered if it was a bodge to fill a porous bit years back so asked Brian, mark this well, he knew these were fitted to all heads 1951 - 64 but he had never needed to ask why !
I've been brought to a grinding stop as I've developed a really nasty dose of neuralgia Not fun

Re: engine overhaul
Posted: Sun Feb 24, 2019 2:25 pm
by mathias1
Re: engine overhaul
Posted: Tue Feb 26, 2019 11:35 pm
by mathias1
Timingcover off:
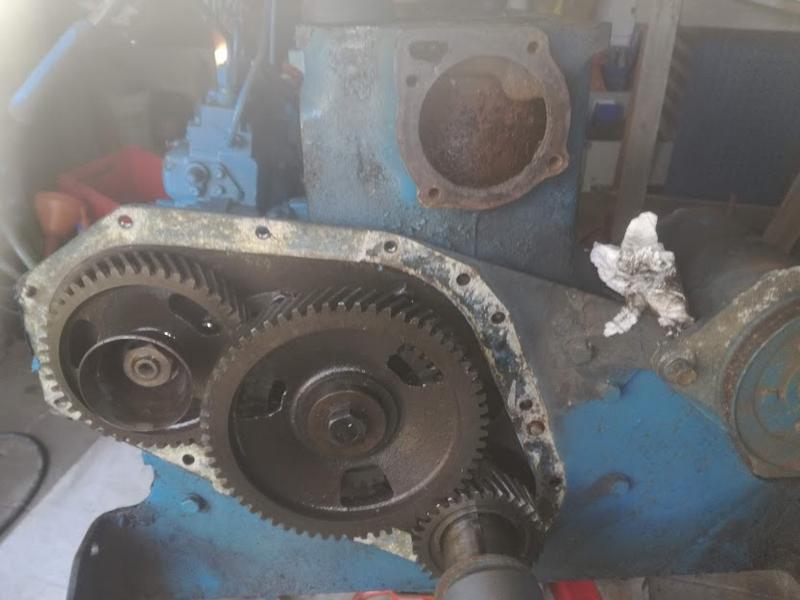
I need to order my parts. What do you guys suggest as head gasket: copper or composite?
Re: engine overhaul
Posted: Wed Feb 27, 2019 12:34 pm
by oehrick
I've just fitted a comp gasket Mattias, with fire ring blowpast & coolant leakage through #3 there was a low and loose outside diameter liner found and a little erosion in the head to match, I ended up making a little rust joint compound as filler and so far (3 days in) and torquing the head bolts down once cold and twice hot, I'm hoping that there will not be a repeat.
Now to replace the regulator which has not worked for several years.....................
By the way, when I changed oil & filter, I found QTP has supplied a filter around an inch shorter than the original, mistake ? new specification?? fortunately my spring box yielded a longer spring of the right rate so no problem there!
Re: engine overhaul
Posted: Fri Mar 01, 2019 1:06 pm
by AdrianNPMajor
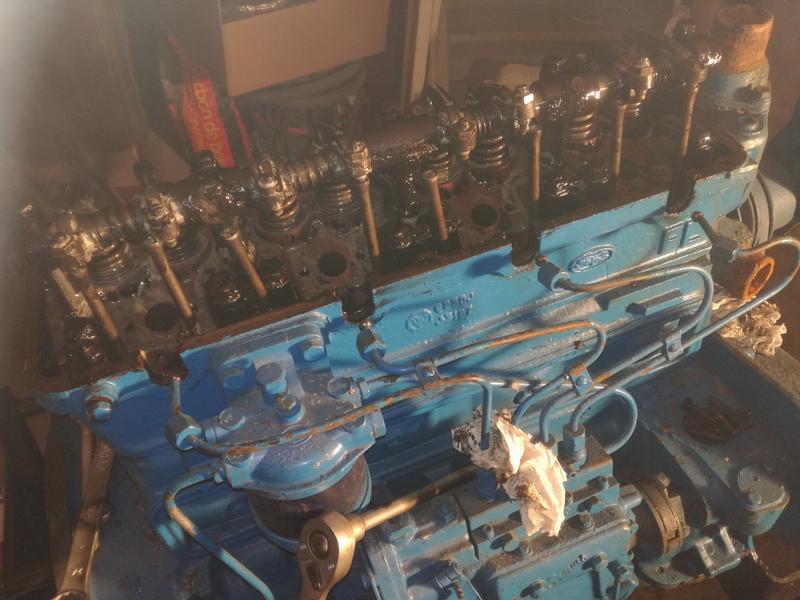
Mathias, here's how to clean the water channels! Strip the block!
You then get to do all the jobs that need doing.
Re Rick's problem, getting the head skimmed is the way to go. Any imperfections on the top surface of the block should be taken up by the composite gasket. I added a film of Blue Hylomar for good measure. Great stuff - I'd spread it on toast if I could! [Just joking - don't try this at home!].
One thing to remember is that you are aiming to restore oil pressure to factory levels ie approx 44 psi on tickover cold, 40 psi two hours into ploughing heavy land. To this end, I recommend replacing the camshaft. The cam bearings are cast into the block so you have to hope they are not worn, but replacing the shaft will help take you back to factory tolerances. You may also find that the hardening on the lobes are worn. Brian says that this was an issue with the NP Super. Mine were worn.
When I did my NP Super, I had expended £900 on the tractor, so I was very keen to get into the engine and extract the liners to see if the bottom liner seal grooves were intact. Thankfully they were. You have an emulsion, which is slighly concerning. I suggest you pull the liners pronto.
Clean methodically as you go and lay out parts in order.
Good luck!
Best, Adrian.
ps video of engine run after rebuild.
https://www.youtube.com/watch?v=vedqU6_wsJQ

Re: engine overhaul
Posted: Fri Mar 01, 2019 4:00 pm
by oehrick
Looks better than mine Mathias, but mine is a holding operation rather than a full job.
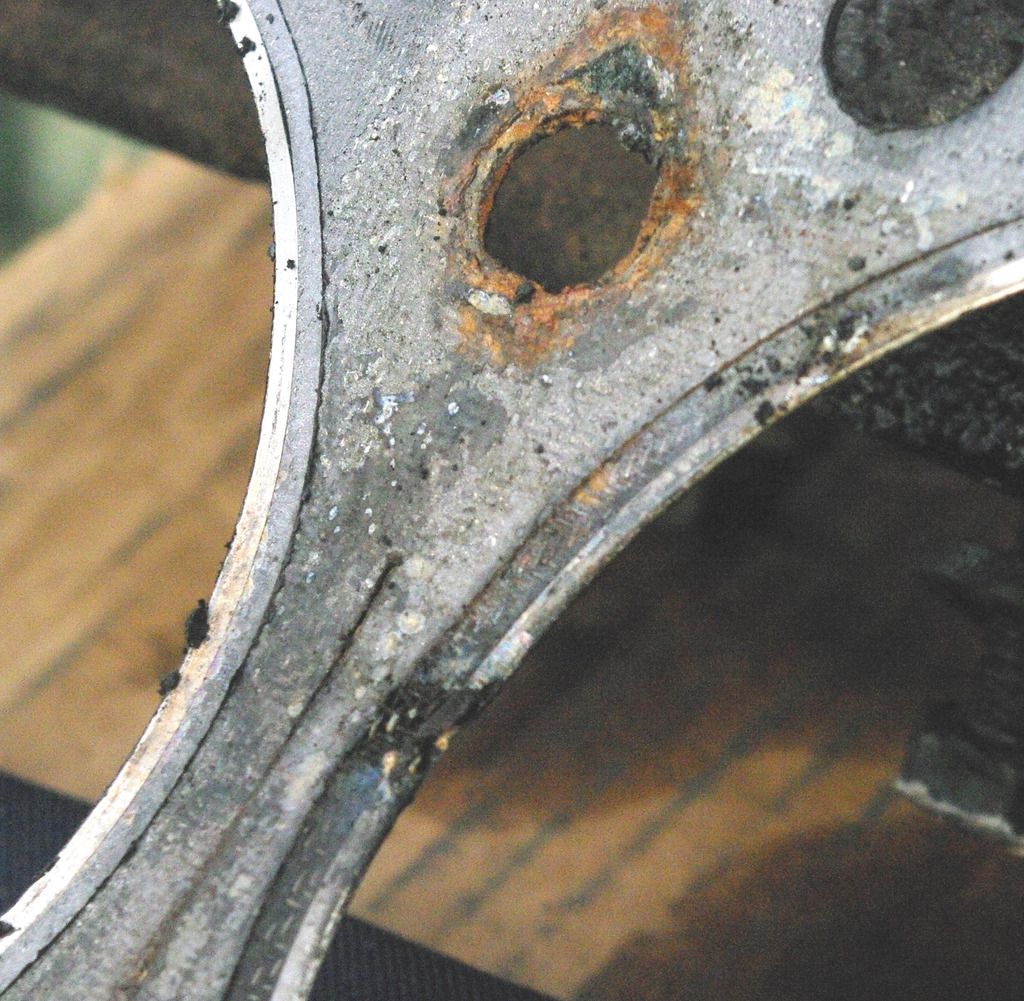
Finally found where the fire ring had given way letting compression into the coolant and coolant into the cylinder
http://i65.photobucket.com/albums/h204/ ... hdxner.jpg
Matching point on the head
http://i65.photobucket.com/albums/h204/ ... 8nxlzh.jpg
Clesan up found liner both slightly low at this point and with a gap around much of the top where the coolant could leak - sealed with Loctite penetrating sealer
https://i65.photobucket.com/albums/h204 ... 80d7i9.jpg
Head had eroded at the same point so some rust joint compo mixed up and applied before pulling down on the new gasket
head bolts re torqued 3 times, last time after we had shared a pint of new anti freeze
http://i65.photobucket.com/albums/h204/ ... racnmw.jpg
Both emitted plenty of smoke, although only one using an exhaust
http://i65.photobucket.com/albums/h204/ ... 0nrwh2.jpg
Then the gate to the asylum was opened and two ageing reprobates (tractor plus driver = 120 years, 122 come 2nd week of April) roared off to annoy this locals to get good and warm before the final head torquing.
Now to sort the electrics out
Re: engine overhaul
Posted: Sun Mar 10, 2019 9:04 am
by blackbob
Rick I know it is probably poor etiquette to nosey through peoples' Photobucket images.. but can't we do something about that lovely tractor in your other photo
https://i65.photobucket.com/albums/h204 ... xuzboj.jpg call the police or something? There must be a law against driving pristine [apart from the already-rusty wheels] Ford 8210 Super-Q's in sea-water?
Re: engine overhaul
Posted: Sun Mar 10, 2019 11:28 am
by Old Hywel
The colour of the antifreeze in the photo suggests it’s OAT, modern stuff. I don’t think it’s the best for old engines. Better off with ordinary Ethyl Glycol.
Re: engine overhaul
Posted: Sun Mar 10, 2019 12:28 pm
by oehrick
Mathius, I know what you mean, trouble is these fishermen (themselves an endangered species) have discovered that red, green, green & yellow and most other colours than blue tractors dissolve in the North Sea - this one and it's trailer go paddling rather than diving but sadly its only a matter of time
Hywel, thanks, I did wonder myself but at the time I needed to buy some but I couldn't find any Glycol locally, more worried about short term frost protection than long term effect - any known issues ? my main worry (frost apart) are those liner O rings and not letting them dry out.
Re: engine overhaul
Posted: Sun Mar 10, 2019 10:40 pm
by mathias1
Mine has now "blue" coolant in it. Might be better for corrosion than old school water + antifreeze.
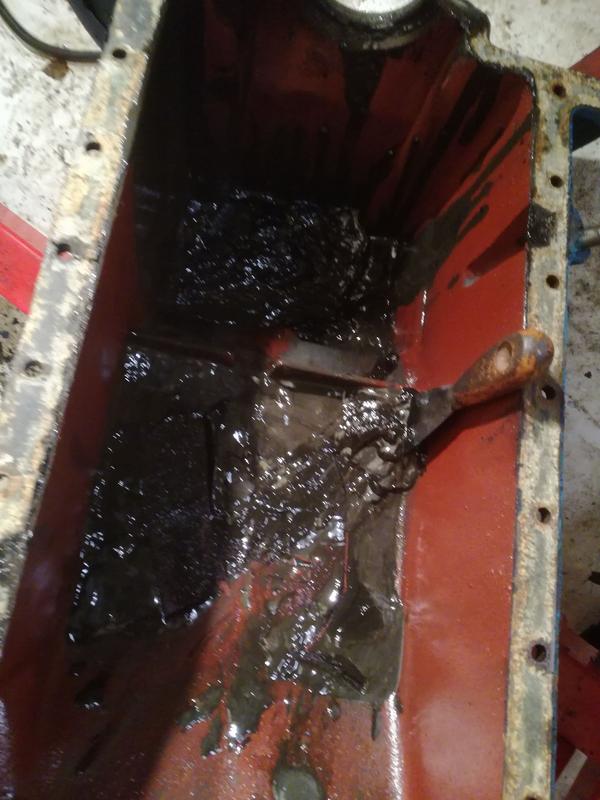
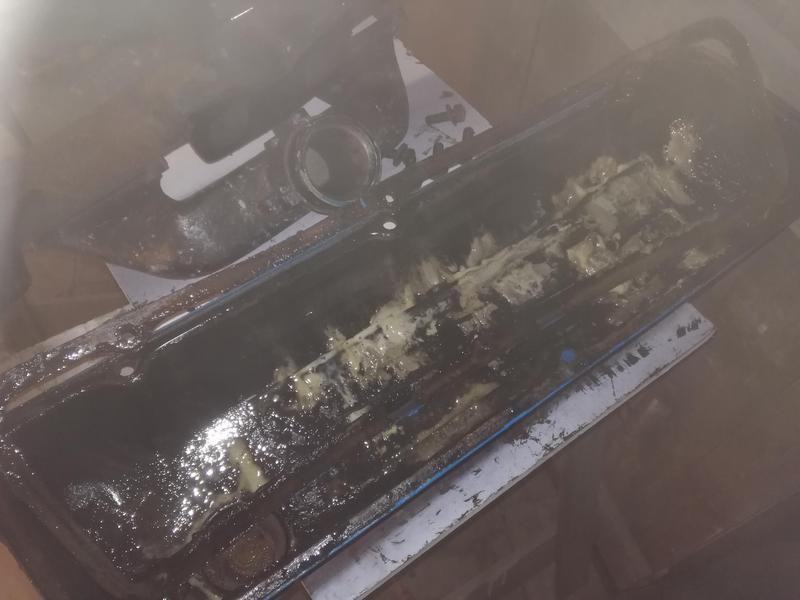
not done much lately. Had some trouble getting the sump off (didn't find the bolt in the front. A good clean of the meshfilter and sump will be needed.


I already took some bolts off the crankshaft (both ends + 1 next to one end)
I think the crankshaft is ok, can feel a little difference beween the place where oil comes and the place where the bearing is. How do I measure the size of the bearings, So I know which ones to order?
Re: engine overhaul
Posted: Mon Mar 11, 2019 11:38 am
by oehrick
It is usual practice to micrometer measure each crankpin to determine the size of bearing shells needed Mathius (if I've understood the question correctly), make sure you measure at a variety of positions along and around each pin to check for both taper and the pin wearing oval.
Somewhere in the engine section of the workshop manual there is a list of specifications which ought to give the original +/- tolerances for the big end and main bearings, the same tolerance ought to indicate if the now worn pins are OK to change bearing shells or if the crankshaft needs regrinding - at which point the shells need to match the newly ground dimensions.
Does that make sense ?
Re: engine overhaul
Posted: Mon Mar 11, 2019 11:55 am
by oehrick
Blackbob, Sorry, for some reason (old age and insanity ?) I replied to Mathius regarding your posting about that beach tractor (at Sea Palling if you find yourself down this way) apologies for that and in my view if Photobucket and other image hosting sites are used then the images are fair game for anyone to view (but not infringe the copyright of of course) I've only posted those to be seen in association with this forum, I keep the best ones on my hard drives


Re: engine overhaul
Posted: Tue Mar 12, 2019 12:02 pm
by AdrianNPMajor
Before you go any further, good idea to dot punch a code on side of bearing caps and corresponding code on adjacent surface of block.
Similarly, dot punch side of big end caps and same side of con rod.
You then know what belongs where, and which way round.
Best, Adrian.
Re: engine overhaul
Posted: Tue Mar 12, 2019 6:26 pm
by mathias1
AdrianNPMajor wrote:Before you go any further, good idea to dot punch a code on side of bearing caps and corresponding code on adjacent surface of block.
Similarly, dot punch side of big end caps and same side of con rod.
You then know what belongs where, and which way round.
Best, Adrian.
That's indeed a good idea Adrian, someone told me this before, didn't know this was a "general" practice among mechanics.
Re: engine overhaul
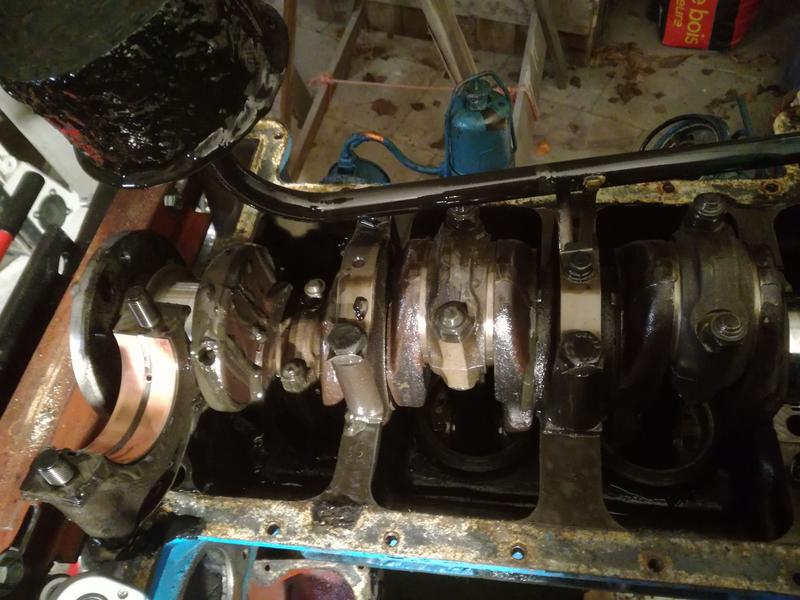
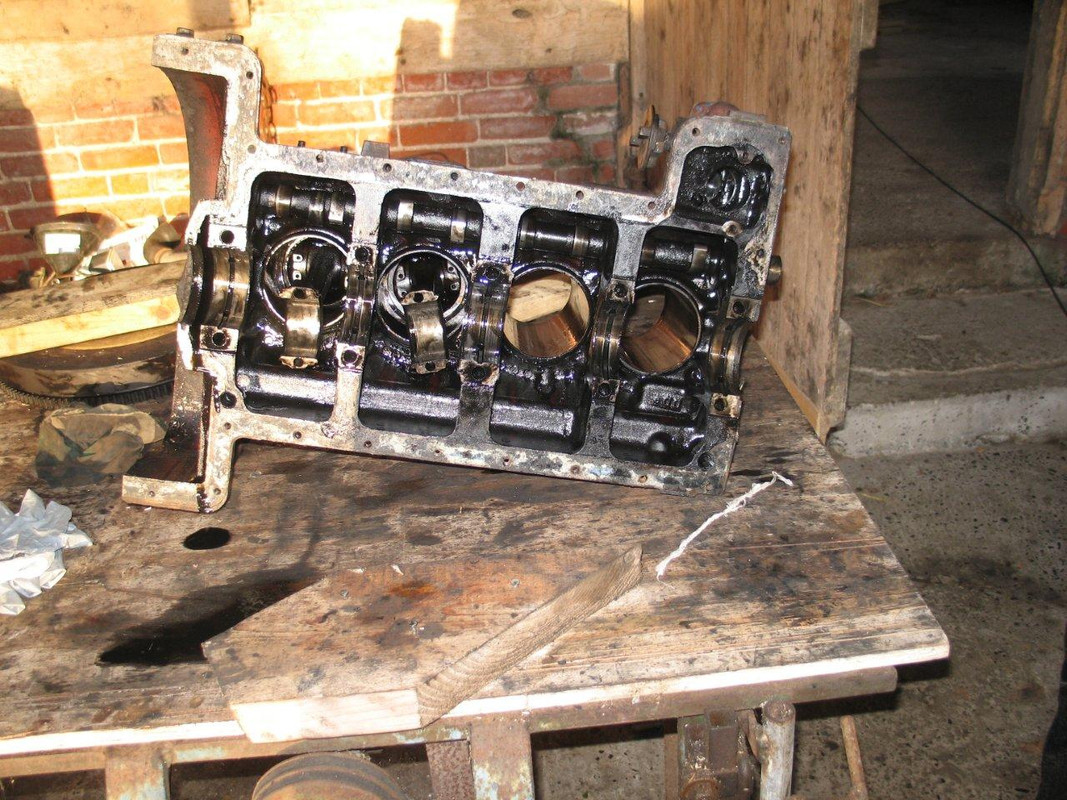
Posted: Mon Mar 18, 2019 11:57 pm
by mathias1
little progress so far,
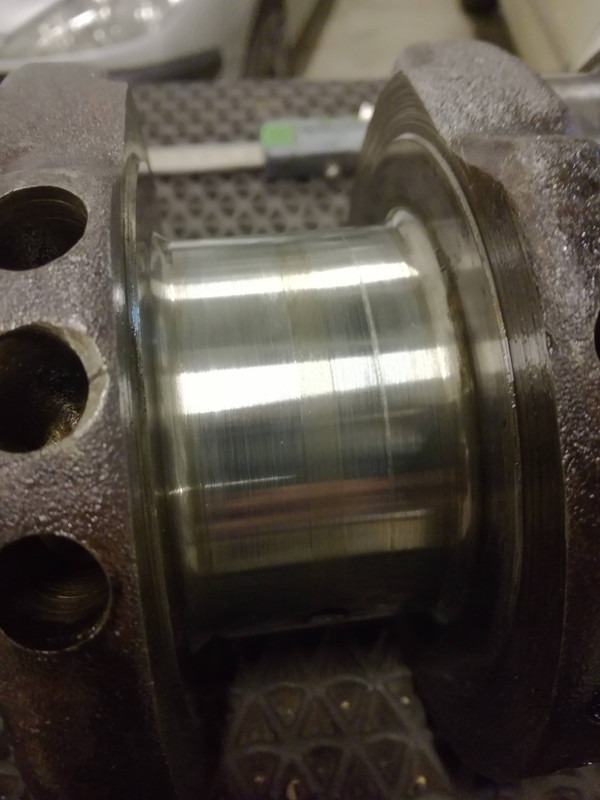
I've got the crankshaft out and a first quick measuring of the crankshaft i found:
about 76.06mm for the main bearings
and about 63.36mm for the conrod bearings.
In the repair manual of the major (52-58) I have:
76.205-76.225 mm
and
63.490 mm - 63.513
Are these the same for the super major, can't find the in my other book.
If so, I need to get it regrind to -0.010", which is 0,254mm.
next is to remove the liners, looks like they won't get out easily.
Re: engine overhaul
Posted: Tue Mar 19, 2019 1:08 pm
by AdrianNPMajor
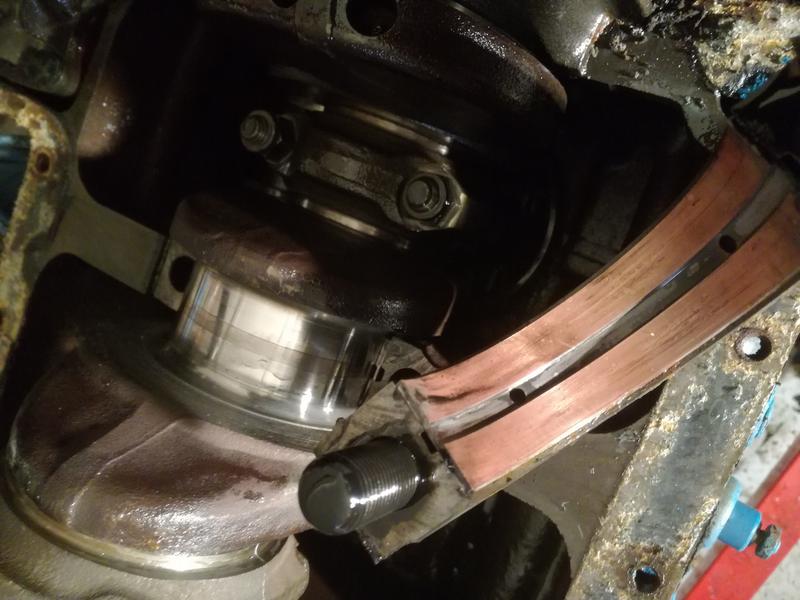
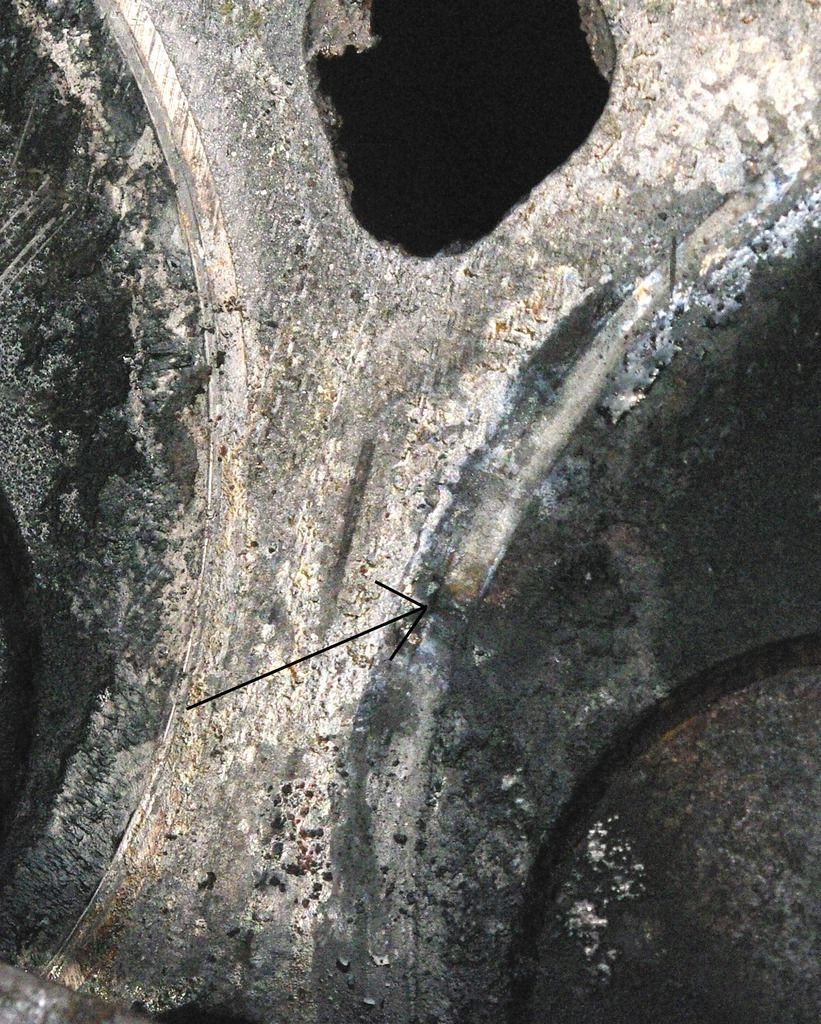
The main crank journal you have shown above looks fine. Your measurements confirm that all is well.
Re liners, they will be very tight.
A threaded rod with a T-bar at the base and a bridge at the top. Apply pressure to top end with spanner, followed by shock force with a lump hammer to the T-bar at bottom end. Reapply pressure, then reshock. Repeat until, by degrees, the liner becomes free. You only need to move liner a quarter of an inch to go from 'This bugger is never going to come out' to 'Oh, that was pretty easy!'.
Oh, by the way, clean, clean and clean again! [Swarfega Jizer.]
Best, Adrian.
Re: engine overhaul
Posted: Tue Mar 19, 2019 1:31 pm
by AdrianNPMajor
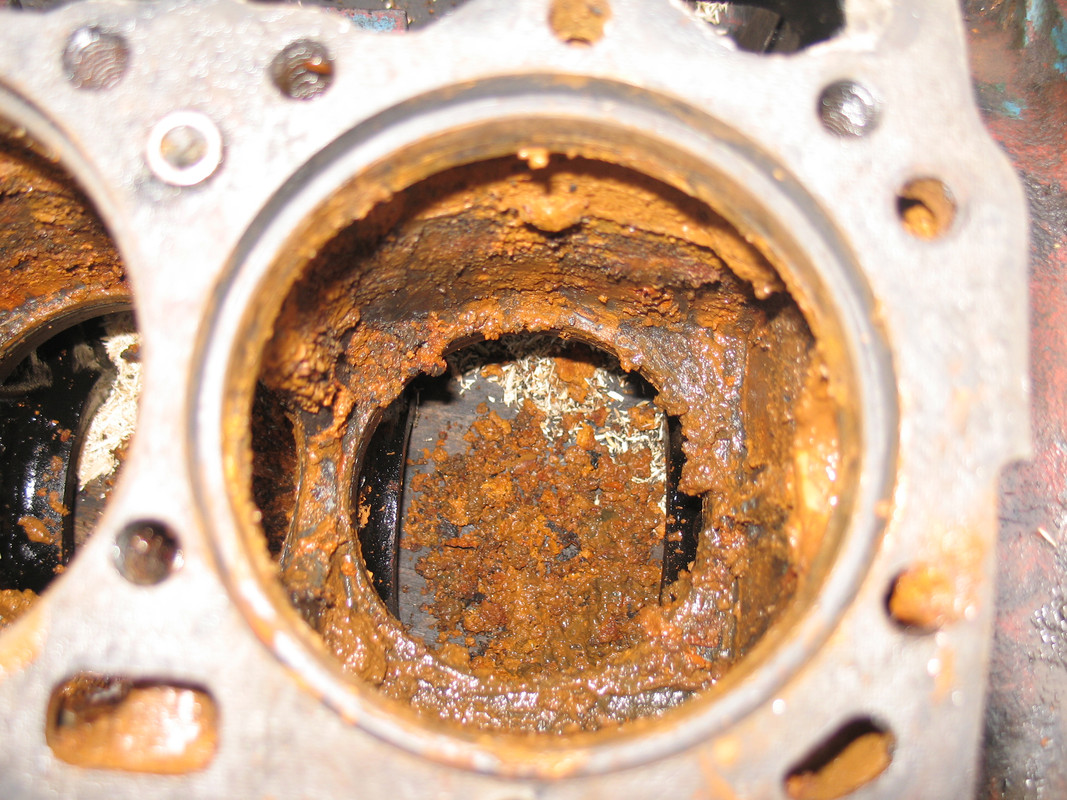
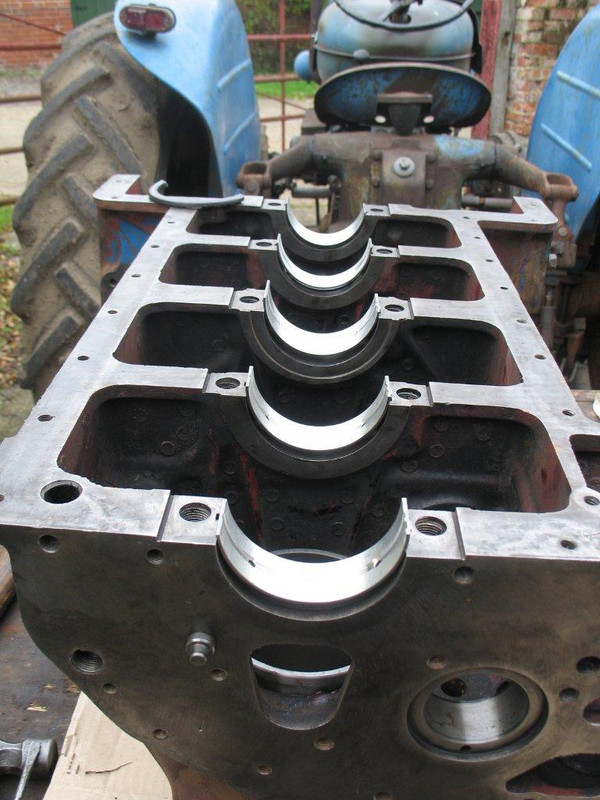
Looked for photo of T-bar. Apparently, I didn't take one, probably due to cursing about how tight the buggers were!
Here are images of the before and after.
Best, Adrian.
Re: engine overhaul
Posted: Tue Mar 19, 2019 1:35 pm
by AdrianNPMajor
For cleaning the block of rust/old gasket material, wire brush on end of electric drill is spot on.
Best, Adrian.
Re: engine overhaul
Posted: Tue Mar 19, 2019 1:57 pm
by mathias1
Adrian, so no regrinding needed, only the -0.10"bearings? I will try to do some more measuring tonight. I don't have a micrometer, i m using a digital caliper to have an idea.
Re: engine overhaul
Posted: Tue Mar 19, 2019 4:56 pm
by AdrianNPMajor
How do the other crank journals (mains and big ends) look? Any visible sign or feel of scoring?
The bearing shell in the photo has lost it surfacing, but the journal looks unaffected. The bearing shells on mine had lost surfacing also, but the crankshaft was unmarked, so I fitted standard bearings. If you are in doubt, take the crankshaft to an engine rebuilder and get them to check it.
While I remember, be sure to clean the oil galleries in the block (remove brass bungs) and the crankshaft. You'll need to make a pull-through, rather like cleaning a rifle barrel. Work up to the right size of rag for the pull-through. You don't want to get it stuck in the bore of the gallery.
Best, Adrian.
Re: engine overhaul
Posted: Tue Mar 19, 2019 10:37 pm
by mathias1
Took some time to do the measuring again tonight, and found out all measurements are approximately within the limits. So no need for regrinding and the standard shells can be used. (i also found a Std mark on one of the main bearing shells)
a little damage on the middle main bearing and 3 conrod bearing. will see if I can polish it out.

Re: engine overhaul
Posted: Wed Mar 20, 2019 10:11 am
by Pavel
I was wondering, Adrian, whether to mention to Mathias about cleaning the oil ways and galleries in the block and crankshaft -- not forgetting the rocker arms and shaft.
If one goes along to a motor store you can buy an oilway cleaner; rather like a smokers pipe cleaner, but with a twisted steel stem with stiffish nylon spikes along it. Works a treat. Failing that an appropriate sized twist drill bit does the job. The muck that reamers out is unbelievable.
Pavel
Re: engine overhaul
Posted: Wed Mar 20, 2019 12:38 pm
by AdrianNPMajor
Yes, Pavel, quite agree. I used a brush for the crank.
With the very long, longitudinal and lateral block galleries, I used a petrol-soaked rag on a pull-through. Ideally I would have used a rifle barrel brush, but didn't have one.
Mathias, the scoring is a cause for concern. How deep is it? Does your fingernail catch on it?
Again whilst I remember, a new oil pump is a must. The sludge in the sump/stuck to the mesh filter means the pump will certainly be worn.
Best, Adrian.
Re: engine overhaul
Posted: Wed Mar 20, 2019 11:57 pm
by mathias1
All parts ordered, including a new oil and waterpump. Will look into the cleaning brushes
