Page 1 of 1
Air Cleaner and Oil Bath
Posted: Wed Aug 12, 2009 7:08 pm
by Bensdexta
Been cleaning my Air Cleaner for first time in 35 years - not pretty.

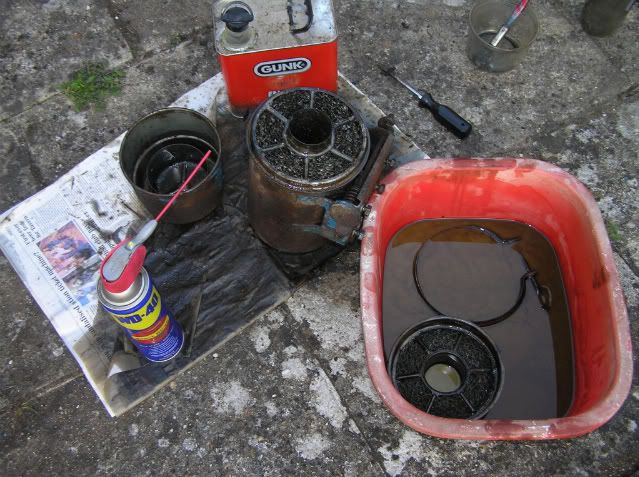
Quite a lot of grit came out of the filter base so it evidently works.
A couple of Qs:
Am I correct in believing that to disassemble the friction pad lever assembly I need to remove a roll pin at A and the split pin that compresses the spring at B?
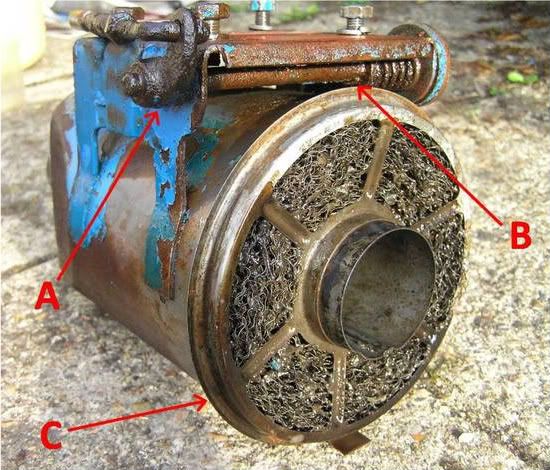
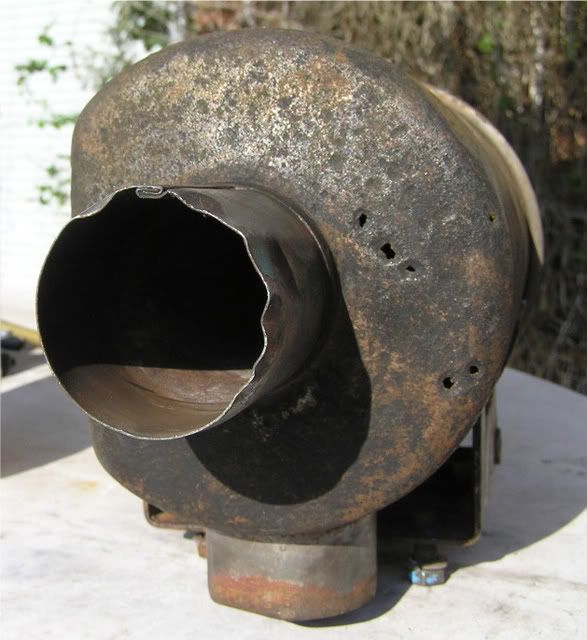
Does the ring at the base of the main body, C above, come off or must I clean the main body by sluicing parafin through it as best I can?
Advice appreciated,
Ben
Posted: Wed Aug 12, 2009 8:12 pm
by Tubal Cain
Ben,
You will have to remove the split pin and roll pin as you suggested.
You cannot remove the mesh shown in your second photo, all you can do is try to flush it through with parrafin or other solvent, my own attempts have not been too successful.
You can, however, obtain a replacement for the filter element in the red bowl in your first photo.
Gerald
Posted: Wed Aug 12, 2009 9:35 pm
by Bill Cox
What about flushing it out with a steam cleaner? Flush it out, then blow it out with air, then come back with denatured alcohol to displace any water that may be left and finally flush it with a hydrocarbon to keep it from rusting?
When I got my Dexta, the mesh wasn't all that dirty and I just used Varsol, Exxon's trademarked name for what I think over your way is called paraffin. Through the years I've used the steam cleaner first so I didn't have to use so much Varsol. Water is a lot cheaper

Air Cleaner Cleaning
Posted: Wed Aug 12, 2009 10:31 pm
by Bensdexta
Thanks for the advice. It is cleaning up by degrees.
I was wonding if some drain unblocker (sodium hydroxide) would shift the vegetable matter and sheep's wool that seems to be remaining? Shouldn't hurt the metal.
Then I need to paint it!
Ben
Posted: Thu Aug 13, 2009 7:25 am
by RossM
Hi Ben,
If you replace the filter element that goes in the bowl at the bottom be warned there are 2 sizes I've been told. The one I've got for mine is the wrong size! Think the difference is between dexta and super dextas.
Ross
Posted: Thu Aug 13, 2009 8:10 am
by Brian
Word of warning! Be careful what you clean the filter with as any residue is drawn straight into the engine.
That is why we were always told to flush these things with diesel.
You can get some interesting results if you use petrol then put it straight back on and start up.

Posted: Thu Aug 13, 2009 10:55 pm
by Bensdexta
Brian wrote:Word of warning! Be careful what you clean the filter with as any residue is drawn straight into the engine.
Thanks for the words of warning.
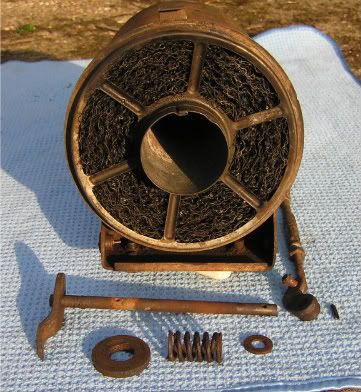
Got the friction assembly apart with the aid of some heat. The roll pin was v hard to drill, but fortunately I was able to tap it out with a suitable small punch (a drill bit!).
Now to clean the whole air cleaner in the electrolysis bucket and then painting. A new one from Agriline at £32 is tempting but wouldn't be the same! I don't know if the new ones have the friction assembly?
All the best,
Ben
Posted: Fri Aug 14, 2009 7:32 am
by Tubal Cain
Hi Ben,
Are you using caustic soda as an electrolyte? If so it should help to clean the filter element.
Gerald
Posted: Fri Aug 14, 2009 9:51 pm
by Jerry Coles
Guys
Re the Caustic Soda (Sodium Hydroxide) stuff.
1. It is nasty stuff on YOU! It will dissolve flesh (memories of school days trying to get a skeleton of a stillborn calf clean). A small drop on your skin will make it go soft and slimey and then it hurts. Wash off with copious water.
2. Prolonged exposure to Caustic Soda will dissolve paint. I clean small painted items by leaving them in a dustbin of caustic solution for a week or two. The paint sludge thats left can then be washed off quite easily.
Just my tuppenyworth!
Regards
Jerry
Electrolytical rust removal & paint stripping
Posted: Fri Aug 14, 2009 11:44 pm
by Bensdexta
Yes I wear gloves, when working with the electrolyte for rust removal. Nitrile gloves are best. I use washing soda as the electrolyte, which is sodium carbonate I believe, and is not quite as caustic as sodium hydroxide.
Washing soda has done a good job on cleaning the gauze in my air cleaner. After washing my filter body, a table spoon full of very fine grit came out, which must have been trapped in blobs of oil in the gauze.
As you say it also shifts paint in a few hours.
One point ref electrolytic rust removal, contrary to some advice, do NOT use stainless steel for the anode. Use ordinary steel (eg mild steel). Stainless steel produces hazardous chromium compounds.
All the best,
Ben
Posted: Sat Aug 15, 2009 9:34 am
by GERRY
HI Bensdexta just on the agriline one i bought one but it has no friction asembely on it i had to drill it an use the asembely from my old one , it works well but there is abit of work if it is to be used for the standered dexta. Gerry
Agriline Air Cleaner
Posted: Sat Aug 15, 2009 10:14 am
by Bensdexta
GERRY wrote:HI Bensdexta just on the agriline one i bought one but it has no friction asembely on it i had to drill it an use the asembely from my old one , it works well but there is abit of work if it is to be used for the standered dexta. Gerry
Gerry,
What did you have to drill and what other work was involved?
Unfortunately it turns out my old cleaner body has perforations on the top due to rust, so I'm contemplating patching them up with epoxy filler, JBWeld?, (or could they be welded?) or getting a new one. I wonder which is less work?
Thanks for the info,
Ben
Posted: Sat Aug 15, 2009 12:50 pm
by GERRY
i got mine about ayear ago ihad the same problems when cleaned it had alot of small holes in it after trying to patch with cemical metal i seen the one at agriline , the one they have is for the super dexta no throtle asembely, so i had to take the old one apart. i used a drill bit which has to be the size of the bushes which fits in the tin part .i just measured them off the old one an drilled them , then pushed in the orignal bushes and connected it all back together , just be carful that the the two holes are alined as close as possible as the old one ,icant rember the size of the drill bit but when you get old bushes out you will be able to check it against the holes , I think that the new one is the best way to go, Gerry
Posted: Sun Aug 16, 2009 6:03 pm
by Bensdexta
GERRY wrote:I used a drill bit which has to be the size of the bushes which fits in the tin part .i just measured them off the old one an drilled them , then pushed in the orignal bushes and connected it all back together , just be carful that the the two holes are alined as close as possible as the old one ,..
Gerry,
Please confirm that the spindle bushes arrowed below are just a push fit and can be tapped out with a small hammer? So you drilled matching holes in your new air cleaner body and pushed the old bushes in?
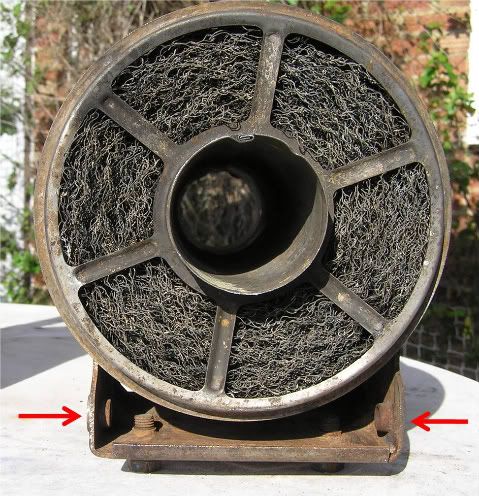
And just before I take the plunge and buy a new air cleaner, any suggestions on how to repair the holes in the top of my old air cleaner? Welding, brazing, solder, epoxy putty, fuel tank repair kit?
Any suggestions appreciated,
Ben
Posted: Sun Aug 16, 2009 6:38 pm
by Bill Cox
It looks to me as if Humble Weld, JB Weld or a similar product would fix it up. A thin coating over the whole top would also fill in the dimples. Sand it smooth and paint. Fairly cheap, not much time or work and it should be durable and would look good.
Posted: Sun Aug 16, 2009 9:15 pm
by GERRY
yes they are a push fit althought a pretty tight fit , if you go down this path when you drill the new holes they have to be alinned perfectly , but looking at your one it isnt too bad cemnical metal or as bill says any type of filler could make agood job of it, the bowl on mine was also gone this was the main reason i went for the new one . if you are pushing the bushes out there is lip on them so tap them out the right way . Gerry
Posted: Tue Aug 18, 2009 3:08 pm
by GERRY
bensdexta just before you go out and get an agriline filter iv just been checking my one and can remember that the screws that hold filter to firewall were very close to throtle bar meaning that if the are not all made excetly the same and these holes are slightly different then you might have a job getting the bar through without altering the holes as well, just a thought so think carfuly before you dicide to go this way . if the bowl is good on yours if it was me iwould just tidy up the top alot less hassale and still an orignal one , GERRY
Posted: Tue Aug 18, 2009 8:14 pm
by Bensdexta
Gerry,
Many thanks for the warning. My filter bowl will tidy up OK, so I've decided to repair the top of my filter body and stay original
Ben