Hi,
I'm the proud owner of an inherited 1959 Fordson Dexta. S/N 957E 35683
The tractor was originally bought to move lorrys around my Uncle's garage. He was a Scania mechanic and had very little time for it. It was a workhorse and got the bare minimum. After he passed away it moved to my Grandfather who used it for cutting turf and drawing turf home via the country byways of tyrone for approx 15 years. Again it received little/minimum attention. After he passes away it was stored in a garage for approx 10 years, until now.............
It was converted to using an alternator and had a home made draw bar. Over the years where things were once screwed together they have been hastily welded together. Needless to say a lot of parts suchs as seats, lights etc have been replaced by generic items, welded or bolted on using spouting bolts!
I intend to restore this tractor to as close to original as I possibly can. I have little mechanical knowledge, although I'm very keen to learn. I'm on a tight budget and I've been a visitor to this site for over a year now.
So far we have been working at this tractor over the last 18 months. As a student I have been lucky enough to be able to dedicate time to it. It has been rubbed down to bare metal and sprayed with 2 coats of undercoat. A new PTO seal has been fitted, new rear axle seals, thermostat, fuel and oil filter, oil switch, heater plug, lift overhauled and steering bearings overhauled (lift and steering by a local mechanic)
Purchased so far:
New Wings
New front grills
New dynamo
New foot plates
New rear lights
New mushroom
New Heater switch
New speedo cable
New levelling box
New steering wheel
New seat pan
I am having extreme difficulty identifying which nuts and bolts to use and how to purchase them. I have followed advice on this forum but i simply do not understand the dimensions on the parts list.
I also sprayed the undercoat by myself to cut costs. This I am learning to do as i go along. I intend to spray the chasis with single pack, and have saved enough however to get the tin work professionally sprayed with two pac. Any comments please feel free.
Introducing my Wee Dexta project.
-
Wee59dexta
- True Blue
- Posts: 157
- Joined: Sat Apr 23, 2011 1:48 pm
- Location: Tyrone, Northern Ireland
Introducing my Wee Dexta project.
Last edited by Wee59dexta on Fri Jun 15, 2012 9:47 am, edited 1 time in total.
-
henk
- Site Governance Team & Expert Team

- Posts: 2069
- Joined: Wed Apr 16, 2008 8:56 pm
- Location: Arnemuiden, The Netherlands
- Contact:
Re: Introducing my Wee Dexta project.
Welcome to the board.
I hope you can rebuild the family Dexta. Any chance on a picture.
The threats are all UNC or UNF. Maybe this link will help: http://www.vdwalle.com/knowledgebase/draad/index.htm
Although it's in Dutch, it did help me a lot to understand English and American threats
I hope you can rebuild the family Dexta. Any chance on a picture.
The threats are all UNC or UNF. Maybe this link will help: http://www.vdwalle.com/knowledgebase/draad/index.htm
Although it's in Dutch, it did help me a lot to understand English and American threats
Kind regards, Henk
Fordson New Major February 1957 Mark I
Fordson New Major February 1957 Mark I
Re: Introducing my Wee Dexta project.
Look forward to seeing some pics!! 

Bensdexta - 1961 working for a living!
-
Jerry Coles
- True Blue
- Posts: 542
- Joined: Thu Apr 17, 2008 9:09 pm
- Location: Camerton, Bath, UK
Re: Introducing my Wee Dexta project.
Welcome to the forum!
I suggest you go out and buy/source a set of A/F spanners and sockets in the size range 7/16" - 1". Some of the older Whitworth spanners from 1/8W to 5/16W will also come in useful. Car boot sales are a good source of second hand tools such as this.
Any nuts and bolts you require can be still obtained from most nut and bolt suppliers and nowadays you can get Nyloc type nuts as well as plain.
It really depends on how far you want to restore your Dexta, a full restore will be time consuming and may require skills that you haven't fully developed. Do you want your Dexta to be a working tractor?
I can also suggest you go to your local Agricultural dealer who has Ford/New Holland tractors as they may well stock Dexta parts even today!
All the best and you can always rely on some good advice from the crowd on this forum.
At your newsagents is a monthly magazine called 'Tractor and Machinery' which has many articles relating to Dexta's, advertisments bith private and parts suppliers also.
Also look at the links on this website as there is loads of information available to you. Stephans German website is where you can download the service manual and parts list.
If in doubt just ask here!!!!
I'm sure forum members from your side of the Irish Sea will be able to assist you as well.
Regards
Jerry
Bath
UK
Jerry Coles
Camerton, Bath, UK
West Highland White Terriers, Dexta's, E27N's and DUKW's
Camerton, Bath, UK
West Highland White Terriers, Dexta's, E27N's and DUKW's
Re: Introducing my Wee Dexta project.
I, too, have been restoring a '59 Dexta. It has been an on again, off again project. Our tractors have s/n's that are very close - mine being 38782.
As I've gone along, I've tried to photograph the process. It has proven helpful in keeping things straight over the past couple of years. Perhaps, you will find them of value, too:
https://picasaweb.google.com/tractorNst ... toration02#
Very soon, I will be dismantling the tractor in order to fit the renewed clutch and flywheel assembly - not something for the faint of heart, since this entire assembly is fairly heavy. I have to design and make a centering device to get the thing to fit properly to the main shaft. Keeps me up at night!
Best of luck with your project.
Don
-
Wee59dexta
- True Blue
- Posts: 157
- Joined: Sat Apr 23, 2011 1:48 pm
- Location: Tyrone, Northern Ireland
Re: Introducing my Wee Dexta project.
Hey,
Thanks again to everyone for replying to my post. Don - your pics are very helpful, such a beautiful restoration. It was very helpful to see how my tractor should have looked originally.
Thanks for the help on the nuts etc.
My tractor restoration initially intended to be a rub down and repainted, replace a few panels etc but since discovering this site a few years ago, it has developed rapidly into becoming as good a restoration as my limited skills and budget can complete.
I love the wee dexta to death if i'm honest. Many years ago it was hand painted a nasty dark blue colour and it has always been my ambition even as a child to restore it back to the beautiful empire blue. I'm a student who does very little partying, preferring to spend my money on the wee dexta. It and the time i spend on this forum is also causing my girlfriend to go slightly insane! Steadily this machine has taken over my life!
Here are some pics! http://www.flickr.com/photos/skidancer/
The tractor will not be split. I do not have the garage, tools, ability etc. There is an oil leak where the rope seal is monkeyed but i'm prepared to live with that for 10 years or so.
I have just this morning fitted the clutch pedal holder. I sourced it from Malcolm Hipperson, so a huge thanks to him. I now have to try and figure out how to remove the very worn clutch pedal bush.......... Any help would be very much appreciated. Ive searched the forum but I cant find anything on it. Apologies if im constantly overlooking things!
-
Wee59dexta
- True Blue
- Posts: 157
- Joined: Sat Apr 23, 2011 1:48 pm
- Location: Tyrone, Northern Ireland
Re: Introducing my Wee Dexta project.
Got the bush out. Found an old size 17 socket. Sledged it out in the garden. Happy days!
Re: Introducing my Wee Dexta project.
On the bolt sizes, check out the downloadable parts list for the Dexta as this lists the bolts and nuit sizes (this has been a god send for me as mine was purchased with the engine being in crates!).
I bought a mixed pack of UNF bolts/nuts/washers off ebay then purchased the less commen items as required (e.g. UNF-UNC studs etc).
So far its going ok, engine is re-built and painted plus today it got loaded into the back of a road-rail landrover (as it has a tail lift) for the 3 mile trip to where the tractor main section is ready for re-fitting.
Mark Russell - 1959 Standard Dexta - Work In Progress!
-
Jerry Coles
- True Blue
- Posts: 542
- Joined: Thu Apr 17, 2008 9:09 pm
- Location: Camerton, Bath, UK
Re: Introducing my Wee Dexta project.
two answers here:
Don You don't need any special adapter/alignment tool for your clutch. I used a long 9/16" socket and extension through the centre of the clutch plate to the flywheel when tightening up the clutch pressure plate assembly fixing bolts. Once you have re-assembled the engine the first time you dip the clutch the plate willfine centre anyway, its just to get that initial alignment when rebuilding.
weedexta The clutch peadl bush is quite easy to replace, remove the LH footplate and then the PTO lever shaft key (thats the bolt through the end of the PTO lever - slacken the nut and then lightly tap the nut to force the key back through the shaft - don't hit the threaded part as it will damage the threads. Once it moves then slacken the nut further and another tap and so on until the key pops out). Remove the PTO lever. Disconnect the clutch clevis rod (thats the long rod attached to the clutch pedal) by removing the split pin on the clevis and removing the clevis. The pedal should now slide off the shaft.
Place the peadl in a vice and put a hacksaw blade through the hole where the bush is, reassemble the hacksaw and cut through the bush metal down the length of the shaft hole. You can then tap inwards the old bush using a flat screwdriver to collapse the bush into the hole. The slot you cut will allow the bush to fold inwards. Clean off the area of the shaft hole and then offer up the bush into the hole making sure its parallel with the axis of the shaft. Using a metal plate in the jaws of a vice you can press in the bush under control easing the bush into the hole. An alternative would be to get two thick metal plates with a large bolt hole through them and a long bolt to squeeze the bush into the hole. Don't try and knock it in as you will very probably bend the bush. Once the bush is in the pedal hole than re-assembly is a reverse process. Be careful when replacing the PTO shaft key as it has a strange set of grooves in it which must line up with the shaft grooves. You have to get the pto lever aligned with the shaft before inserting the key and don't try and put it in the opposite way as it is a tepered key. Don't rush things and be gentle (as the actress said to the MP).
Once again refer to the perts list as it can give you a lot of insight as to how things come apart and go back together correctly.
Jerry
Bath
UK
Jerry Coles
Camerton, Bath, UK
West Highland White Terriers, Dexta's, E27N's and DUKW's
Camerton, Bath, UK
West Highland White Terriers, Dexta's, E27N's and DUKW's
-
Jerry Coles
- True Blue
- Posts: 542
- Joined: Thu Apr 17, 2008 9:09 pm
- Location: Camerton, Bath, UK
Re: Introducing my Wee Dexta project.
Weedexta
Why not contact and join the National Vintage Tractor and Engine club? Theres a group in NI Ireland and I'm absolutely sure someone there can help in many ways.
There details are:
Ballyeaston group
Secretary and Membership Mr A Magill 85 Gortnageeragh Road, Martinstown, Ballymena NI BT43 7NA
028 217 58543
Give him a call and that will open many doors I'm sure.
It looks to be fairly near to you in NI.
Regards
Jerry
Bath
UK
Jerry Coles
Camerton, Bath, UK
West Highland White Terriers, Dexta's, E27N's and DUKW's
Camerton, Bath, UK
West Highland White Terriers, Dexta's, E27N's and DUKW's
-
Jerry Coles
- True Blue
- Posts: 542
- Joined: Thu Apr 17, 2008 9:09 pm
- Location: Camerton, Bath, UK
Re: Introducing my Wee Dexta project.
Weedexta
Just took a look at your pics and am worried about your support for your Dexta!!
Axle stands are OK but you have them resting on Breeze (US = cinder) block. They are not good at sustaining a concentrated load such as at the feet of you axle stands. They may easily crumble causing you some grief and injury!! Replace them with some more solid and substantial such as lengths of sleeper.
Regards
Jerry
Bath
UK
Jerry Coles
Camerton, Bath, UK
West Highland White Terriers, Dexta's, E27N's and DUKW's
Camerton, Bath, UK
West Highland White Terriers, Dexta's, E27N's and DUKW's
Re: Introducing my Wee Dexta project.
Jerry,
My Dexta has two clutch discs. One for the transmission, the other for the PTO. In reading the shop manual, I was under the impression that there is a special tool for getting both discs centered, then aligned with the main shaft. I have two different alignment tools for clutch discs that I've used on my N tractors and on the Funk I am restoring. But, with the Dexta the discs have two different, splined holes in the center of the disc. One disc goes onto the main shaft, the other onto the pto shaft, which is a larger diameter hole. Am I making sense here? Anything that will make this job easier will be much appreciated!!
Don
-
Jerry Coles
- True Blue
- Posts: 542
- Joined: Thu Apr 17, 2008 9:09 pm
- Location: Camerton, Bath, UK
Re: Introducing my Wee Dexta project.
Don
Measure the two shaft diameters. Using a piece of rod the diameter of the pilot bearing and then two sleeves or tubes whose external diameters are a fraction smaller than the Disc diameters you can place the sleeves over the rod and slide the clutch down the rod/tubes when you assemble the release plate.
I have a single clutch on my Dexta so it was a bit easier.
Essentially you need the clutch discs central on the flywheel when you tighten down the release plate so that the two shafts can enter the assembly and align with the two clutch plate centres.
Regards
Jerry
Bath
UK
Jerry Coles
Camerton, Bath, UK
West Highland White Terriers, Dexta's, E27N's and DUKW's
Camerton, Bath, UK
West Highland White Terriers, Dexta's, E27N's and DUKW's
-
Wee59dexta
- True Blue
- Posts: 157
- Joined: Sat Apr 23, 2011 1:48 pm
- Location: Tyrone, Northern Ireland
-
naildriver
- True Blue
- Posts: 148
- Joined: Wed Nov 11, 2009 2:01 am
- Location: Monroe, North Carolina
Re: Introducing my Wee Dexta project.
Looking for instructions on how to post pics. ???Bensdexta wrote:Look forward to seeing some pics!!
Re: Introducing my Wee Dexta project.
hi weebluedexta 90b if you go in to misellenionus posts an type in photo trail in search box
an attempt by me to post photos should come up it should give you and idea
on posting photos
an attempt by me to post photos should come up it should give you and idea
on posting photos
-
Wee59dexta
- True Blue
- Posts: 157
- Joined: Sat Apr 23, 2011 1:48 pm
- Location: Tyrone, Northern Ireland
Re: Introducing my Wee Dexta project.
Hi, I have not been on this in a while. But the Wee Dexta project is continuing. The biggest move undoubtedly was my Father and I building a 20ft by 16ft shed with concrete floor in order to move the Dexta into. We now have somewhere proper to work at her with!
Every single part of the tractor to date has been rubbed down, primed with red oxide and then sprayed with grey primer. Having bought a second hand compressor and a quite good devilbiss HVLP spray gun 22 parts have just today had their first coat of Empire Blue!!
We decided to use the Sparex Enamel tractor paint. I have been to quite a few rallies over the summer and I just do not like the look of the 2Pac painted tractors. The castwork on many of these have been filled in and are smooth and shiny, not the look im gong for with mine.
I know Stefan thought the paint a little bit soft and i'm finding it takes longer to cure - but im in no hurry. Our spare room is now dedicated to drying dexta parts in between coats!
I am now seeking you gents advise as to what my next step should be. I'm going to paint everything That I can hang up, before I move onto the tractor body, but this is where i'm stuck. Should we concentrate on getting the tractor filled with oil and running etc before we paint the body (with limited wiring) or should we; as my Father thinks finish the tractor off - let cure for a month and then begin to wire and start.
Thanks again for your help and i'll try and get pics sorted out!
Re: Introducing my Wee Dexta project.
I've restored six tractors and have found that it is best to prime and paint all of the parts - including the chassis and motor - before reassembly. Undoubtably you will ding or scratch some of the components when reassembling. However, it is not terribly time-consuming or difficult to do a final once-over with paint after the tractor is totally put back together. Just wet sand everything lightly, wipe, and repaint.
In addition to my Dexta, I am restoring a '53 Ford Funk, OHV 6, for a friend. You can see some of the photos here:
https://picasaweb.google.com/tractorNst ... estoration#
I am at the stage where the electrical harness has been fabricated and installed, along with lots of other parts. I'll take a day or so, strip the tractor back to the chassis, and spray one more time before putting everything back on. If I ding something doing that, I'll get out an artist's brush and make final repairs.
If you do not spray the motor before starting it, you will likely get oil and other contaminants onto the bare metal. Paint does not like that. It is much easier to wipe off oil and grease from a finished surface.
I am sure there are other ways of doing a restoration, but this works for me.
Good luck.
Don
-
Wee59dexta
- True Blue
- Posts: 157
- Joined: Sat Apr 23, 2011 1:48 pm
- Location: Tyrone, Northern Ireland
Re: Introducing my Wee Dexta project.
Cheers Don! Your advice is always sound. If my tractor could look one tenth as good as the work you've been producing i'll be a happy camper!
-
Wee59dexta
- True Blue
- Posts: 157
- Joined: Sat Apr 23, 2011 1:48 pm
- Location: Tyrone, Northern Ireland
Re: Introducing my Wee Dexta project.
Just a quick update on my wee Dexta!
Here are some pics: http://www.flickr.com/photos/skidancer/sets/
We've been flat out recently, and after 2 coats of empire 'Bella' is ready for wiring! I'm following the wiring diagram and this forum, so no doubt i'll be needing your advice!
But hopefully not to shabby..................
How the heck do I get an image to appear. I try and past the bbcode or HTML but nothing comes up!
-
Wee59dexta
- True Blue
- Posts: 157
- Joined: Sat Apr 23, 2011 1:48 pm
- Location: Tyrone, Northern Ireland
Re: Introducing my Wee Dexta project.
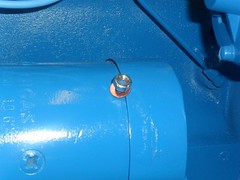
Has anyone ever seen this brass screw on a Starter motor before?

This imaging really sickens me, please click on this link, Cheers http://www.flickr.com/photos/skidancer/6165883033/
This imaging really sickens me, please click on this link, Cheers http://www.flickr.com/photos/skidancer/6165883033/
Re: Introducing my Wee Dexta project.
You have to get the link to the actual image, (.jpg)Wee59dexta wrote:Has anyone ever seen this brass screw on a Starter motor before?
This imaging really sickens me, please click on this link, Cheers
Bensdexta - 1961 working for a living!
-
Wee59dexta
- True Blue
- Posts: 157
- Joined: Sat Apr 23, 2011 1:48 pm
- Location: Tyrone, Northern Ireland
Re: Introducing my Wee Dexta project.
Thanks Ben, I'll give it a go...........
Re: Introducing my Wee Dexta project.
Bensdexta wrote:You have to get the link to the actual image, (.jpg)Wee59dexta wrote:Has anyone ever seen this brass screw on a Starter motor before?
This imaging really sickens me, please click on this link, Cheers
If you click on quote for this post, you will see what the link looks like
Bensdexta - 1961 working for a living!
-
Wee59dexta
- True Blue
- Posts: 157
- Joined: Sat Apr 23, 2011 1:48 pm
- Location: Tyrone, Northern Ireland
Re: Introducing my Wee Dexta project.
Here is a video aprox 30 secs after the black smoke. Unfortunately I couldnt video myself starting her!
http://www.flickr.com/photos/skidancer/6882857383/
http://www.flickr.com/photos/skidancer/6882857383/