is it exhaust filter that u can renew ?
cant remember but im sure i changed one in there ?
Dexta 'Newbie' here... and a few questions
Re: Dexta 'Newbie' here... and a few questions
Some mornings I wake up grumpy, but most mornings I let her sleep in.
Re: Dexta 'Newbie' here... and a few questions
Hi Tom,
Yes the one to change is on the exhaust back into the casing. The intake into the pump just has a strainer.
Presumably when they designed it they thought more muck would get in from external equipment so the filter on the returning oil would catch it.
I washed out the casing today. I jacked the front of the tractor up in the air to get the muck to flow backwards into the final drive area and out the drain hole.
I 'chased' the last bit out of the casing with the air line.
Looking in through the axle filler cap there is still a fair bit of muck up the sides of the final drive area but I am not stripping that out now. I will put plenty of oil in it to slosh around and hopefully get the muck down to the bottom. I will then drain and filter the oil after a bit of running and see what I get out. I got the oil for the tractor today.....not cheap
All the cleaned internals are laid out in the shed ready to go back together when the o'rings turn up.
I also took the union, heater and spray nozzle out of the inlet manifold. With the nozzle out in the open and connected back onto the pipe it would just squirt out a thin single squirt rather than any sort of spray. I am not sure if it is the nozzle or the pump not supplying enough pressure. I will look into that.
The heater had obviously not been used in a long while. It came out covered in a black sooty / oily mess. Putting it over a good battery made it produce vast amounts of smoke, then caught light and then glowed and after 40 seconds was glowing surprisingly very bright orange / yellow hot..... so that works
I think it realy needs a re-wire to make things work again. I will also give it some lights, horn, indicators etc to go on the road.
My next job is to make up two big thin spanners to set the bearing preload and tighten the final drive pinion nuts together.
I have decided it needs its own dry shed when we move.
Lots to do.
Edit: I just found a question in another thread about changing the PTO seal. It looks easy enough to pull out the PTO bearing housing from the back.
That might give me an access hole to wash out the final drive area a bit better.
Can someone tell me if you can see the final drive pinion by looking up through the PTO hole?
I want to have a look at the teeth on the pinion without stripping it all down if I can as the pinion nuts were loose.
Rob
-
dexta roadless
- True Blue
- Posts: 153
- Joined: Sat May 16, 2009 9:50 pm
- Location: Norway
Re: Dexta 'Newbie' here... and a few questions
yes you can and if you have small hands you can reach in and try to dry out rest of tha muck. mine is unfortunately too big.Edit: I just found a question in another thread about changing the PTO seal. It looks easy enough to pull out the PTO bearing housing from the back.
That might give me an access hole to wash out the final drive area a bit better.
Can someone tell me if you can see the final drive pinion by looking up through the PTO hole?
I want to have a look at the teeth on the pinion without stripping it all down if I can as the pinion nuts were loose.
6o Dexta Roadless
62 Dexta
63 Super Dexta
75 Shilter UT
62 Aebi
62 Dexta
63 Super Dexta
75 Shilter UT
62 Aebi
Re: Dexta 'Newbie' here... and a few questions
Thanks for that.
I will strip it out after lunch and see what I can see.
Rob
I will strip it out after lunch and see what I can see.
Rob
Re: Dexta 'Newbie' here... and a few questions
Well, I stripped out the PTO shaft and washed around in the diff casing as much as I could.
The muck looked worse than it was. It looked like muck with grit and debris in it but the blobs of 'grit' turned out to be blobs of congealed greasy stuff that was not abrasive so happier that what is remaining should not do any harm.
I could not see the pinion from the back anly the crownwheel. There is not a load of backlash and the mesh runs smoothly so I will just sort out the pinion lock nuts and hope the pinion is ok.
I washed around all the back end and brake linkages with a screwdriver,toothbrush, paintbrush and a WD40 squirter filled with diesel. That loosened up and washed out most of the muck jammed around all the linkages. I then got the airline out and blew all around the back end to blow the diesel,grit and muck off.
I can now see the handbrake linkages properly and can get to lubricate them.
Edit: My clutch and brake linkages take a route around the footplate bolts and rub on them. If I move them the other side of the bolt heads they still don't seem right.
Can someone who has nice straight clutch and brake links take a similar picture?
I just noticed the clevis pin or arm on my clutch rod looks rather worn
Rob
Rob
Re: Dexta 'Newbie' here... and a few questions
Hi All,
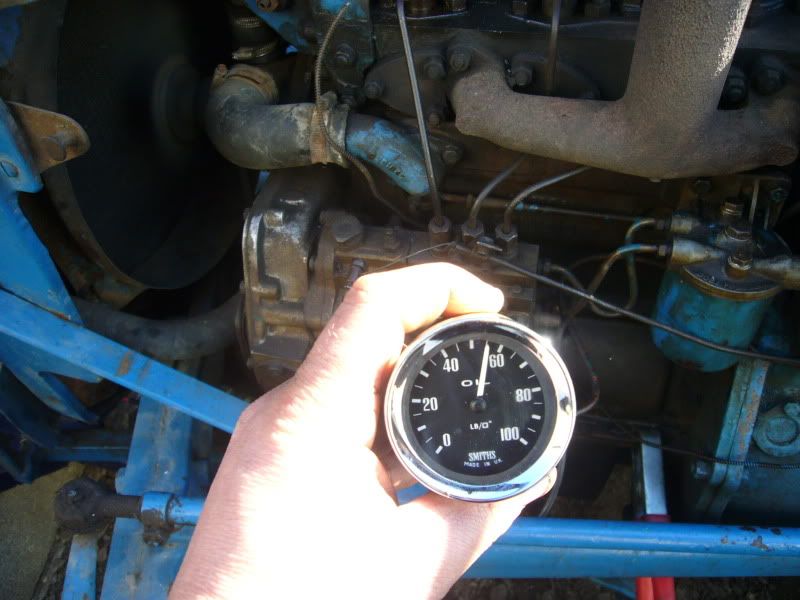
A good dry day again today so got the sump plate, strainer and new filter on the engine. Filled it up with oil and then cobbled together an oil pressure guage.
The wiring or switch for the heater does not work and it was turning over slowly so was a bit reluctant to start. At least that got the oil pressure up before starting it.
Oil pressure.... (note the jump lead on the block bypassing the duff battery lead which was some of the cause of making it turn over slowly)
I have a simple question..... Can someone tell me the length of the oil dipstick from the end upto the collar that rests on the block?
The collar on my dipstick is free to slide up and down so the engine has probably been running about 1"1/4 less oil than it should have had. I just poured in 8 litres including filling the filter.
Rob
Re: Dexta 'Newbie' here... and a few questions
Hey Rob,
Nice oil presssure!
Here's a link about the dipstick>..>>>
http://www.fordsontractorpages.nl/phpbb ... ick#p23464
Says 14cm there.
I'll see if ours are the same... later, if I get down to the shop.
Les
Nice oil presssure!
Here's a link about the dipstick>..>>>
http://www.fordsontractorpages.nl/phpbb ... ick#p23464
Says 14cm there.
I'll see if ours are the same... later, if I get down to the shop.
Les
Re: Dexta 'Newbie' here... and a few questions
Thanks Les. I was hoping for anything over 20 PSI so 55 PSI was much more than I imagined.Lesfen wrote:Hey Rob,
Nice oil presssure!
Here's a link about the dipstick>..>>>
http://www.fordsontractorpages.nl/phpbb ... ick#p23464
Says 14cm there.
I'll see if ours are the same... later, if I get down to the shop.
Les
The book says the pressure at normal running temperatures should be 40 PSI.
The engine was cold and the oil was maybe a bit thicker. The oil is new too so has not gone thin and nasty.
The book also says the pressure relief valve is set at 60 PSI. I think it must be set at 55 PSI on mine as the pressure zooms upto 55 PSI and then sits solidly at that pressure.
I have the top cover off the back end so the hydraulic pump was just pumping air so did not want to run the engine for long.
Rob
Re: Dexta 'Newbie' here... and a few questions
Rob,
On our '62 Super Dextas I measured 141mm and 142mm from the lip of the cap that rides on the sump to the max mark.
Both are 42mm from min. to max. marks with 7M and 6mm left on the tip and are stamped with the same part number.
Les
On our '62 Super Dextas I measured 141mm and 142mm from the lip of the cap that rides on the sump to the max mark.
Both are 42mm from min. to max. marks with 7M and 6mm left on the tip and are stamped with the same part number.
Les
Re: Dexta 'Newbie' here... and a few questions
Hi Les,Lesfen wrote:Rob,
On our '62 Super Dextas I measured 141mm and 142mm from the lip of the cap that rides on the sump to the max mark.
Both are 42mm from min. to max. marks with 7M and 6mm left on the tip and are stamped with the same part number.
Les
Thanks for that. I will measure mine when I remember to.
I have been re-wiring the dexta and getting all the electrical bits to work.
The new loom is laid out on the freezer in the shed. Tomorrow when there is some light I will fit it all up on the tractor and finish it off. Hopefully I will be able to have a startup with the heater and oil and dynamo lights working.
One question... on the wiring loom it shows a 'panel light'. I presume this in the back of the hour meter? I have left a lead currently about 4ft long ready for this lamp. I don't have an hour meter to look at so just presuming this is where it goes.
Rob
Re: Dexta 'Newbie' here... and a few questions
my hour meter has a bulb , comes on with side lights ect. ( only light on the tractor  )
)
so ur prob right .
so ur prob right .
Some mornings I wake up grumpy, but most mornings I let her sleep in.
Re: Dexta 'Newbie' here... and a few questions
+1tom lad wrote:my hour meter has a bulb , comes on with side lights ect. ( only light on the tractor
so ur prob right .
The bulb holder is the same as for the warning lights.
Bensdexta - 1961 working for a living!
Re: Dexta 'Newbie' here... and a few questions
Thanks for the replies,
I got all the re-wiring laid out on the side of the tractor and then taped together to get the loom 'shape'.
I then transfered this to the top of the freezer in the shed and then taped over and around the whole thing just like the original. That was with black tape and then I went over the whole thing again with blue tape. The loom is now on the tractor and everything works as it should.... except the hour meter light which I don't have.
I stripped out the battery / engine bulkhead, removed the remaining few patches of asbestos, cleaned it down, flattened out all its bends and dents and put it back in.
I stripped out the inlet manifold butterfly as I don't need that and filled the butterfly shaft hole in the manifold with a bolt, 'K' nut and split pin just to make sure the bolt would never end up going down inside.
With the wiring sorted out and no air filter fitted I could see the heater glowing and setting light to the diesel in the manifold... The spray nozzle is still not spraying properly.
It starts much more easily with some decent battery leads and connections. The starter spins it over far faster now.
I found a couple of oddities today that I was hoping someone could answer.....
On the injector pump there is a throttle lever about 4" long standing vertically between the pump and engine block. The top end is connected to the throttle via a horizontal link. The bottom end is connected to a shaft that runs right across the injector pump. How is it attached to this shaft? Is is rather loose and wobby and it would be a real pain if it were to fail and then require the pump to be removed to sort it out.
The other question is.... At the back of the sump looking upwards there are two small (maybe 1/4" or 5/16") holes, one either side....
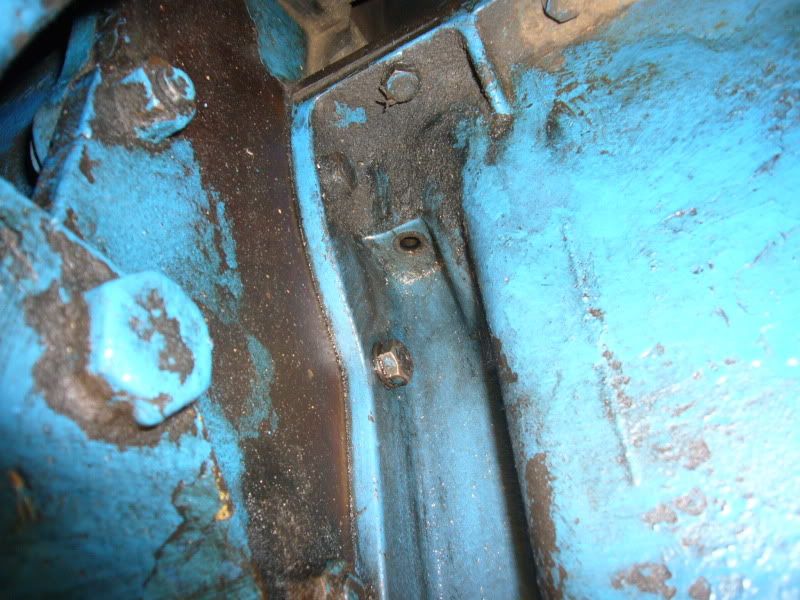
The engine breaths a little through these and leaks a bit of oil out of them too.
Should these have bolts in?
What are they holding on if they should have bolts in?
Rob
I got all the re-wiring laid out on the side of the tractor and then taped together to get the loom 'shape'.
I then transfered this to the top of the freezer in the shed and then taped over and around the whole thing just like the original. That was with black tape and then I went over the whole thing again with blue tape. The loom is now on the tractor and everything works as it should.... except the hour meter light which I don't have.
I stripped out the battery / engine bulkhead, removed the remaining few patches of asbestos, cleaned it down, flattened out all its bends and dents and put it back in.
I stripped out the inlet manifold butterfly as I don't need that and filled the butterfly shaft hole in the manifold with a bolt, 'K' nut and split pin just to make sure the bolt would never end up going down inside.
With the wiring sorted out and no air filter fitted I could see the heater glowing and setting light to the diesel in the manifold... The spray nozzle is still not spraying properly.
It starts much more easily with some decent battery leads and connections. The starter spins it over far faster now.
I found a couple of oddities today that I was hoping someone could answer.....
On the injector pump there is a throttle lever about 4" long standing vertically between the pump and engine block. The top end is connected to the throttle via a horizontal link. The bottom end is connected to a shaft that runs right across the injector pump. How is it attached to this shaft? Is is rather loose and wobby and it would be a real pain if it were to fail and then require the pump to be removed to sort it out.
The other question is.... At the back of the sump looking upwards there are two small (maybe 1/4" or 5/16") holes, one either side....
The engine breaths a little through these and leaks a bit of oil out of them too.
Should these have bolts in?
What are they holding on if they should have bolts in?
Rob
-
dexta roadless
- True Blue
- Posts: 153
- Joined: Sat May 16, 2009 9:50 pm
- Location: Norway
Re: Dexta 'Newbie' here... and a few questions
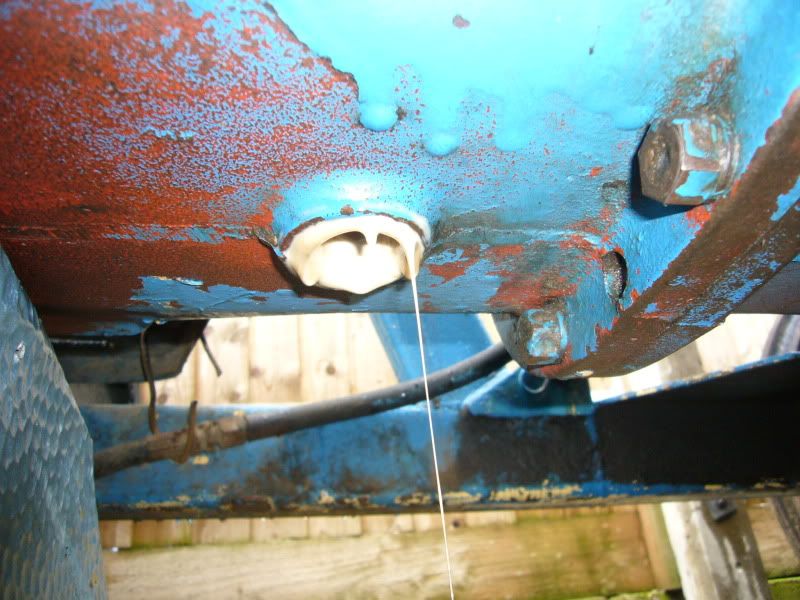
In these holes should there be 3/16 unc bolts helping holding the sump to the block. It is the same bolts wich are alongside the the side of the sump yet a little longer. I don't remember if these holes go all the way up in to the crankcase and therefor it is spitting oil out.
6o Dexta Roadless
62 Dexta
63 Super Dexta
75 Shilter UT
62 Aebi
62 Dexta
63 Super Dexta
75 Shilter UT
62 Aebi
Re: Dexta 'Newbie' here... and a few questions
Hi Dexta Roadless,dexta roadless wrote:In these holes should there be 3/16 unc bolts helping holding the sump to the block. It is the same bolts wich are alongside the the side of the sump yet a little longer. I don't remember if these holes go all the way up in to the crankcase and therefor it is spitting oil out.
I have been looking at pictures on Google and have found a few that show what I was looking for.
They do go up into the block like you say. The pictures seem to show them coming through outside the crank case just behind the crank / flywheel flange.
I think the breathing I saw is where I don't have a pipe on the rocker cover breather and that points in that general direction.
The oil does come out of these holes.
I have a plate sandwhiched between the bellhousing and engine that the loader picks up on. I think oil must be getting past the crank seal and then filling up behind this plate and then finding its way out through those bolt holes.
I will find some bolts... It is a bit worrying that I have found quite a few loose nuts and bolts all over the tractor.
Rob
Re: Dexta 'Newbie' here... and a few questions
hi
under ther bell housing / under fly wheel there should be a little hole / drilling , this is to let any oil leaks out of the bell housing area , the colour of oil gives clues as to weither it engine or backend oil .
easy for the hole to get blocked with muck , often has a split pin in it to rattle around and keep it clear.
give it a poke , mine leaks oil from the rear crank seal , another job for me , this leak will upset clutch and will need sorting .
tom
under ther bell housing / under fly wheel there should be a little hole / drilling , this is to let any oil leaks out of the bell housing area , the colour of oil gives clues as to weither it engine or backend oil .
easy for the hole to get blocked with muck , often has a split pin in it to rattle around and keep it clear.
give it a poke
tom
Some mornings I wake up grumpy, but most mornings I let her sleep in.
Re: Dexta 'Newbie' here... and a few questions
The whole back end, gearbox, belhousing and most of the engine are now de-crapped, poked and scraped and scrubbed with a toothbrush and diesel then blowing down with the air line and a final wipe over.tom lad wrote:hi
under ther bell housing / under fly wheel there should be a little hole / drilling , this is to let any oil leaks out of the bell housing area , the colour of oil gives clues as to weither it engine or backend oil .
easy for the hole to get blocked with muck , often has a split pin in it to rattle around and keep it clear.
give it a poke
tom
The process involved transfering all the muck from the tractor to my overalls, hair, ears etc and then having a bubbly bath and my clothes in the washing machine to remove the dirt. I also ended up with a big tray full of black oily diesely straw, muck, mud, stones and rubbish that I added some more straw to and then set light to.... that burnt realy well
Going over the tractor in such detail has found no end of things that I should sort out.
I am sure it will not stay that clean for long but my plan is to keep it pretty clean and not let it get to the state it was in.
I drained, well took the plug out, of the injector govenor today. No oil came out. The govenor works well enough so I have overfilled it tonight with some cheapo oil and will let that soak into things and will drain some out tomorrow, fire it up and then drain and change the oil for the proper stuff.
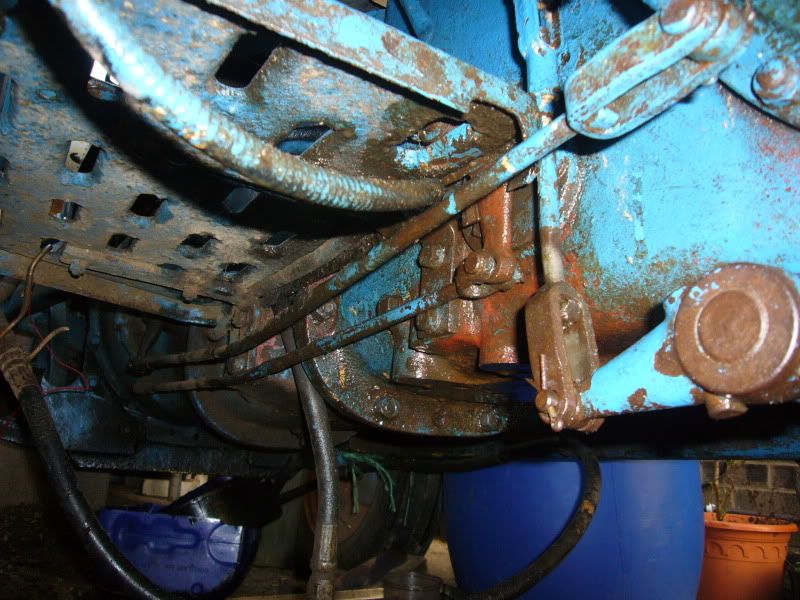
I have been out in the shed this evening putting the hydraulics controlling linkages back together.
Anoyingly the new pin I pressed into one of the arms is about 1/16" longer than the original and that is just enough for it to rub on one of the springs inside.
I will put the whole top cover inside a big bag and tape it up with just the arm poking out, take it outside, and grind off a 1/16th.
I don't want to have to undo a load of work just to sort that out.
Rob
Re: Dexta 'Newbie' here... and a few questions
Been out in the shed again working on it.
I bagged up the top cover and lift arms and trimmed 1/16" off the end of the little cam pin. That worked and saved me stripping it all down again just to trim that off.
All the linkages are back together with a turned up bush in between the two levers to replace the material lost to rust
The main cylinder and valves are back together..... anoyingly the Sparex main piston seal had a cut in the edge of it so I decided the old one was still pretty good and could go back in.
I measured up the main control valve and the ports in the sleeve in the main cyclinder. I then modeled up a cad model of the two parts so I could make the sleeve transparent on the computer and work out the opening and closing points of the ports.
That has given me movements on the control valve as....
--------------------------------------
Edit: I must have measured something wrong as I could not get the measurements to work once I hade reasembled it...
--------------------------------------
The check valve that goes in the front of the top cover gave me a few issues. It was a real sod to get out in the first place. It is designed to be a press fit according to the manual. I was tapping it back in using a bolt as an arbour. The fit was way too tight. i tried warming the top cover and putting the valve in the freezer. That made no difference realy and was still ludicrously tight. It went in about half way and then I got concerned about the valve breaking so wound it back out again with a draw bolt up the middle. I spun the valve slowly on the end of a bolt against some fine wet and dry paper on a perfectly flat plate with lots of oil and pressing it down flat with my thumb to keep it straight. Doing this I took off about 1/4 thou measuring with a micrometer as best as I could. After a wash down I tried it again, again with heat and cold. It was still far too tight. I took it out and repeated the process taking off 1/2 a thou in total. I then tried it at that again with heat and cold and it was still uncomfortably tight but did go in. The last 1/8" was pressed in using the plug that you can see on the outside. If the valve ever comes out again i will take a bit more off it.
It is a bit too late to be working on it now (1am) so off to bed...
Rob
Re: Dexta 'Newbie' here... and a few questions
Hi All,
Just been working on the pick up hitch today.
The old pin measures 1 inch diameter in the bit that had not worn. The working areas had worn down to about 7/8". The bore of the bracket and arm had worn out to very nearly 28mm. I got hold of a 28mm hand reamer and managed to wind that through the parts, by hand, to give me some fresh round holes at 28mm. I then turned up a new pin between centres on my lathe.
That came out fine...
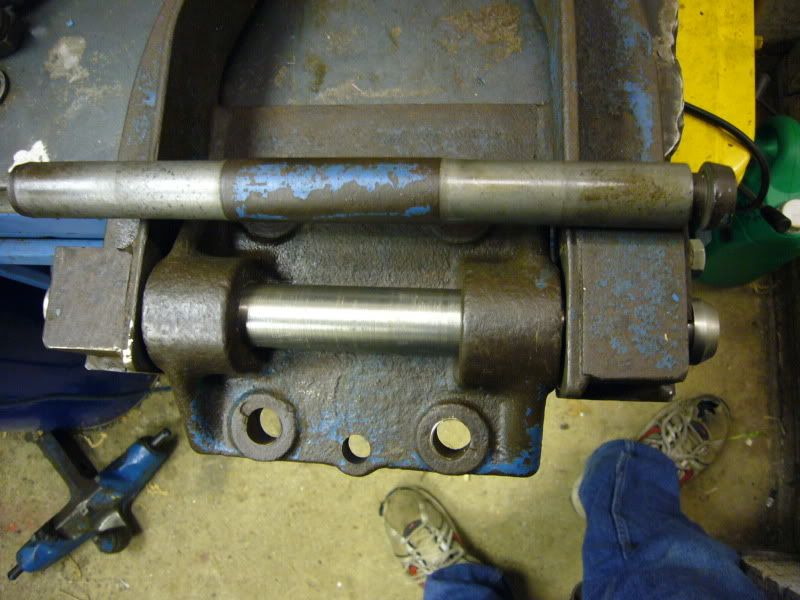
I am going to make some 1/16" thick washers to take out the wear on the side faces.
I did concider drilling the pin and putting grease nipples in the ends of the bar to lubricate the pin but decided the old pin had worked for maybe 50 years so the new one should be ok for a while.
I now need to sort out the holes at the other end
Rob
Just been working on the pick up hitch today.
The old pin measures 1 inch diameter in the bit that had not worn. The working areas had worn down to about 7/8". The bore of the bracket and arm had worn out to very nearly 28mm. I got hold of a 28mm hand reamer and managed to wind that through the parts, by hand, to give me some fresh round holes at 28mm. I then turned up a new pin between centres on my lathe.
That came out fine...
I am going to make some 1/16" thick washers to take out the wear on the side faces.
I did concider drilling the pin and putting grease nipples in the ends of the bar to lubricate the pin but decided the old pin had worked for maybe 50 years so the new one should be ok for a while.
I now need to sort out the holes at the other end
Rob
Re: Dexta 'Newbie' here... and a few questions
Hi All,
I drained the 'double cream' out of the gearbox today....
There were no horrid bits of grit or nasties just emulsified oil.
I need to build the tractor a small shed to keep it dry and keep the water off of it.
Rob
I drained the 'double cream' out of the gearbox today....
There were no horrid bits of grit or nasties just emulsified oil.
I need to build the tractor a small shed to keep it dry and keep the water off of it.
Rob
-
Dextrous
- True Blue
- Posts: 199
- Joined: Mon Jul 27, 2009 12:32 pm
- Location: West Yorkshire - Lancs border
Re: Dexta 'Newbie' here... and a few questions
Rob, do you have the list of O-rings you worked out? I'm thinking they are proababy all standard BS sizes, for example the newer dexta PTO lever O-ring is a BS114. If so I have a box of 30 different imperial O-rings from BS006 to BS327,from 7 to 20 of each.60dexta wrote:Hurrah... The log book returned in the post
I got the gaskets and seals from Malcolm Hipperson. They turned up on Friday.
The gaskets look ok but some of the o'rings just seem the wrong size. They are in a little bubble pack from Sparex so not something Malcolm has come up with. I don't know what the o'ring material is either so measured up all the o'ring recesses yesterday and using the Dowty catalogue worked out what seals should be used. Those are now on order. I don't want to be messing about stripping it all down again.
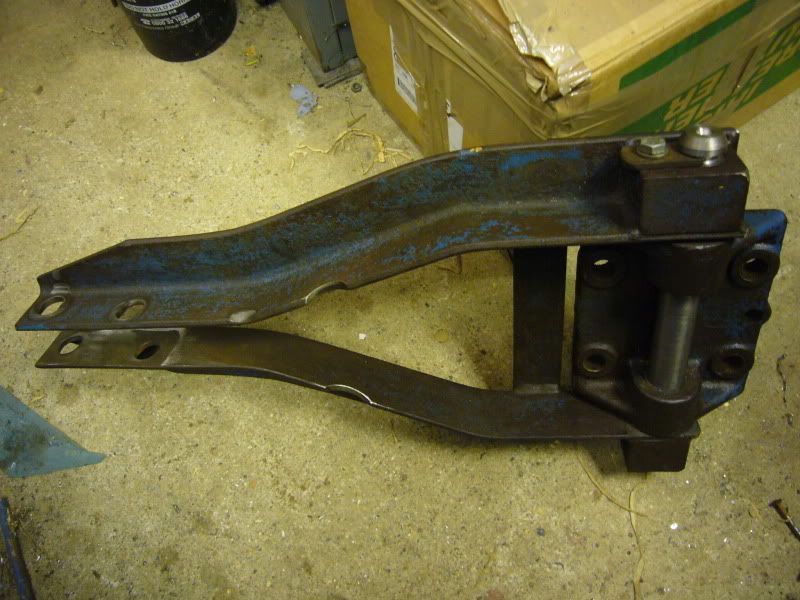
I removed the hydraulic exhaust filter yesterday. Glad I did... it is packed full of muck.
Todays job is to wash the gloop out of the casing.
Rob
EDIT - just checked out the 4 O-rings from the filter and castings part of the hydraulic assembly with four I forgot I had bought many moons ago at a show, one is BS112, another BS114 and one BS213. The smallest one of the four is similar to BS110 in outside diameter but a bit thinner. I guess I need to check them out against the ones in the tractor as there is no guarantee the ones in the kit are correct. Lid coming off very soon
Cheers
Andy