Super Dexta Rear Axle Bearing and Seals

This forum is about the Fordson Dexta, Super Dexta and Petrol Dexta.
Post Reply
Rocketsled
Not Quite Blue Yet
Posts: 22
Joined: Sun Jun 16, 2013 5:20 pm

Super Dexta Rear Axle Bearing and Seals

Post by Rocketsled »

As I have not been able to find a post with all the info and pics in one spot pertaining to Super Dexta Rear Axle Bearing and Seal replacement I figured I would start this one. Hope this cuts down on a lot of head scratching and searching for many of you.
Well this all started when I noticed oil discharge coming from the brake drums. Learned through this forum that it was most likely bad axle seals. Also explained why my brakes were working so poorly.
Followed the manual (which I got of ebay: http://www.ebay.com/itm/Fordson-Dexta-A ... 19d4b9acef) instructions for removing the axles. Took a lot of PB blaster, heat, and CAREFUL tapping with a sledge hammer to got the drum free from the hub assembly. Don't forget to back off the brake adjustment wheel so the shoes will not hang up on the drum. Remember just because the drum spins freely it still might hang up because there is probably a lip worn into the drum from years of use.

Once you've removed all the brake shoes and hardware it is now time to remove the nuts from behind the back plate and pull out the axles. I found it helpful to place a few nuts back on the studs just flush with the bolt tops and tap them with a hammer to break the axle free. Now you should be looking at the inner oil seal. As you can see mine is damaged from a bad bearing.
Image
Image
Now time to remove the bearing retaining nuts. I started using a large pipe wrench but it was messing up the nut so I decided to spend the $$ for a 2 3/4" (70mm) slogging hammer which I again found on ebay. Like this: http://www.ebay.com/itm/GEDORE-70MM-2-3 ... 3a8096200e
Although the nuts broke loose quite easily with the slogging hammer they seemed to bind up after a couple of revolutions. I found that the tops of my lock nuts had separated from the main body, wouldn't spin with the nut and therefore were preventing me from removing the nuts. I found it necessary to remove the "tops" with a pipe wrench before I could remove the nuts.
Image
Image
Image
Well, now I need a little help from you guys. I am trying to remove the bearings and outer seals now. The manual is not very clear hear as it talks about using a bunch of special tools that I just don't have. It seems that I should be able to "push" the axle through the bearing housing now but am not positive and afraid of damaging the threads for the retaining nut as it would force the bearing over them. I have a 20 ton press but don't want to force anything until I get some feedback. Here is a pic of what I am thinking of doing.
Image
So gentleman please help us all out here with ideas on the best way to get these bearings and seals out and the new ones in using normal shop tools. Thanks! :beer:
Last edited by Rocketsled on Sat Aug 31, 2013 5:01 pm, edited 2 times in total.

Rocketsled
Not Quite Blue Yet
Posts: 22
Joined: Sun Jun 16, 2013 5:20 pm

Re: Super Dexta Rear Axle Bearing and Seals

Post by Rocketsled »

Still trying to figure out this picture posting thing but I think you can see them all when you click any of the links. :scratchhead:

Tubal Cain
Site Expert Team
Site Expert Team
Posts: 418
Joined: Wed Apr 16, 2008 8:47 pm
Location: PEMBROKESHIRE WEST WALES

Re: Super Dexta Rear Axle Bearing and Seals

Post by Tubal Cain »

Hi,

To remove the bearings I used four lengths of stud bar screwed into the bearing cap, I made a flange to fit over the stud bars which was centraly bored so that the ram from my Sykes Picavant hydraulic puller could be used to draw the bearings off.

I found that the bearings took a lot of effort to remove.

I will ask Ben's Dexta to post a photo for me, as I'm hopeless at it.

Gerald

Bensdexta
True Blue
Posts: 2666
Joined: Mon Sep 15, 2008 12:59 pm
Location: N Wales

Re: Super Dexta Rear Axle Bearing and Seals

Post by Bensdexta »

Rocketsled wrote:Still trying to figure out this picture posting thing but I think you can see them all when you click any of the links. :scratchhead:
You've got too many Image

and your pics will come up when you preview/submit your post. :wink:

If you 'Quote' this post, you will see how the code looks!
eg
Image
Bensdexta - 1961 working for a living!

Rocketsled
Not Quite Blue Yet
Posts: 22
Joined: Sun Jun 16, 2013 5:20 pm

Re: Super Dexta Rear Axle Bearing and Seals

Post by Rocketsled »

Thanks again BensDexta! I think I got the pics figured now.
Thanks for the reply Gerald. Your fabrication sounds interesing...So did you draw the bearing over the threads (see pic)? That is really my main concern here. The manuals description almost makes me think it is threaded on. I pic would be worth a thousand words here. I know it is a bit of a pain having to use a third party to post but I am sure we would all greatly appreciate it!
Image

Rocketsled
Not Quite Blue Yet
Posts: 22
Joined: Sun Jun 16, 2013 5:20 pm

Re: Super Dexta Rear Axle Bearing and Seals

Post by Rocketsled »

Ok, so after a bit more searching I found this link:
http://www.fordsontractorpages.nl/manua ... r_axle.htm
This is a different manual than the one I have and as you can see it says to use a puller or press to remove the axle from the bearing retainer. I am off to put some pressure on it with my press. Wish me luck!

Tubal Cain
Site Expert Team
Site Expert Team
Posts: 418
Joined: Wed Apr 16, 2008 8:47 pm
Location: PEMBROKESHIRE WEST WALES

Re: Super Dexta Rear Axle Bearing and Seals

Post by Tubal Cain »

Thanks to Ben the photos showing my setup should be below.

Image

Image

As long as you ensure that the bearing is being pulled evenly you shouldn't have a problem with the threads, the diameter of which is slightly smaller than the bore of the bearing.

Gerald

Rocketsled
Not Quite Blue Yet
Posts: 22
Joined: Sun Jun 16, 2013 5:20 pm

Re: Super Dexta Rear Axle Bearing and Seals

Post by Rocketsled »

Wow Tubal Cain! Nice little setup. Wish you were around here so I could borrow your fabrication. Not exactly stuff I have in my garage. Worked at it a bit yesterday but running into an issue with hub clearance. Should be able to do something similar with the lengths of All Thread and my press. Thanks for the great idea! PS Saw one of your vids on YouTube. I commend you on your willingness to document your repairs for the benefit of others. We all appreciate it...and I agree that these older machines should be treated as priceless antiques. :clap:

Tubal Cain
Site Expert Team
Site Expert Team
Posts: 418
Joined: Wed Apr 16, 2008 8:47 pm
Location: PEMBROKESHIRE WEST WALES

Re: Super Dexta Rear Axle Bearing and Seals

Post by Tubal Cain »

Correction, I have never posted on You Tube, so it must be someone else using the same name!

Gerald

Rocketsled
Not Quite Blue Yet
Posts: 22
Joined: Sun Jun 16, 2013 5:20 pm

Re: Super Dexta Rear Axle Bearing and Seals

Post by Rocketsled »

Tubal Cain wrote:Correction, I have never posted on You Tube, so it must be someone else using the same name!

Gerald
Wow, must be a fellow "forger of all instruments of bronze and iron." Thanks for the help anyway! Thought it was odd that you didn't have an english accent... :mrgreen: Here is a link to the vid.
http://www.youtube.com/watch?v=C_Evq-KyL4o

Tubal Cain
Site Expert Team
Site Expert Team
Posts: 418
Joined: Wed Apr 16, 2008 8:47 pm
Location: PEMBROKESHIRE WEST WALES

Re: Super Dexta Rear Axle Bearing and Seals

Post by Tubal Cain »

An interesting and instructive set of videos, the same man has also made a number of videos demonstrating machine shop practice which I have found useful.

On the Dextas' the seal runs on the axle itself, so if you find the axle to be grooved in way of the seal you can buy repair sleeves. These are very thin stainless steel sleeves which are fitted over the worn area. I used one on the crankshaft pulley of my Dexta, together with a new seal and it has stopped the leak.

Gerald

Bensdexta
True Blue
Posts: 2666
Joined: Mon Sep 15, 2008 12:59 pm
Location: N Wales

Re: Super Dexta Rear Axle Bearing and Seals

Post by Bensdexta »

Tubal Cain wrote:On the Dextas' the seal runs on the axle itself, so if you find the axle to be grooved in way of the seal you can buy repair sleeves. These are very thin stainless steel sleeves which are fitted over the worn area. I used one on the crankshaft pulley of my Dexta, together with a new seal and it has stopped the leak.
Was that a Speedi Sleeve? Do you have to machine the shaft first to match the sleeve? Any probs installing the sleeve?

I'm wondering if I need one on my pto shaft, as it's still leaking after a new oil seal. :eyes:
Bensdexta - 1961 working for a living!

Rocketsled
Not Quite Blue Yet
Posts: 22
Joined: Sun Jun 16, 2013 5:20 pm

Re: Super Dexta Rear Axle Bearing and Seals

Post by Rocketsled »

I did run across the use of these "Speedi Sleeves" during my searches. I don't believe mine are worn enough to warrant it as it barely registers on my caliper. However, it does sound like many have used them with great success. I don't believe any machining is necessary as they offer different sizes for different applications. I do believe it is recommended to install the sleeve with Lock_Tight but just follow the directions. Here is a link to the NAPA site and part #:
http://www.napaonline.com/Catalog/Resul ... d3%26N%3d0
As you can see they are used for a lot of different things. Just double check that the part # matches the shaft size.
I replaced the seal on my PTO shaft already and I remember that the seal that I installed was wider than the one removed which would likely remedy the groove issue. I also remember there being quite a bit of space in the housing to move the seal forward or backward a little to avoid the grooved area. Worst case I am sure the right size "Speedy Sleeve" would remedy the problem. :D

Tubal Cain
Site Expert Team
Site Expert Team
Posts: 418
Joined: Wed Apr 16, 2008 8:47 pm
Location: PEMBROKESHIRE WEST WALES

Re: Super Dexta Rear Axle Bearing and Seals

Post by Tubal Cain »

Ben,

The correct PTO shaft seal is a double lip seal. If you are not careful when refitting the seal, the inner lip can be distorted as you push the seal housing along the shaft. I have found this to be the case on a number of occasions.

This may possibly be the reason why your seal is leaking.

To avoid this problem I use a short lenght of thin walled pipe which can just slide over the shaft. After fitting the new seals in the housing, making sure that there are no burrs or sharp edges on the pipe, apply some oil to the pipe and carefully slide it into the housing then slide the pipe and housing in place over the shaft. Once the housing is bolted in place carefully remove the pipe.

Gerald

Bensdexta
True Blue
Posts: 2666
Joined: Mon Sep 15, 2008 12:59 pm
Location: N Wales

Re: PTO Shaft Rear Seal

Post by Bensdexta »

Tubal Cain wrote:The correct PTO shaft seal is a double lip seal. If you are not careful when refitting the seal, the inner lip can be distorted as you push the seal housing along the shaft. I have found this to be the case on a number of occasions.

This may possibly be the reason why your seal is leaking.

To avoid this problem I use a short lenght of thin walled pipe which can just slide over the shaft. After fitting the new seals in the housing, making sure that there are no burrs or sharp edges on the pipe, apply some oil to the pipe and carefully slide it into the housing then slide the pipe and housing in place over the shaft. Once the housing is bolted in place carefully remove the pipe.
Gerald, many thanks for the tip. :beer:
Bensdexta - 1961 working for a living!

tom lad
True Blue
Posts: 447
Joined: Tue Oct 05, 2010 2:53 pm
Location: Preston, Lancashire. UK.

Re: Super Dexta Rear Axle Bearing and Seals

Post by tom lad »

had pto leak problems on one of my fergies
there was a grove on the collar on the shaft , new seal still leaked , Patrick ( a good man ) at fergieland new all about it and sold me new wear collar . prob solved .

I knew the grove was there but chose to ignore it and had to do the job twice . :buddies:

so a rubber / leather seal can wear into a steel collar .odd but it does .
Some mornings I wake up grumpy, but most mornings I let her sleep in.

Rocketsled
Not Quite Blue Yet
Posts: 22
Joined: Sun Jun 16, 2013 5:20 pm

Re: Super Dexta Rear Axle Bearing and Seals

Post by Rocketsled »

tom lad wrote:had pto leak problems on one of my fergies
there was a grove on the collar on the shaft , new seal still leaked , Patrick ( a good man ) at fergieland new all about it and sold me new wear collar . prob solved .

I knew the grove was there but chose to ignore it and had to do the job twice . :buddies:

so a rubber / leather seal can wear into a steel collar .odd but it does .
I suspect it isn't the rubber/leather seal wearing a grove in the shaft but the dirt/debris/oxidation buildup being trapped there. Of course in my case the failing bearing allowed the shaft to start eating into the seal spring and case. Fortunately the axle shaft is hardened steel and I caught it in time.

Going out to get me some 7/16" x14tpi all thread and nuts today so I can finally pull these bearings...just hope my new bearings and seals show up today. It has been over a week now that I ordered them from Yesterdays Tractor. Never the quickest but at least they can get the parts I need at a reasonable price.

Any one got advice/tips on installing the new bearings and seals? I will be using my press that you can see in the pics. Mainly concerned about damaging the cup. Was thinking of just using a socket. :shock:

Rocketsled
Not Quite Blue Yet
Posts: 22
Joined: Sun Jun 16, 2013 5:20 pm

Re: Super Dexta Rear Axle Bearing and Seals

Post by Rocketsled »

Hay guys! Pun intended... sorry it has been so long since my last update/installment but I am happy to report that I have been busy getting my hay down. I had a chance this morning to show how I managed to finish this task. Here you go...

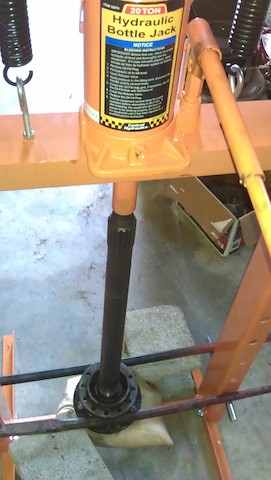
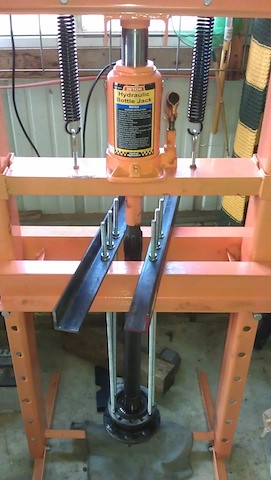
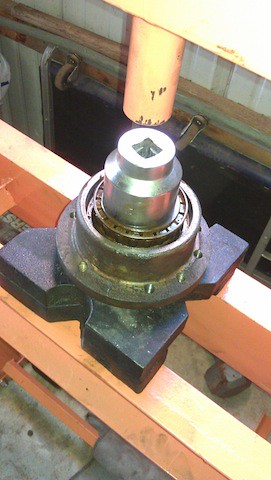
To remove the bearing using my 20 ton press I got 6 3' pieces of 7/16 x 14tpi (matches bolt holes in bearing retainer) all thread from Fastenal. 4 may have worked but went with 6 to be on the safe side. Also got matching flange nuts from them for the press side. Wanted to avoid drilling holes in my press plate so I found some 1/4" thick angle iron, cut of two 2' pieces and drilled 3 holes in each. These hole match up with the opposing side bolt holes in the bearing retainer. Used a couple of pieces of 4x4 post as a base to set the axle on. Doesn't really matter what you use here as long as they are exactly the same dimension (to keep the bearing level when placing your all thread nuts). Once I was sure the assembly was level and in line with my press ram I installed the nuts onto the all thread just finger tight for all 6 being careful not to lift the assembly. Now remove the spacers supporting the assembly so it should now be suspended by the all thread. It is worth mentioning you should be doing all of this with the nuts replaced on the wheel studs to protect the threads but I also recommend having a pillow or something below the assembly to "catch" the axle when it comes free from the bearing retainer. Now you're ready to press!
Image
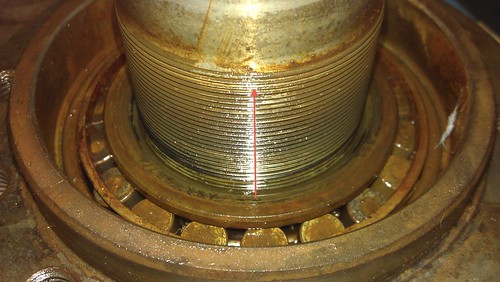
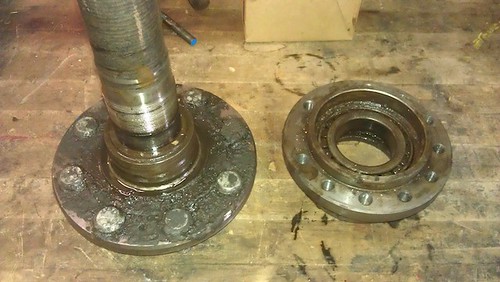
One of the bearings took a lot more pressure before it broke free. Was really starting to make me worry but it finally went POP and came away cleanly. These things are really on there! Clean off old bearings and put somewhere safe as you will use these to press out the old cups.
Image
Image
Image

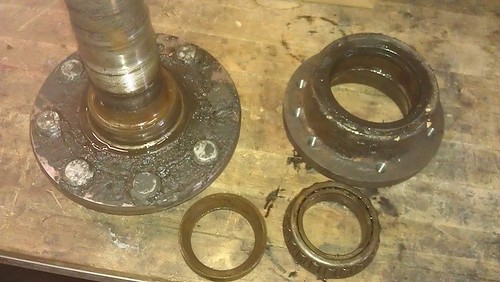
Next, clamp the retainers in a vice and "punch" out the old seals with a hammer and chisel..or whatever you have. Just be sure not to damage the retainer.

Now that old seals and the bearings are removed it is time to remove the bearing cups. Back at the press, flip the retainer over and use the bearings you just removed to press out the old cups. I used a large socket on top of the bearings to allow my ram to make contact. Once removed, clean off the old cups and put them somewhere they won't get damaged as you will use these to press in the new cups later.
Image
Image

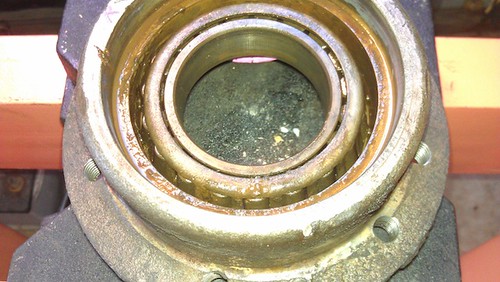
With the old cups removed it is time to prep them for pressing in the new cups and seals. First do a thorough clean up the retainers to be sure there is no small particles of dirt or other abrasive debris that may score the lands when pressing in the new seals/bearings. Then lube the retainer with grease to reduce friction and allow the seals to press in smoothly and evenly. Now using the old clean and undamaged cups (fat side down) with a steel plate on top, press in the new cups. Be sure that you do this slowly and carefully to be sure the cup is being pressed evenly. Keep pressing until cup is fully seated...you will feel a slight change in pressure/resistance. Before going to next step, turn over retainer and double check that the cup is fully seated against retainer.
Image

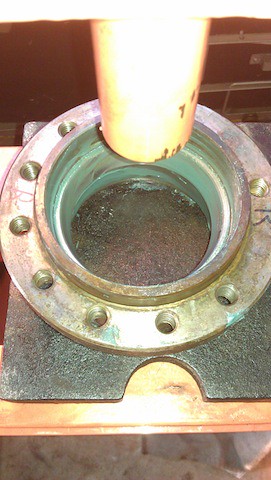
With the cups installed it is time to press in the new seals. Again pre lube the seal and retainer with grease. Remember that these seals are fragile and easy to damage if not perfectly centered and level before pressing. I find I have good success hand centering first by rotating the seal as I put light pressure on it. Now CAREFULLY press it in until fully seated. I again used the old cups (fat side down) and a plate to accomplish this.
Image
Image

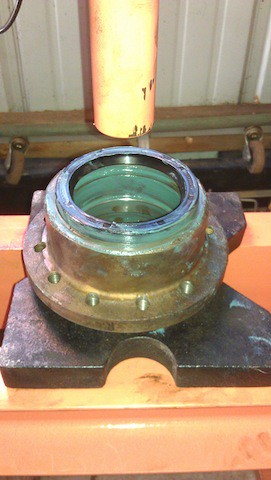
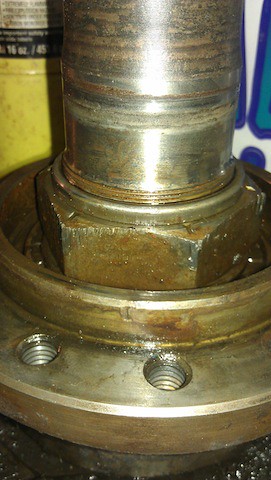
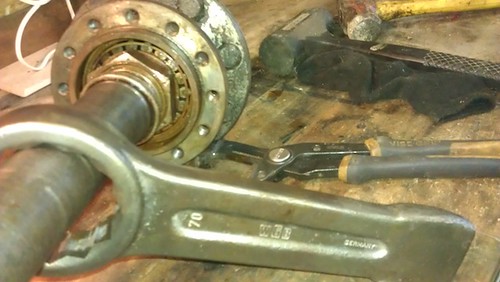
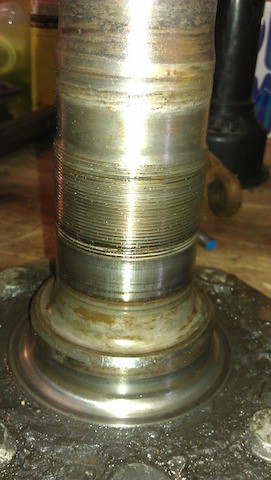
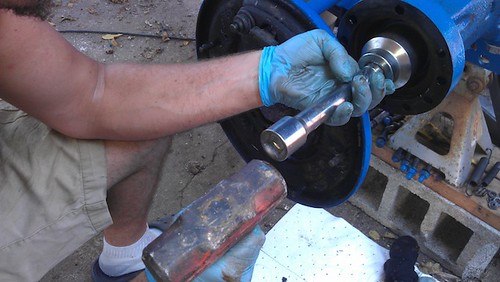
Now time for the biggie! I was concerned about getting an even start for the axle bearing and decided I would try to get an even start by driving it on with the axle nut. Again I lubed everything with grease and simply placed axle on my workbench. Carefully lower the retainer down over the axle and as soon as you feel the seal make contact with the axle start rotating the retainer as you keep lowering it until it bottoms out against the seat. Spinning it as you lower it will reduce the chance of damaging the seal as it passes over the threads and axle face. Now fully pack the retainer and bearing with proper grease and carefully lower the bearing until it rests EVENLY on the axle. Now take the lubed axle nut and thread it on by hand until it makes contact with the bearing face. Double check that the nut is contacting the bearing evenly all around and then begin driving the bearing onto the axle by tightening the axle nut. I accomplished this by using my slogging wrench to tighten the nut. As soon as you're confident the bearing is being driven on evenly you can now finish driving on the bearing with a press. I found that it was going on easy enough with the nut and so I just trapped the axle in my vise and was able to continue driving the bearing on with the nut and slogging wrench by hand. Because I was wrenching it on by hand it was very obvious when the bearing finally bottomed out against the seat. Not having a proper torque wrench for a job this size, I simply gave my slogging hammer a few good "taps" with a small 3lb. sledge. These nuts should be torqued 230-250ft/lbs..


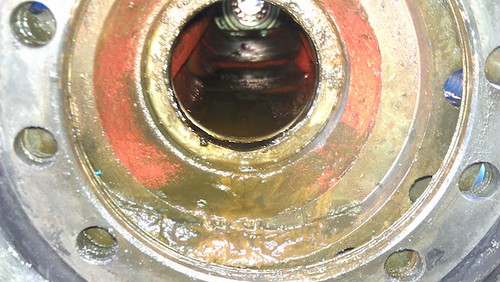
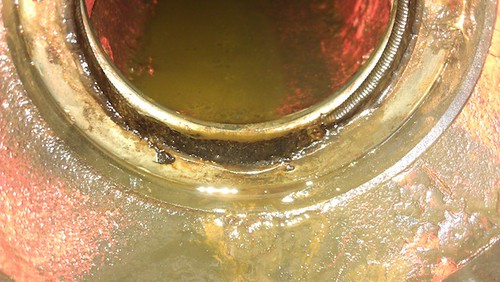
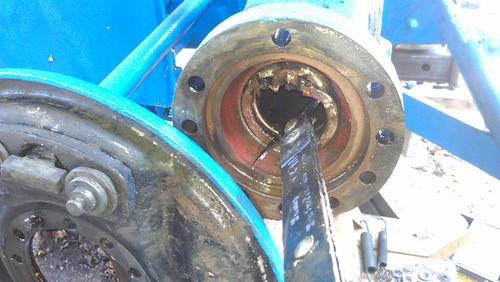
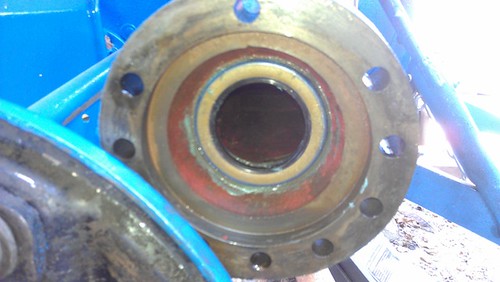
Sweet! Now time to put the new inner seals in the axle housings. First to remove the old ones with a seal puller. Mine were fairly corroded and I found it necessary to "weaken" the seal body with a small wood chisel and peel the seal away from the axle. If you find this necessary as well I would recommend working the top of the seal in case you accidentally strike the seal land and score it. This way any damage done is at least towards the top of the seat/seal and unlikely to see any oil any how. With the old seals removed I could see some old dirty looking oil that had been sitting in the axle body and decided to remove it by making a giant swab out of socks zip tied to a pole. This worked well. Just be careful not to push and dirt into the inner drive splines. Now do a final cleanup to the inner seal seat and pre lube it. Now lube the seal and center it by hand. Once centered, drive the new seal in until it bottoms out against the seat. I used a small sledge and large socket to tap it in being sure it went in evenly and not to damage the seal body.
Image
Image
Image
Image


Now time to reinstall the axles! Be sure there is still plenty of grease on the axle assembly and the inner seal and splines to reduce any possibility of damaging the seal as you insert the axle. I found it helpful to have all the retainer studs already evenly inserted into the retainer save one. The one odd stud should be holding the shims and backing plate in place on top of the axle housing. Now slowly and carefully insert the axle into the housing being sure to fully support the axle and not let it "ride" on your new inner seal. I was able to do this myself but I can see this being a two person job. Whatever it takes not to damage that new seal! You may find it necessary to slightly rotate the axle one way or another to line up the splines but it should go fairly easily. The axle will support itself once the retainer studs enter the housing holes. Now you will have to draw the axle in the rest of the way using 10 nuts on the retainer studs. Just be sure to use the "star" method (as you do mounting wheel studs) to draw it in evenly. These nuts should be torqued 40-45ft/lbs.

Now cleanup your brake assembly/drums and reinstall with new brake linings. Remount your wheels, top off your differential fluid, adjust brakes and you're done! Congrats and enjoy being able to stop your tractor now! :clap:
Image
:beer:

Rocketsled
Not Quite Blue Yet
Posts: 22
Joined: Sun Jun 16, 2013 5:20 pm

Re: Super Dexta Rear Axle Bearing and Seals

Post by Rocketsled »

Happy to report that I have logged almost 50 hrs since rebuild and no leaks. Most of that was cutting and baling 50acres of field. Definitely worked the old girl hard and she took it like a champ. Can't tell you how nice it is to have brakes again! Thanks again to all of those who helped me with their input. Cheers! :beer:
Visit us at www.oursweetwaterfarm.com to check out our blog and some more pics.
Image

Cvans
True Blue
Posts: 157
Joined: Fri Apr 20, 2012 12:46 am
Location: South Dakota, USA

Re: Super Dexta Rear Axle Bearing and Seals

Post by Cvans »

I have this job looking me in the face but it's going to wait till spring. Think both sides will get done at the same time. Want to thank you for the information and photos you and others posted. Should make the job a lot easier.
Enjoy your tractor.
Chris

Post Reply