Hi Guys
I need to replace the bushes of the "Lift Cross Shaft" of my S/Dexta. Please can someone help me. I am fortunate to have a spare lift cover assembly which I have slowly disassembled as a practice round before I touch the one on my S/D. The manual tells you to remove the arms which I have done, then to remove the two bushes and then the cross shaft will come away. There appears to be a bit of a lip on the outside of one bush but not the other, maybe worn down.
Look forward to any responses.
Kind regards
Mervyn
Lift cross shaft bushes
-
Mervyn Spencer
- True Blue
- Posts: 831
- Joined: Wed Apr 16, 2008 3:34 pm
- Location: South Africa
-
Mervyn Spencer
- True Blue
- Posts: 831
- Joined: Wed Apr 16, 2008 3:34 pm
- Location: South Africa
Hi Ben
Thanks for your response, I wondered how many people would gather what I was referring to. For those who have the Fordson Dexta workshop manual section 8, page 4, fig 5, labelled "Hydraulic Lift Cylinder Assembly, Linkage and Lift Arms". In the illustration it is the part numbered 68 Lift Cross-Shaft Bushing. I did take some pics but still have to try and upload to photobucket. Whilst looking at the illustration I noticed that the Ram piston shows only one rubber ring, where as mine has two rubber rings.
Will try and get those pics on asap.
Kind regards
Mervyn
-
Mervyn Spencer
- True Blue
- Posts: 831
- Joined: Wed Apr 16, 2008 3:34 pm
- Location: South Africa
-
Mervyn Spencer
- True Blue
- Posts: 831
- Joined: Wed Apr 16, 2008 3:34 pm
- Location: South Africa
Hi Terry
Thanks for your offer. I received a PM from Ben a couple of minutes before I received your post asking me to email him the pics which I have just done. He is going to send me the links so I can then try and post them. Maybe it might be easier for him to post them straight onto the board as I may still have a problem. I will however still email them off to you Terry. Thanks again for offering I was ready to smash my pc with a hammer.
Kind regards
Mervyn


Mervyn, do the bushings stick out past the lift cover? I can't tell by looking at the picture. If they do no protrude, I am not sure how you would remove them. You might be able to drive the "ram lift arm" (part number 34-A) against the bush to get them started out. I would be sure and have the replacements on hand first.
Terry
Terry
--
1964 Fordson Super Dexta
1964 Fordson Super Dexta
-
Mervyn Spencer
- True Blue
- Posts: 831
- Joined: Wed Apr 16, 2008 3:34 pm
- Location: South Africa
Hi Ben and Terry
You gentlemen are really on the ball thanks alot.
On the exploded diagram fig 5 above, you will notice item 66
which is the cross shaft and 68 are two bushes that keep
item 66 snug. On my S/D that I am restoring those bushes are worn and my question is how do we get the damn things out.
As I mentioned in my first post the manual tells you that the bushes need to be removed before the cross shaft can be removed.
Hope that all makes sense. Here goes.
Thanks again Ben and Terry
Best regards
Mervyn
Last edited by Mervyn Spencer on Mon Jan 12, 2009 11:09 pm, edited 1 time in total.
A thought came to me. Can you drive them through, past the ram lift arm and out the other side. What I am trying to say, use something to drive one bush through the ram lift arm, into (against) the other bush and out the cover. A piece of pipe the same size as the bush might work as a driver. I am not sure any of this is at all possible, just a thought.
Terry
Terry
--
1964 Fordson Super Dexta
1964 Fordson Super Dexta
-
Mervyn Spencer
- True Blue
- Posts: 831
- Joined: Wed Apr 16, 2008 3:34 pm
- Location: South Africa
Hi Guys
I've been trying to remove the duplicate that I posted as it was making the page very wide, and I myself get quite geed up when you have to scroll back and forth. Please can one of the big five remove my "Mervyn wrote etc." just to tidy it up.
Back to your question Terry, not really asyou don't have much space between the ram lift arm and side. The other point is that the ram lift arm looks like it is on a spline, unless I am not understanding you well Terry. My feeling is that the ram lift arm maybe rusted onto the shaft and needs some encouragement.
A point I must remind you on is this cover/top was laying out in the weather and is rusted. The bushes of the cover/top in the pics are good compared to those on the tractor I am restoring. I did consider transferring all the linkages and valves from the one to the other.
I will work on it again this weekend and see what I can make of it.
Thanks for the ideas and input.
Mervyn
-
Mike Kuscher
- Site Governance Team

- Posts: 306
- Joined: Wed Apr 16, 2008 10:18 am
- Location: Worcestershire, England
Hi Mervyn,
None of the 'Big Five' were available, so the 'Little One' has done what you asked.
Now a thought...
Looking at the exploded diagram, the shaft has a larger diameter spline in the centre than at the two ends so you can't pass the shaft through the bushes. Therefore, in assembly, the order must be;
Place Item 67 in position, pass shaft through the casting and item 67, then drive the bushes into the casting bores over the shaft.
To dismantle, you've somehow got to reverse this order, but how?
Do you have an internal cut-away view of the casting?
What I'm wondering is, do the bushes just get driven in until they are 'flush' with the outside of the casting or do they drive in until they 'bottom out' against a shoulder?
I'm guessing no shoulder and, if this is the case, there's goining to be need for a lot of repetative heating the casting and item 67 (blowtorch) then cooling the shaft (cans of pipe freeze). This should eventually break through the corrosion 'seal'. The you are going to have to use a heavy copper mallet or a 'fly press' with a copper pad to gradually force the shaft to use the larger splined diameter, in the centre, to become its own 'drift' against the bushes as it comes out of item 67.
Heat, cooling, press with a copper pad or heavy copper mallet. Continued force without violence is what's needed to avoid damage.
Alternative thought. How big, deep and good is the thread in the ends of the shaft?
Once you've used the heat, cool and maybe a few gallon of penatrating oil, screw a length of high tensile 'all thread' into the shaft. Make a substancial 'collar' from a piece of steel with a clearance hole drilled for the 'all thread'. Find some pipe, or a couple of pieces of steel, to use as a spacer between the end face of the casting and your 'collar'. Get a good 'meaty' ring spanner and use the assembly to pull the shaft through the one side, bringing the bush with it. Then tackle the other side.
Whatever, it's clear you've got to rely on the larger diameter centre spline to remove each outer bush.
Hope it works.
Mike
-
Mervyn Spencer
- True Blue
- Posts: 831
- Joined: Wed Apr 16, 2008 3:34 pm
- Location: South Africa
Good morning Mike
Remember there is a place on earth for everybody big and small so thank you very much for fixing my botch up, I really appreciate what you did.
On the main topic thanks for those suggestions, I will study them this evening and see if any of them are suitable. Going to take lots and lots of patience, got to keep .
.
Until next time cheers
Mervyn
Remember there is a place on earth for everybody big and small so thank you very much for fixing my botch up, I really appreciate what you did.
On the main topic thanks for those suggestions, I will study them this evening and see if any of them are suitable. Going to take lots and lots of patience, got to keep
Until next time cheers
Mervyn
-
Meanderer
- True Blue
- Posts: 163
- Joined: Wed Apr 16, 2008 12:46 pm
- Location: Elora Ontario, Canada (transplanted from Crookwell, NSW, Australia)
G'day Mervyn,
The parts image earlier in the thread doesn't tell the full story I don't think. Below is the appropriate part from my parts manual.
Please make note of item 50. It's a thrust washer. You can see it in your photo.
I agree with most of what Mike has said. I'd approach in a direction where I was pushing from the same side as the thrust washer is located. Otherwise, the washer will prbably prevent the shoulder of the spline to push against the Bush. Nor will it damage the bush. So whatever heat and penetrene you need is up to you but my point is that you need to go in that direction.
Looking at it's condition, I'm fairly sure you'd need a press to get it out.
Good luck with it.
(Maybe young Dave Warner can knock it out with his willow? He can knock six stitchers out of the cricket ground!!! )
Regards,
Rick
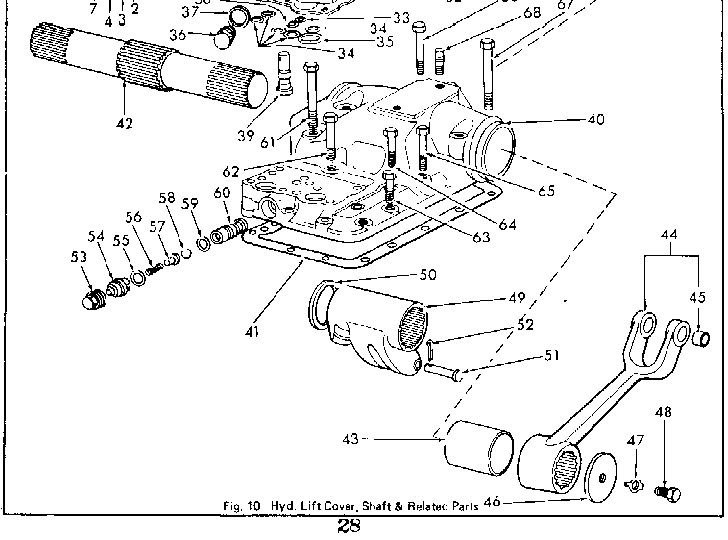
'
Regards,
Rick
Regards,
Rick
-
Mervyn Spencer
- True Blue
- Posts: 831
- Joined: Wed Apr 16, 2008 3:34 pm
- Location: South Africa
Hi Gentlemen
Thanks again for your good responses. Rick's illistration is 100% correct. I had a look at both my spare tops this evening and if my mind serves me correctly the thrust washer is on the right side of the ram lift arm, about 2mm thick. I noticed that the bush is flush with the outside of the cast, and protrudes also about 1.5 mm into the inside of the cast.
Unfortunately I don't have any heating equipment so Thats out of the question. I think my best bet is to take the top etc to a pal of mine who has a press and ask him to see what he can do.
Until next time, cheers.
Mervyn
-
Tubal Cain
- Site Expert Team

- Posts: 418
- Joined: Wed Apr 16, 2008 8:47 pm
- Location: PEMBROKESHIRE WEST WALES
Mervyn,
Just to cheer you up, I've had a cross shaft in the hydraulic press with a load of 10 tons for several weeks and it hasn't budged. I'm pretty certain that it is the rocker that is seized in way of the splines to the shaft.
Prior to that I applied heat to try and free it, but it is a large lump to heat.
On a previous occasion, on another cover, I managed to press the shaft out without removing the bushe, it came out with the shaft. Although the splines on the shaft did damage the bush somewhat.
Gerald
-
Mervyn Spencer
- True Blue
- Posts: 831
- Joined: Wed Apr 16, 2008 3:34 pm
- Location: South Africa
Hi Gerald
Wow now that is not good news. Thanks all the same though for your input. I am surprised you eventually got the spline for the arm through the bushes. Like a women giving birth to an elephant. Gerald, please can you indicate whether the two tops that you worked on were freshly off the tractor or spare tops that had been weathed. The reason I ask is that my two tops that I am referring too have spent many years in the weather. I have not removed the working top which I hope might be easier as it would have been continuously splased with oil and rust.
Brian, where are you, maybe you can throw some light on this topic? There must be a simple solution that ford came up with.
Looks like we are still a long way from a solution.
Regards
Mervyn
-
Tubal Cain
- Site Expert Team
- Posts: 418
- Joined: Wed Apr 16, 2008 8:47 pm
- Location: PEMBROKESHIRE WEST WALES
Hi Mervyn,
I think you may have misunderstood me, the cross shaft moved until the splines contacted the bush, forcing the bush out with the shaft.
The two covers that I worked on had both been removed from tractors prior to me working on them. My bench press is rated at ten tons and it takes all of my 16 stone on the end of the pump handle to apply that loading. If you have access to a larger press you may well find that the shaft will move, probably with a bang.
If you can get it to move a little bit then I find that working it backwards and forwards and applying plenty of WD40 or releasoil helps to free it off.
The moral here is never assemble components dry a coating of grease of Copaslip will usually ensure that they will come apart at a later date!
Gerald
-
Mervyn Spencer
- True Blue
- Posts: 831
- Joined: Wed Apr 16, 2008 3:34 pm
- Location: South Africa

Mervyn,
You are getting all the answers without me! It was only a few that really stick when I was working on them but remember that was in the 1960's, there has been a lot of damp, fertilizer etc. in there in the last 45 years
Heat and press on the centre splined rocker on the shaft is going to be the best. Problem is, you do not want to damage anything.
Fordson Tractor Pages, now officially linked to: Fordson Tractor Club of Australia, Ford and Fordson Association and Blue Force.
Brian
Brian
-
Mervyn Spencer
- True Blue
- Posts: 831
- Joined: Wed Apr 16, 2008 3:34 pm
- Location: South Africa
Hello Brian
Thanks a lot for your input and I really appreciate you sparing a moment of your busy time to respond. I would also like to thank the other members that gave their views on the subject. The fact remains that it is not going to be an easy task.
Brian you mention fertiliser and moisture, this ol' dear of mine was used to cart pig muck from the sty.
Until next time cheers.
Mervyn
if you can work out a way of shipping - although i suspect it would be prohibitive- i have a spare top inc lift arms but missing some of the hydraulic rods etc which you are welcome to or indeed any bits if i can remove them. Like you i dont have any heavy gear and limited tools though - not to mention a distinct lack of mechanical training!!
Mike
-
Mervyn Spencer
- True Blue
- Posts: 831
- Joined: Wed Apr 16, 2008 3:34 pm
- Location: South Africa
Mike thanks ever so much for the thought - yes it would be very very expensive to ship those parts across to me due to there weight.
I actually have two hydraulic lift tops at home of which both have less wear than the one on the tractor. Fortunately my tractor is not a working tractor but a toy, so there is no urgency to get it done soon. I may have mentioned it in one of my previous post that if all fails, I could transfer all the bits and pieces from the top that is on the tractor to the better one of the two tops, and hope it works.
Thanks again for your offer Mike, Bless you.
Kind regards
Mervyn
-
Mervyn Spencer
- True Blue
- Posts: 831
- Joined: Wed Apr 16, 2008 3:34 pm
- Location: South Africa
Re: Lift cross shaft bushes
Three years have gone by and my problem of removing those damn bushes still remains . I took my three hyd.tops to our local New Holland lads some three months ago expecting them to be able to make up one good top. Well I was rather disappointed when they told me they would have to cut the rocker to get the shaft out so all they did was to fit new o rings and piston ring.  . Would oil splash/seep out between the crossshaft and top if the bushes were not replaced?
Mervyn
Mervyn
-
justjamiefarming
- True Blue
- Posts: 78
- Joined: Sun Jul 18, 2010 1:10 pm
- Location: United Kingdom
Re: Lift cross shaft bushes
Mervyn,Mervyn Spencer wrote:Three years have gone by and my problem of removing those damn bushes still remains
Mervyn
We did this excercise on a '61 Dexta last year but my memory is not as strong as it was.
The assembly will only dismantle from one side.
Remove lift arms
Apply some heat to the Arm (66) but not too much, and then quench. This will break the rust seal.
The Shaft needs to be pressed out from the side to push it AWAY from the thrust washer.
Take lift top to A hydraulic press, stand vertical and press shaft out/away from thrust washer.
Ours took 48 tonnes of pressure and then moved with a bang.
The shaft will push out the bush on that side.
The other side bush, I gently cut out with oxy/acetylene. (Not pretty as bushes are phosphor bronze).
Job Done
Best Regards, Jamie.
It was like that when I found it.... & I wish I had left it alone!