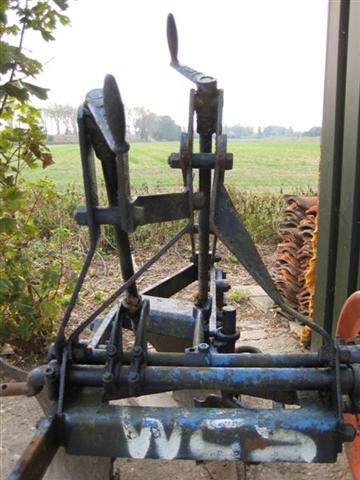
Started on the rebuild of my plough. It’s a EP J or G model. Don’t know the difference.
The upper structure and the depth wheel construction were in bad shape. The width control was stuck and the disc bearings were all worn.
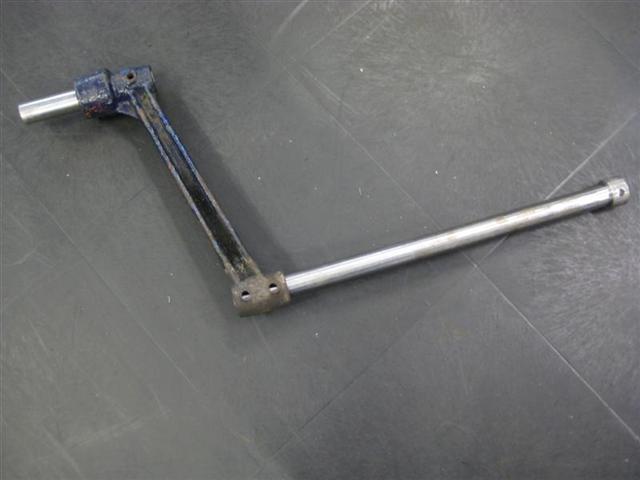
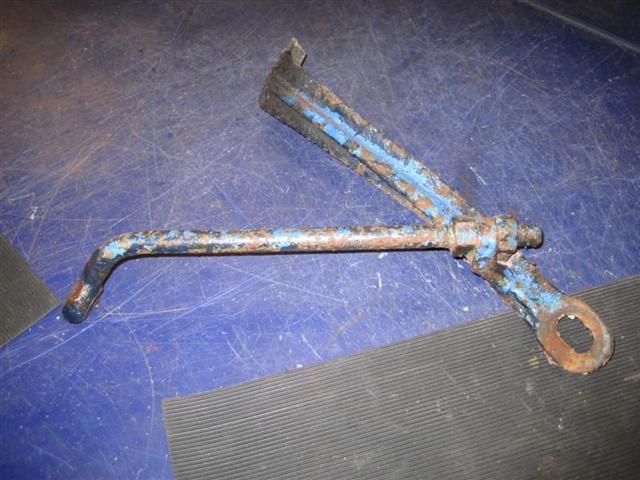
I removed the triangle construction because it was all bended. That was the reason the width control wasn’t working. The cross bar for the depth wheel was bended in two directions so the wheel was in two directions turning out of line. Also the bearing of the depth wheel was worn.
When I wanted to straighten the cross bar for the dept control it crack in two halves. The steel was a hard quality and there was a false hole that was blinded with a round peace and covered with paint so I could not see it. Just across this hole it went in half.
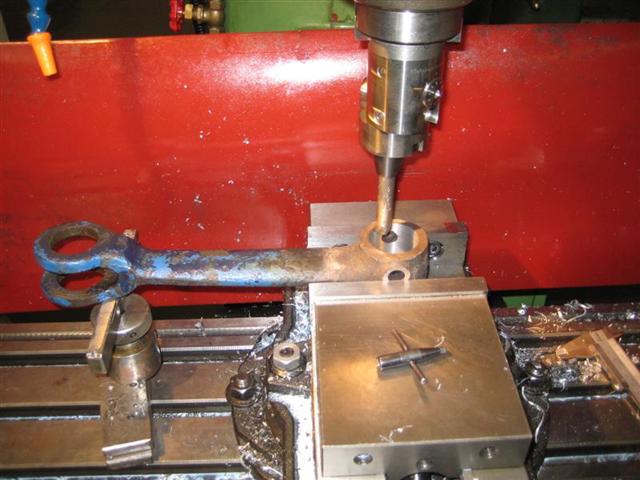
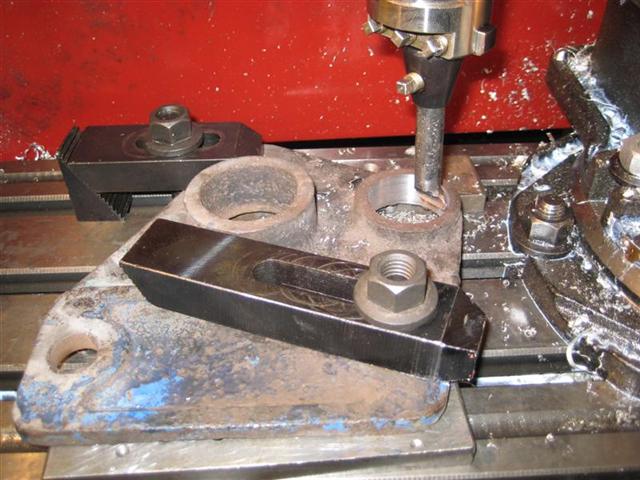
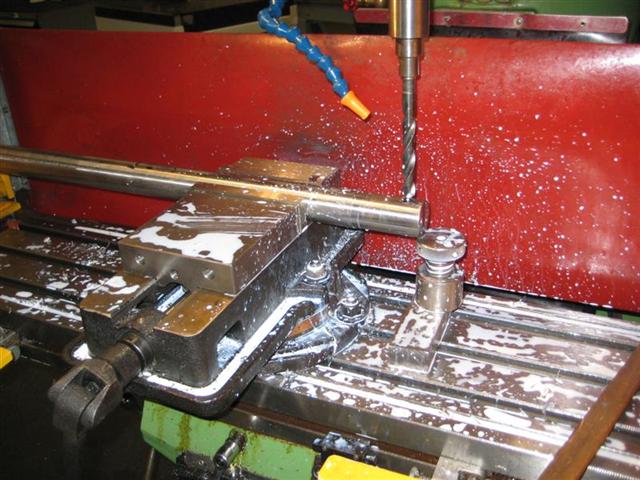
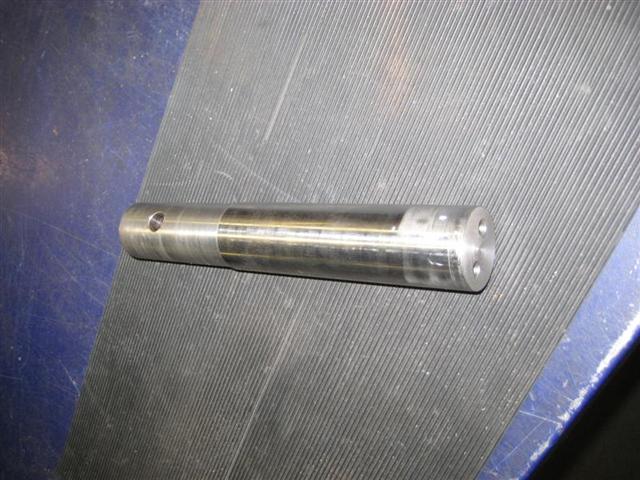
I ordered a new peace of good quality steel from 40 h9 mm. Therefore I have to machine the control lever hole to 40 mm and one side of the bracket were it runs trough. The lever was also bended and is straiten. ( cast steel with heat) There were some cast holes in it and these are drilled and grinded and then welded. The bar will be machined to 38,1 mm for the depth wheel arm and the locker on the other side. The rest of the bar can be used as a new axle for the depth wheel hub. Therefore I machined it to 40 mm. I have to make another locking construction for the wheel and made a cap to close it.
The upper triangle structure will be made completely new. One side is pore steel and bended despite some welded in peace to prevent it. Also the lower bush that will give strength to the structure was left out. The other part was broken and badly welded.
It will take much hours to make it original and in good shape, but I'm confident it will work.
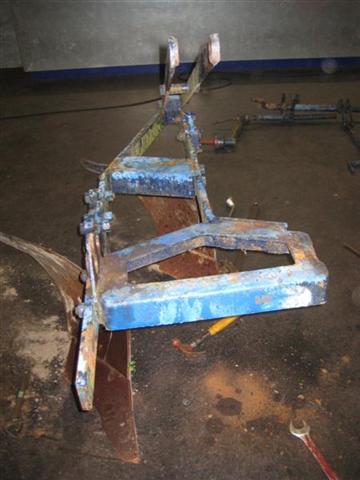
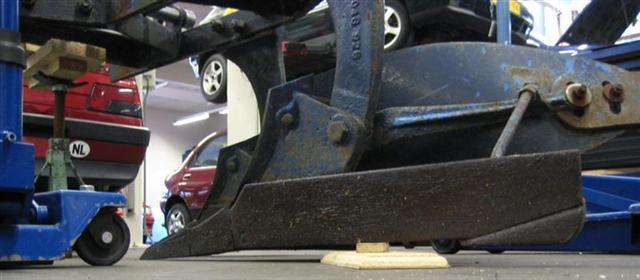
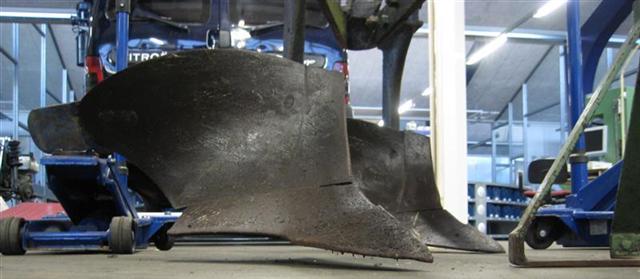
The share and plough body’s are in great conditions.
Keep you posted with some pictures.
Fordson-Ransomes EP plough
-
henk
- Site Governance Team & Expert Team

- Posts: 2069
- Joined: Wed Apr 16, 2008 8:56 pm
- Location: Arnemuiden, The Netherlands
- Contact:
Fordson-Ransomes EP plough
Kind regards, Henk
Fordson New Major February 1957 Mark I
Fordson New Major February 1957 Mark I
-
henk
- Site Governance Team & Expert Team
- Posts: 2069
- Joined: Wed Apr 16, 2008 8:56 pm
- Location: Arnemuiden, The Netherlands
- Contact:
Re: Fordson-Ransomes EP plough
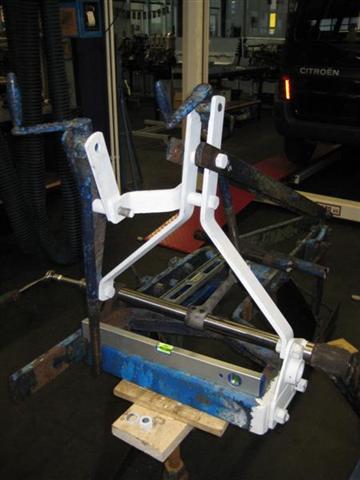
The construction foults
Dismanteled
Cross rods
The depth wheel hub
The depth contol lever
The right side bracket
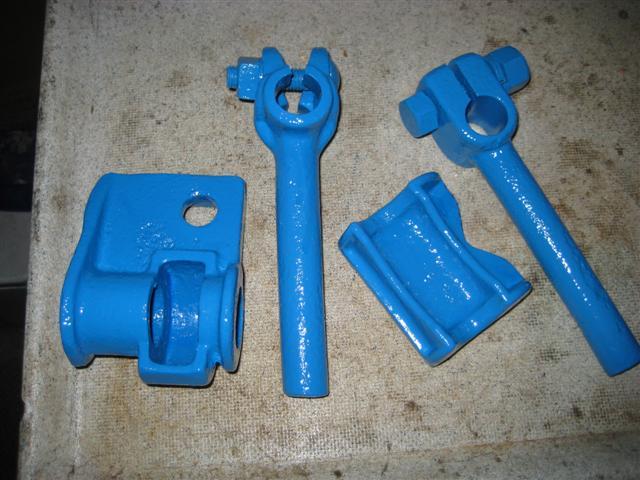
All ready done
Dismanteled
Cross rods
The depth wheel hub
The depth contol lever
The right side bracket
All ready done
Kind regards, Henk
Fordson New Major February 1957 Mark I
Fordson New Major February 1957 Mark I
-
Dandy Dave
- True Blue
- Posts: 1859
- Joined: Thu Apr 02, 2009 2:49 am
- Location: Copake, NY
Re: Fordson-Ransomes EP plough
Nice Work.  I also have a Bridgeport Mill and two South bend lathes in my basement shop for making, and refubishing, parts made from unobtainium.
  Dandy Dave!
Have a Fordsonful day Folks!
1960 Fordson Power Major
1960 Fordson Power Major
Re: Fordson-Ransomes EP plough
Saw an EP for sale the other day Henk, £1500!!!!!!
Fordson Tractor Pages, now officially linked to: Fordson Tractor Club of Australia, Ford and Fordson Association and Blue Force.
Brian
Brian
-
henk
- Site Governance Team & Expert Team
- Posts: 2069
- Joined: Wed Apr 16, 2008 8:56 pm
- Location: Arnemuiden, The Netherlands
- Contact:
Re: Fordson-Ransomes EP plough
That must of been a gold one.
Seems I'm working for a good pension now.
Seems I'm working for a good pension now.
Kind regards, Henk
Fordson New Major February 1957 Mark I
Fordson New Major February 1957 Mark I
-
henk
- Site Governance Team & Expert Team
- Posts: 2069
- Joined: Wed Apr 16, 2008 8:56 pm
- Location: Arnemuiden, The Netherlands
- Contact:
Re: Fordson-Ransomes EP plough
Have made some progress last week and today.
Made the new top link support. It fits well.
Made a mistake do, to make the lower hole about 10 mm lower. Thought it would make things stronger. But today I assembled some parts and notice that the right support for the width control lever is now out of line. I will have to make some adjustments. The support is all ready bended and will need some work.
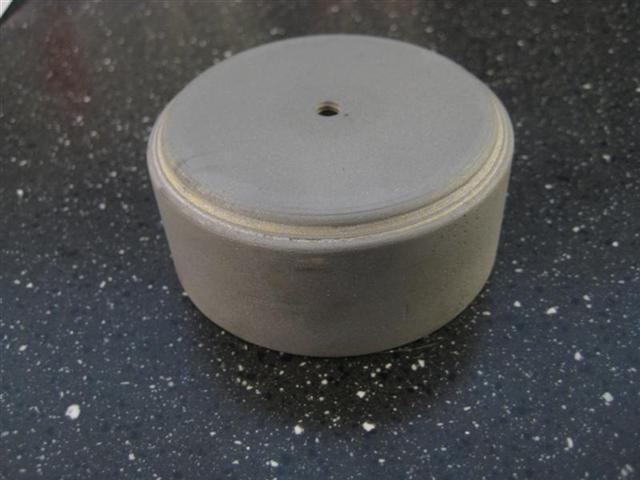
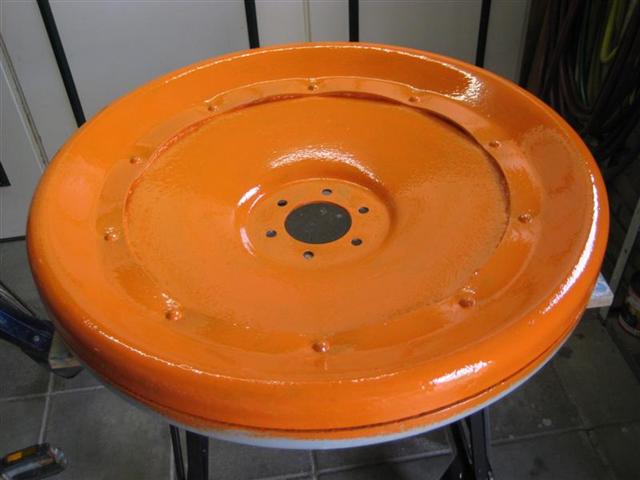
Made a cap for the depth wheel hub. It was missing, but with an example from another plough I was able to make it out of a pipe. Soldered a flat round peace in it.
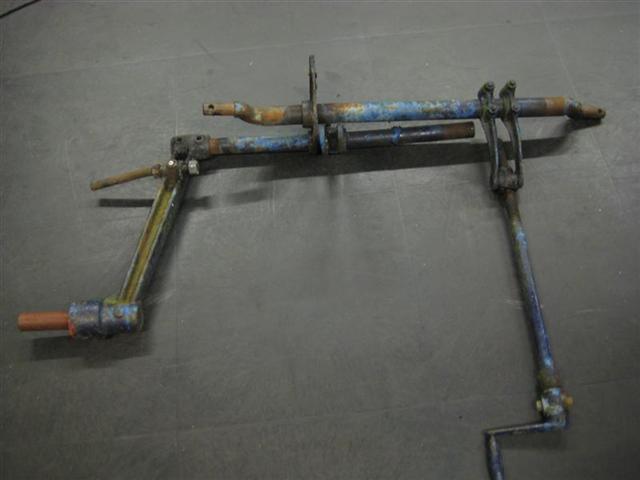
Today I made the cross rod for the depth control and the axle for the depth wheel on a lathe. The result is great. Tomorrow I will drill the holes in them. The two largest repair are then completed.

While measuring the correct place for the holes in the cross rod, I put the plough frame horizontal in both directions on a flat floor. This gave me a change to measure if the plough body’s were correct on 14". They were. So my first thought that they were set on 14" and were at the shares at 16" were luckily wrong. I did notice that the second plough body is to deep with the share, and the heel is too high.
A student made all the bolds and nuts working, and I cleaned a bit of small parts.

Made the new top link support. It fits well.
Made a mistake do, to make the lower hole about 10 mm lower. Thought it would make things stronger. But today I assembled some parts and notice that the right support for the width control lever is now out of line. I will have to make some adjustments. The support is all ready bended and will need some work.
Made a cap for the depth wheel hub. It was missing, but with an example from another plough I was able to make it out of a pipe. Soldered a flat round peace in it.
Today I made the cross rod for the depth control and the axle for the depth wheel on a lathe. The result is great. Tomorrow I will drill the holes in them. The two largest repair are then completed.
While measuring the correct place for the holes in the cross rod, I put the plough frame horizontal in both directions on a flat floor. This gave me a change to measure if the plough body’s were correct on 14". They were. So my first thought that they were set on 14" and were at the shares at 16" were luckily wrong. I did notice that the second plough body is to deep with the share, and the heel is too high.
A student made all the bolds and nuts working, and I cleaned a bit of small parts.
Kind regards, Henk
Fordson New Major February 1957 Mark I
Fordson New Major February 1957 Mark I
Re: Fordson-Ransomes EP plough
Looks great, Henk!
Best regards,
Pascal
Fordson's don't leak oil, they are just marking their territory.
Pascal
Fordson's don't leak oil, they are just marking their territory.
-
henk
- Site Governance Team & Expert Team
- Posts: 2069
- Joined: Wed Apr 16, 2008 8:56 pm
- Location: Arnemuiden, The Netherlands
- Contact:
Re: Fordson-Ransomes EP plough
Today I drilled the holes in the cross rod and hub axle. It fits well.
I bended the support for the width control lever in the right shape. I do hope the axle can still passes the upper frame, because the position has changed. Next week I'll find out.

Now I started to try to loosen up the plough legs. I've done the rear one now. What a bit of heat and a air hammer can do. Will clean the bolts and nuts and replace them with some copaslip to ensure the will come of any time.
The rear plough body is to low at the front. The heel is to high. Turning it a bit will result in a correct horizontal plough frame in both way’s and a correct setting of both body’s.
How can I adjust the rear body to lower the heel and lift the share point?
I bended the support for the width control lever in the right shape. I do hope the axle can still passes the upper frame, because the position has changed. Next week I'll find out.
Now I started to try to loosen up the plough legs. I've done the rear one now. What a bit of heat and a air hammer can do. Will clean the bolts and nuts and replace them with some copaslip to ensure the will come of any time.
The rear plough body is to low at the front. The heel is to high. Turning it a bit will result in a correct horizontal plough frame in both way’s and a correct setting of both body’s.
How can I adjust the rear body to lower the heel and lift the share point?
Kind regards, Henk
Fordson New Major February 1957 Mark I
Fordson New Major February 1957 Mark I
Re: Fordson-Ransomes EP plough
hi m8
all locking good isnt it
i only know a little bit about setting up ploughs ..
but when ever they discuss setting up a ploughs pitch ect. the books always say measuring to a new plough point/ share , ( one that u know is un worn / full size )
if ur points have different amounts of wear that may be upsetting you're measurements.
you probably already know this m8
another thought
if u remove both plough shares /points and measure from the tip of the frog ( the bit the share attaches to ) verticaly up to the frame of the plough both measurements should be the same .
If they are not then u need to adjust them to match each other ( which i think is you're original question )
)
i think some ploughs have a adjusting screw and lock nut on the back of the mouldboard , i've seen this on david brown ploughs . cant see on the photos how to adjust you'res tho .If the main attacking bolts are loosened then there may be some play there.
or one of the two is bent , but lets hope not .
hope this helps tom
all locking good isnt it
i only know a little bit about setting up ploughs ..
but when ever they discuss setting up a ploughs pitch ect. the books always say measuring to a new plough point/ share , ( one that u know is un worn / full size )
if ur points have different amounts of wear that may be upsetting you're measurements.
you probably already know this m8
another thought
if u remove both plough shares /points and measure from the tip of the frog ( the bit the share attaches to ) verticaly up to the frame of the plough both measurements should be the same .
If they are not then u need to adjust them to match each other ( which i think is you're original question
i think some ploughs have a adjusting screw and lock nut on the back of the mouldboard , i've seen this on david brown ploughs . cant see on the photos how to adjust you'res tho .If the main attacking bolts are loosened then there may be some play there.
or one of the two is bent , but lets hope not .
hope this helps tom
Some mornings I wake up grumpy, but most mornings I let her sleep in.
-
henk
- Site Governance Team & Expert Team
- Posts: 2069
- Joined: Wed Apr 16, 2008 8:56 pm
- Location: Arnemuiden, The Netherlands
- Contact:
Re: Fordson-Ransomes EP plough
Tom,
There are two new share points on it.
Yesterday I have been searching for a way to adjust the plough body. Managed to get the plough beam loose from the bracket. There are two bolts. The one at the top can be seen. The lower one is hiding behind the heel of the plough. The first one is out. To remove the lower one I have to dissemble the heel iron, so I loosened it up a bit. Now the beam can be moved a bit. I have not found any way to adjust the plough body. It's all fixated. Have to think it over for a while.
I have removed the adjustment for the rear moldboard to get to the nuts of the bolds. This the nuts and thread is very worn. I will cut a part of and weld a new peace on, make new thread and then is will work again.
Most things are very tight. I have to use much heat to get things moving.
The frame is almost completely dissembled and ready to clean. The depth wheel is ready.
Kind regards, Henk
Fordson New Major February 1957 Mark I
Fordson New Major February 1957 Mark I
-
henk
- Site Governance Team & Expert Team
- Posts: 2069
- Joined: Wed Apr 16, 2008 8:56 pm
- Location: Arnemuiden, The Netherlands
- Contact:
Re: Fordson-Ransomes EP plough
I’m cleaning and sandblasting a few parts of the plough. I notice that the cast iron quality is very pore. Casting holes, bended and rough. History tells that the Ford Ransomes plough as the Pm and the EP were build at the foundry from Ford at Lemington. Normally the casting of the tractor parts is good quality. Don’t understand why these plough parts are so pore.
Kind regards, Henk
Fordson New Major February 1957 Mark I
Fordson New Major February 1957 Mark I
-
henk
- Site Governance Team & Expert Team
- Posts: 2069
- Joined: Wed Apr 16, 2008 8:56 pm
- Location: Arnemuiden, The Netherlands
- Contact:
Re: Fordson-Ransomes EP plough
Everything that I wanted to remove is now done. The two plough beams and crossbeams are removed from the plough body's.
The front plough bracket uses a plough bolt at the bottom to connect it with the plough beam, while the rear one uses a square headed bolt. Seams I have two different frogs. Will add a picture later. I could not find a way to adjust the plough beam, so the share points could be adjusted to the ground while the frame is horizontal. When I have clean it all I will see how much free play there is, and maybe I make the bottom hole a bit wider to one side.
What would be the right steel sort for a front landside?
To see all the pictures: http://people.zeelandnet.nl/hmdetroije/ ... pages.html
To read the story: http://people.zeelandnet.nl/hmdetroije/ ... e%201.html
Kind regards, Henk
Fordson New Major February 1957 Mark I
Fordson New Major February 1957 Mark I
-
Daves rusty bits
- True Blue
- Posts: 152
- Joined: Wed Jun 17, 2009 4:04 pm
- Location: Dorset UK
Re: Fordson-Ransomes EP plough
Just a thought Henk, you are comparing the attitude of the plough shares at the same level as the tractor wheels are on, but in work the plough will be lower than the tractor, would this make a difference?
1960 Power Major, 1975 International 475 - well no ones perfect.
-
henk
- Site Governance Team & Expert Team
- Posts: 2069
- Joined: Wed Apr 16, 2008 8:56 pm
- Location: Arnemuiden, The Netherlands
- Contact:
Re: Fordson-Ransomes EP plough
Dave,
Sorry I missed your post.
To answer it, it has nothing to do with the tractor. When ploughing the two plough body’s have to be at the same depth and make the same curve. When everything is level to the frame it means that the frame will always be level at normal ploughing. When the tractor is in another position you have to correct the plough with the leveling box and the top arm and adjust the dept with the wheel.
Last week I could practice this all when ploughing my first meters with the EP behind the Major. I had some help of two men that are cracks at ploughing matches. One of them is Dutch champ this year.
Yesterday i have ploughed on oure club harvest day and there was public and a lot of men who knew how to plough. Made me a bit nervous but the result was not bad at all. I still have two days of practice before the regional ploughing contest.
Kind regards, Henk
Fordson New Major February 1957 Mark I
Fordson New Major February 1957 Mark I
Re: Fordson-Ransomes EP plough
i wondered how u were going on
well done m8
bet it feels good to see the plough in the ground and being used again , as it was intended.
hows the bodies cleaning up ?
well done m8
bet it feels good to see the plough in the ground and being used again , as it was intended.
hows the bodies cleaning up ?
Some mornings I wake up grumpy, but most mornings I let her sleep in.
-
henk
- Site Governance Team & Expert Team
- Posts: 2069
- Joined: Wed Apr 16, 2008 8:56 pm
- Location: Arnemuiden, The Netherlands
- Contact:
Re: Fordson-Ransomes EP plough
They clean up very well. Brian has greased them well before he brought it.
Kind regards, Henk
Fordson New Major February 1957 Mark I
Fordson New Major February 1957 Mark I
Re: Fordson-Ransomes EP plough
Congratulations with your first ploughing, Henk!!
You can be proud of yourself!
Good luck with the contest!
You can be proud of yourself!
Good luck with the contest!
Best regards,
Pascal
Fordson's don't leak oil, they are just marking their territory.
Pascal
Fordson's don't leak oil, they are just marking their territory.
Re: Fordson-Ransomes EP plough
did u get the two share bottoms level ? or did it not matter in the end ?
Some mornings I wake up grumpy, but most mornings I let her sleep in.
-
frode
- True Blue
- Posts: 237
- Joined: Sun Feb 27, 2011 7:51 pm
- Location: Hokksund - Norway (No polar bears, sorry)
Re: Fordson-Ransomes EP plough
You did a good job restoring that plough, henk!
Regards,
Frode
Regards,
Frode
frode
1957 County MarkIV Crawler
1964 County Super-4
1967 County 654
1977 County 7600-FOUR
1957 County MarkIV Crawler
1964 County Super-4
1967 County 654
1977 County 7600-FOUR
-
Dandy Dave
- True Blue
- Posts: 1859
- Joined: Thu Apr 02, 2009 2:49 am
- Location: Copake, NY
Re: Fordson-Ransomes EP plough
Nice Straight Furrows. You would make my old Pappy proud. Job well done on the plow. Dandy Dave!
Have a Fordsonful day Folks!
1960 Fordson Power Major
1960 Fordson Power Major
-
henk
- Site Governance Team & Expert Team
- Posts: 2069
- Joined: Wed Apr 16, 2008 8:56 pm
- Location: Arnemuiden, The Netherlands
- Contact:
Re: Fordson-Ransomes EP plough
Tom,
Sorry I mist your last post.
The share are level now. I made a lot of work doing that. The moulbourds still have some difference, but half a centimeter won't be a trouble I think.
Yesterday I had my first ploughing match. It was the reginal match. There were 6 round going and 7 vice versa ploughs.
I was last ofcourse. The best had 146 points and I had 98 points. Considering I had a front disc coulter that would not turn after two rounds and the others are real cracks, it's not a bad result.
I stil have some work to do on the plough. The skimmers need a bit of grinding on the side to de discs, the share need to be sharper and the disc unit connection to the rod has to much play and I have to check why the disc coulter would not turn.
But it's great to have the Major working, and it's doing well.
ps, Sorry about the lost pictures. My webspace was not enough and I had to remove them. Ill see if I can put them somewhere else.
But I made the last repair page on my site of the plough.
You need java to see it.
Kind regards, Henk
Fordson New Major February 1957 Mark I
Fordson New Major February 1957 Mark I
-
henk
- Site Governance Team & Expert Team
- Posts: 2069
- Joined: Wed Apr 16, 2008 8:56 pm
- Location: Arnemuiden, The Netherlands
- Contact:
Re: Fordson-Ransomes EP plough
Found the difference between the letters behind the EP2 or EP3.
Two is two furrow, three is three furrow.
D = 12" convertible
E = 14"
G = 10"+ 12"
H = 14"
J = 10"+ 12"+ 14"
M = ?
Mine is a EP2J with DMD deep digger body’s and Epic 726 points
I also found out I had to turn my depth wheel to get it behind the rear wheel. Looking at the wheel and how it was mounted when I bought the plough it was not logic.
On the for last run the depth wheel was running in the furrow bottom and the rear wheel was running on the ploughed land and I could not get deep enough with the depth wheel. Also at the second run of the opening I could not use the track of the depth wheel to the front wheel. Problems should now be salved.
Kind regards, Henk
Fordson New Major February 1957 Mark I
Fordson New Major February 1957 Mark I
Re: Fordson-Ransomes EP plough
Hi Henk, I have just come accross this thread! I have a ford-ransomes ts63e plough, the land wheel bearing has a fair bit of play in it, how do you go about taking the bearing out and re-newing it? I also have no hubcap, so will have to make one to fit.
Oh yay, look, another seized bolt! Lets get a hammer.....and some kano.....and some cider!
Re: Fordson-Ransomes EP plough
my TS 59 dont have a cap either ? how do they fit ? what holds it on?
I saw a cap at a ploughing match last year , he'd turned a block of nylon till it tapped on ,like a bung. it worked .
mine has slight play in the bearing but no plays to mod. that yet. did have to re. build the outer rim/ wheel thou, cuz the original had rotted .
tom
I saw a cap at a ploughing match last year , he'd turned a block of nylon till it tapped on ,like a bung. it worked .
mine has slight play in the bearing but no plays to mod. that yet. did have to re. build the outer rim/ wheel thou, cuz the original had rotted .
tom
Some mornings I wake up grumpy, but most mornings I let her sleep in.
-
henk
- Site Governance Team & Expert Team
- Posts: 2069
- Joined: Wed Apr 16, 2008 8:56 pm
- Location: Arnemuiden, The Netherlands
- Contact:
Re: Fordson-Ransomes EP plough
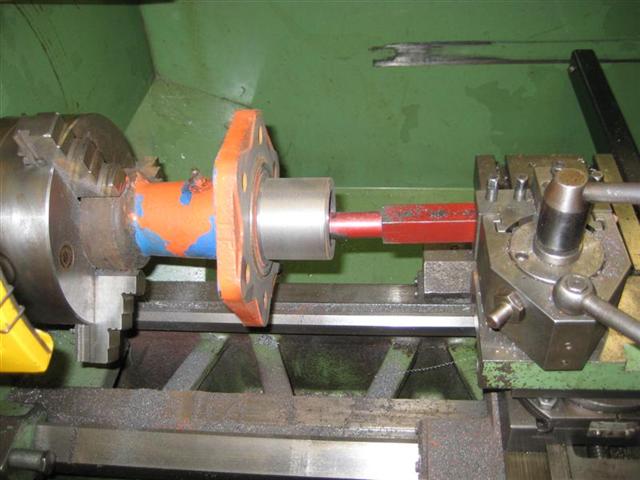
Tom and Nick,
I machined the hub inside the hole and fitted a new axle. When the axle is ok you could try to use a bush in the hub. Of course you have to machine it all. I also machined the place where the cap fits.
For the cap I used a piece of pipe. Machined inside to fit on the hub. closed it with a round plate that was soldered on it.
The cap keeps fitting by using grease and a tight fitting.
Kind regards, Henk
Fordson New Major February 1957 Mark I
Fordson New Major February 1957 Mark I