Hello.
First post here. Have been working on my girlfriends familys tractor for quite a while now. It is a fordson major diesel, dont know if it is a new major, but i presume it is. I have been struggling with the 3 point linkage for a while. To start with they had not been moved for 10 years and were uneven so with some duck oil, about 2 weeks of pounding, I got them unseized. I managed to spread some fertiliser evenly with it which was a highlight!The 3 point is all working fine at the moment then but my girlfriends family also has a topper that they would like to use. I attached it but the link arms simply do not go low enough to do any good. I am about an inch or two too high. Real bugger. I have lowered both link arms to their lowest settings pretty much but with only a few threads on both but just not quite there. Infuriating to be honest. I am thinking of drilling an extra hole further up the link arms to get it lower but this was a last resort. Anyone else got any suggestions? How far down does yours go?
Tom
fordson major diesel link arms
-
rugbytommy
- Not Quite Blue Yet
- Posts: 7
- Joined: Thu May 27, 2010 11:25 am
Hi Tom,
How low are the outer balls from the ground then?
What I can imagine is that the lift arms at the top have been fitted wrong. Left hand one on the right side and vice versa. That will give trouble like this.
Can you show a picture, that will clear a lot to us.
Regards
Emiel
How low are the outer balls from the ground then?
What I can imagine is that the lift arms at the top have been fitted wrong. Left hand one on the right side and vice versa. That will give trouble like this.
Can you show a picture, that will clear a lot to us.
Regards
Emiel
Best regards
Emiel
N 1937, E27N 1948, 8N 1949, E27N 1950, E1A Diesel 1953, E1ADKN PP 1956, Dexta 1959, NH Clayson M103 1964
Emiel
N 1937, E27N 1948, 8N 1949, E27N 1950, E1A Diesel 1953, E1ADKN PP 1956, Dexta 1959, NH Clayson M103 1964
The lift arms themselves have three holes in for adjusting the lift heights. These are where the lift rods connect to the arms. Try moving the pins to different holes and see if it cures your problem.
Fordson Tractor Pages, now officially linked to: Fordson Tractor Club of Australia, Ford and Fordson Association and Blue Force.
Brian
Brian
Dont even try to drill those arms, if those are original Fordson lift arms all you will do is burn up drill bits. I needed an extra hole in one I replaced on my industrial model with one from an ag model. That was due to different chain spacing on each. I had to burn that hole in with a torch.
Also if you ever need to weld them you need to heat treat your welds. I also tried to weld a broken Dexta with out heat treat. It just cracked/broke again along side the weld. You could see the crystals in the metal. I rewelded and heat treated with success. I also welded new ends on one set of Dexta without heat treat with the ends seems to be no problem.
Also if you ever need to weld them you need to heat treat your welds. I also tried to weld a broken Dexta with out heat treat. It just cracked/broke again along side the weld. You could see the crystals in the metal. I rewelded and heat treated with success. I also welded new ends on one set of Dexta without heat treat with the ends seems to be no problem.
.
" Oily to bed Oily to rise are the days of a man, when a Fordson he buys"
Some men always thought they wanted to be farmers, what they discovered really, is that they only just wanted to drive the tractors!
.
" Oily to bed Oily to rise are the days of a man, when a Fordson he buys"
Some men always thought they wanted to be farmers, what they discovered really, is that they only just wanted to drive the tractors!
.
-
rugbytommy
- Not Quite Blue Yet
- Posts: 7
- Joined: Thu May 27, 2010 11:25 am
ok will try and get a picture when i get back. i have 3 holes in the link arms. at the moment the check chains are in the rear hole and the lifting rods are in the middle hole. The check chains are even more seized up than the 3 point was so i think it would probably take me a year to unseize! I am sure they would go down far enough if the lift rods were in the rear hole but unfortunately the check chains are there. How far do everyone's major link arms go down then? Mine are probably 3 inches or so off the ground, about an inch too high for the topper. The levelling box arm goes down to about the right level but the left lift arm does not as it does not have enough thread.
Would it change it a lot then if the link arms are the wrong way round, they seem similar to me???
I will post a picture asap.
Nice forum by the way, can see myself getting addicted to fordson majors!
Would it change it a lot then if the link arms are the wrong way round, they seem similar to me???
I will post a picture asap.
Nice forum by the way, can see myself getting addicted to fordson majors!
Tom
-
Dandy Dave
- True Blue
- Posts: 1859
- Joined: Thu Apr 02, 2009 2:49 am
- Location: Copake, NY
That topper seems very low if the balls are three inches above the ground and it still won't go low enough.
Have you tried putting the pin in the rod into the sliding position? This should take the arm down another two inches.
Have you tried putting the pin in the rod into the sliding position? This should take the arm down another two inches.
Fordson Tractor Pages, now officially linked to: Fordson Tractor Club of Australia, Ford and Fordson Association and Blue Force.
Brian
Brian
.
Brian,
Since I been around these Majors a lot longer than you,:) (just kidding) you should know just how stuck the sliders pistons/nuts get!
Myself I have never found one that was in the pinned position setting for a long time that wasn't REALLY stuck. Mine even get stuck over a short time. Oil and grease dont seem to help much either as those things just seem to collect dust making things worse.
To get them unstuck I have found the only way was was to put them in a hot wood fire then burn them. Letting cool slowly in the ashes. Even then it may be a tough job. When I do get them apart I put the drum nut (male sliding piston) in the lathe and take a skim cut on them about .005 in or so or just get the bumps off and a little clearance. I also turn a nice little bevel on the bottom end so if ever you need to drive them out it wont mushroom the end out.
To me the sliding floaters are a great feature. It seems to have been left off of the Super Major. I like them for use with the Roto tiller. With them the tiller stays even with the ground surface and should hit a big rock or something else hard in the weeds it allows the tiller to bounce avoiding breaking blades.
NOTE: On the leveling screws I heat treat them, Case harden. The screws turn a lot easier with little or no wear them. I use hi grade threaded rod to replace worn or bent screws on leveling boxes then heat treat. On my 54 FMD I have replaced the inside thread of the nut/piston with a machined welded in insert from 4140 then heat treated that too. Those work so smooth all the time.
By the way just what is a topper? Must be something common to your area. I have never seen one or they are called something else here in the USA.
.
" Oily to bed Oily to rise are the days of a man, when a Fordson he buys"
Some men always thought they wanted to be farmers, what they discovered really, is that they only just wanted to drive the tractors!
.
" Oily to bed Oily to rise are the days of a man, when a Fordson he buys"
Some men always thought they wanted to be farmers, what they discovered really, is that they only just wanted to drive the tractors!
.
-
Kiwi Kev
- Site Governance Team & Expert Team

- Posts: 802
- Joined: Thu Apr 17, 2008 7:44 am
- Location: Norfolk Island. South Pacific.
T Mac
A topper is what you guys call a bushhog, but lighter duty than a bushhog. In our part of the world, we call them a slasher.
rugbytommy
If you project a straight line along the top of the rear transmission housing, not the hydraulic lift cover, but where these 2 bolt together, with your hydraulic lift in the fully down position, the eyes of your left & right handed arms should be approx 2.25 inches above this projected line. If they are on the wrong sides( i.e. LH are on the RHS etc) this measurement will be around the 5 inch mark.
Now on the link arms, if you move the lift arms to the front hole, not the back hole, that will allow the link arms to go lower.
Dont screw the lift arms out to far, as this will put too much strain on the threads.
As Brian has said, if your attachment point ball of the topper is only 2 inchs from the ground, that is very low. I use the sliding hole on my Major, which allows the topper to follow the ground contours better, without bumping the hydraulics up and down all the time.
I would consider mounting new attachment points to the topper, rather than doing any radical alterations to the tractor. Sure, free the pins and adjusters up.
The attachment points on my topper are about 6 inchs off the ground.
Good luck and keep us informed.
Kiwi Kev
"Classic Contracting"
66 Ford 5000 6X (semi retirement)
International 784 4WD
& looking at another tractor!
66 Ford 5000 6X (semi retirement)
International 784 4WD
& looking at another tractor!
-
rugbytommy
- Not Quite Blue Yet
- Posts: 7
- Joined: Thu May 27, 2010 11:25 am
hi again,
been working on the tractor a fair bit since I last was on here. thanks for everyone's suggestions too. I am struggling at the moment to put pictures up. They are on my computer and snapfish but cannot put them up.
the url is here though to view the album http://www3.snapfish.co.uk/snapfishuk/t ... napfishuk/
with the pins in telescopic position it is still slightly too high. The topper attachments are just about 30cm from the ground and the left link arm is slightly too high. Yesterday though, after much brute bloody strength I managed to remove the check chains and put the lifting rods into the forward hole which made it low enough for the topper. The check chains (being totally seized up) do not really work in the middle hole though, and it makes the lift arms too wide to attach. The topper seemed to work fine with no check chains though, the check chains were slack with the topper anyway so no difference. Still need the check chains for other stuff though so not really an ideal situation. Can I buy stabiliser bars that would be really quite adjustable to attach to the middle hole and be long enough to keep the link arm gap narrow enough?
I haven't drilled anything, that idea went out of my head quickly enough. Am not really sure where I am measuring from to see if the LH and RH attachments are transposed? Can you explain again? Is it common? I presume the transmission housing is underneath the cover with the big bolt in the middle?
cheers everyone
Tom
-
Mike Kuscher
- Site Governance Team

- Posts: 306
- Joined: Wed Apr 16, 2008 10:18 am
- Location: Worcestershire, England
Tom,
I've followed your link to the pictures.
You can't show them and we can't view them because snapfish requires you to log in with a password.
You need to use a site that does not need a password for it to work on here.
Now your link arm problem.
Looking at the one picture I can see, without creating an account with snapfish, everything looks correct on the Major.
You say that the topper attachments are only 30cm from the ground.
That seems much too low.
All my implements, topper included, are much higher than that.
I think that is where your problem is.
Here is a picture of two typical toppers, note the hight of the attachment points I've circled...

This topper you're trying to use - it's not designed for a compact or garden tractor is it.
Mike
I've followed your link to the pictures.
You can't show them and we can't view them because snapfish requires you to log in with a password.
You need to use a site that does not need a password for it to work on here.
Now your link arm problem.
Looking at the one picture I can see, without creating an account with snapfish, everything looks correct on the Major.
You say that the topper attachments are only 30cm from the ground.
That seems much too low.
All my implements, topper included, are much higher than that.
I think that is where your problem is.
Here is a picture of two typical toppers, note the hight of the attachment points I've circled...
This topper you're trying to use - it's not designed for a compact or garden tractor is it.
Mike
Last edited by Mike Kuscher on Fri Jun 04, 2010 1:46 pm, edited 1 time in total.
Nobody is perfect and I want to be a Nobody.
-
rugbytommy
- Not Quite Blue Yet
- Posts: 7
- Joined: Thu May 27, 2010 11:25 am
hi mike,
i know, 30 cm is quite low. I used a large flail topper in Ireland and the 3 point was much higher. I did not buy the topper so don't blame me!It is a teagle topper 5 (category 1 linkage) http://www.teagle.co.uk/Products/Toppers/topper5z.asp.
I would say it is for a smaller tractor to be honest but I would have still expected it to be ok for it. Does anyone know exactly how far the new majors link arms should go down with the rods in the telescopic position?
Can you give me a name of a site without a password? I am not particularly computer-savvy!
Tom
Tom
Photo-bucket is one of the best, free site and you can post pictures here with no problems.
I'm with Mike, your topper is not really compatible with your tractor which will put more hp through it than it can cope with.
You may also find that the PTO shaft will not be straight forward as it will have to run at a fair angle with the topper hitch that low to the ground and possibly foul the drawbar.
I cannot get on snapfish either and you can only share your pictures with other snapfish users, that's why we cannot view.
Fordson Tractor Pages, now officially linked to: Fordson Tractor Club of Australia, Ford and Fordson Association and Blue Force.
Brian
Brian
Another good site for your pictures is www.ImageShack.us. Free, resizes, easy to copy to forum.
Gman: 1959 Power Major
-
Mike Kuscher
- Site Governance Team
- Posts: 306
- Joined: Wed Apr 16, 2008 10:18 am
- Location: Worcestershire, England
Tom,
I've just followed your link to the topper details.
It says there that the Topper 5 is designed for 'smaller tractors'. I read that as 'compact' and their picture certainly shows one using it.
So, there's your answer, the attachment points are too low for a 'standard' tractor. The Cat 1 pins is another clue I suppose.
My honest opinion, there's nothing wrong with the linkage on the Major so don't modify (butcher) it.
If you want to (or need to) use that particular topper then...
Refit the stabiliser chains to the tractor, then modify the 'A frame' height on the topper to fit instead.
A suitably positioned cut with a hacksaw, either side. Drill some through holes for bolts. Cut 2 pieces of flat steel bar long enough for the extra height you need. Drill clearance bolt holes in these, then using suitable bolts extend the height of the A frame and mounting points.
'Black drawn' steel and bolts available from your local B&Q, should cost less than 15 quid and take about half hour.
Mike
Nobody is perfect and I want to be a Nobody.
-
rugbytommy
- Not Quite Blue Yet
- Posts: 7
- Joined: Thu May 27, 2010 11:25 am
hi,
I am of the same opinion now that the topper is for a smaller tractor. It works with the lifting rods in the forward hole instead of the check chains so will leave it at that. The only thing I am bothered about now is the check chains. It seems fine without them on the topper but i need them for my spreader and for just normal driving so that they dont wear the tyres. As said before they are totally seized (much more so than the 3 point which took 2 weeks of solid work to unseize) so i will need new ones i think. Are these readily available? How adjustable are they when they are in working order? Do they stretch long enough to work if the check chain were in the middle hole (i.e for when using this bloody topper)?
Here is the tractor in the normal set up after everything was unseized.

Just for curiosity can someone perhaps draw me a diagram or circle where I am meant to look to see if the LH and RH link arms were on the wrong way round just in case?[/img]
I am of the same opinion now that the topper is for a smaller tractor. It works with the lifting rods in the forward hole instead of the check chains so will leave it at that. The only thing I am bothered about now is the check chains. It seems fine without them on the topper but i need them for my spreader and for just normal driving so that they dont wear the tyres. As said before they are totally seized (much more so than the 3 point which took 2 weeks of solid work to unseize) so i will need new ones i think. Are these readily available? How adjustable are they when they are in working order? Do they stretch long enough to work if the check chain were in the middle hole (i.e for when using this bloody topper)?
Here is the tractor in the normal set up after everything was unseized.
Just for curiosity can someone perhaps draw me a diagram or circle where I am meant to look to see if the LH and RH link arms were on the wrong way round just in case?[/img]
Tom
.
I take it you mean the turnbuckles are seized. If so these to can be burned. Get them off the tractor, chains and all, build a wood fire with the chains streched out not in the fire. Heat them till red hot. After cooling with some penetrating oil they come easy.
You can heat other ways to, but wood is best, letting cool in the ashes. This normalizes the metal, reliving stresses without getting so hot that the threads could weld. I have done this to all I have, some were even just a ball of rust that I got off junk tractors. NOTE: Dont cool with water from red hot.
If the chains are short and the movement of the turnbuckle is insufficient, to lengthen them just add another shackle.
My SMD is an industrial model, the tractor shackle mountings are different so the chains are shorter than the standard AG model, that problem arises sometimes with different equipment. So I have a second set, the longer Ag ones, to install in that situation.
.
" Oily to bed Oily to rise are the days of a man, when a Fordson he buys"
Some men always thought they wanted to be farmers, what they discovered really, is that they only just wanted to drive the tractors!
.
" Oily to bed Oily to rise are the days of a man, when a Fordson he buys"
Some men always thought they wanted to be farmers, what they discovered really, is that they only just wanted to drive the tractors!
.
-
rugbytommy
- Not Quite Blue Yet
- Posts: 7
- Joined: Thu May 27, 2010 11:25 am
currently have one of the check chains off. I have a big metal stove and i am resting them on top of there. Hopefully will get red hot, definitely don't want them in the fire??? Have some duck oil which penetrates nicely so fingers crossed. hopefully it will reach to the middle pin, if not another shackle seems like a good idea.
Tom
Tom
Tom
-
Daves rusty bits
- True Blue
- Posts: 158
- Joined: Wed Jun 17, 2009 4:04 pm
- Location: Dorset UK
-
Kiwi Kev
- Site Governance Team & Expert Team
- Posts: 802
- Joined: Thu Apr 17, 2008 7:44 am
- Location: Norfolk Island. South Pacific.
rugbytommy
Finally got around to drawing the diagram for you, to show the height of the lift arms if correctly "handed"
The measurement is 53.34mm.
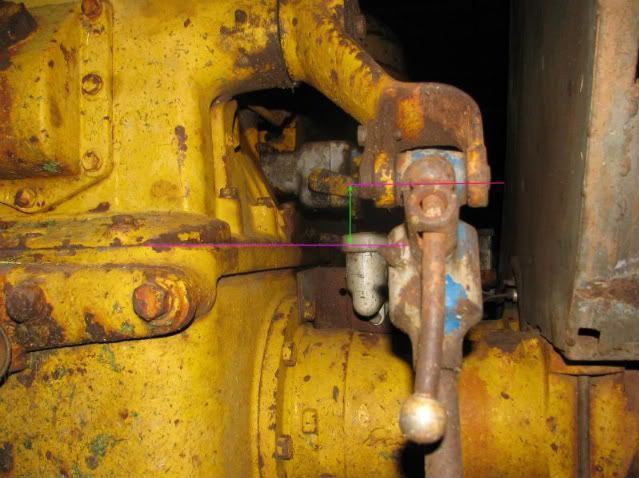
Sounds like the problem was the topper, but here is the measurement so you can double check.
Kiwi Kev
Finally got around to drawing the diagram for you, to show the height of the lift arms if correctly "handed"
The measurement is 53.34mm.
Sounds like the problem was the topper, but here is the measurement so you can double check.
Kiwi Kev
"Classic Contracting"
66 Ford 5000 6X (semi retirement)
International 784 4WD
& looking at another tractor!
66 Ford 5000 6X (semi retirement)
International 784 4WD
& looking at another tractor!
-
rugbytommy
- Not Quite Blue Yet
- Posts: 7
- Joined: Thu May 27, 2010 11:25 am
thanks kiwi kev, yeah it is the topper for sure. will check this later though, thanks very much for it. Have got all 3 point working, check chains and all, works fine on the topper. Needed a D-Shackle on both ends to lengthen check chains to fit in middle hole but they were only a quid each so not too bad!cheers for everyones help ythough...
Tom